Questions to ask
How can I help you?
The answer needs to be noted and used in the conversation
How long have you had this problem? If it is:
A Few hours
Then it is an acute problem like an acute infection or change in their body
Few Days
This could be an acute problem that persists or getting worse especially if an infection is not controlled
Few weeks
This could be more of a chronic condition that may need longer-term treatment
Few Months
This is a chronic condition that persists and most probably will not be any infection
More than a year
This is a chronic problem and may need a longer-term solution
Is it getting better or worst
Better
This means the body is coping with it well and is recovering
Worse
This means that the body is not recovering and needs extra help and support to help
Are there any family history of this problem?
It is important to find out if there is any genetic link between this problem this patient has and that of his family
Do you have any problems with the following systems?
Cardiovascular System (Heart and circulation)
Go to Cardiovascular system
Central nervous system
Musculoskeletal system
Skin
Hormonal
Lung
Red flag symptoms
Musculo-skeletal system
Any abnormality of the joints
Any abnormality of the muscles
Any Loss of power
Loss of muscle tone
Atrophic muscles
Hypertrophic muscles
Any abnormalities of the ligaments
Any pain
Pain with rest
Pain with movement
How far can you walk
10 meters
20 meters
50 meters
100 meters plus
Central nervous system
Any numbness of the body
Any abnormalities of the cranial nerves
Any neuro abnormalities
Cardiovascular system
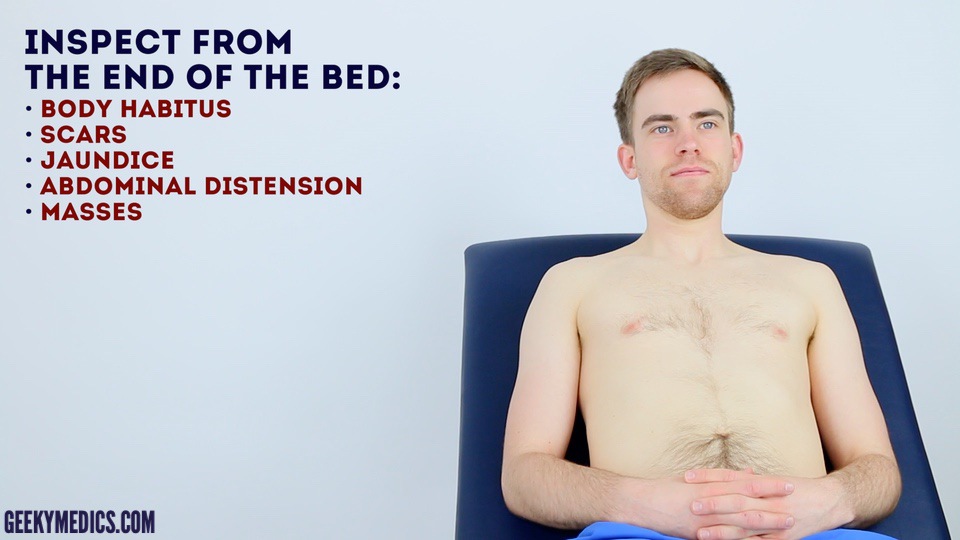
Inspect the patient from the end of the bed whilst at rest, looking for clinical signs suggestive of underlying pathology:
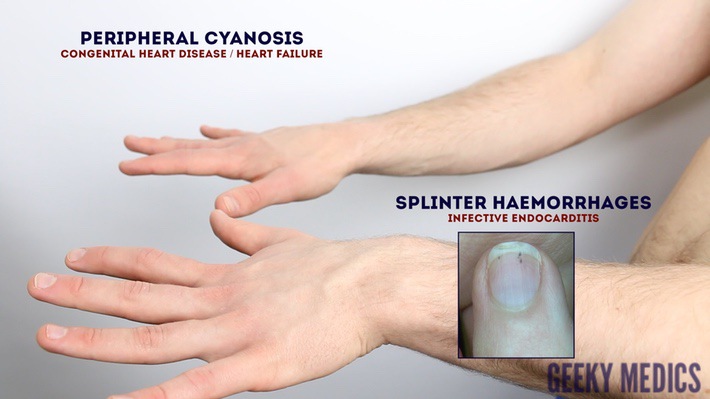
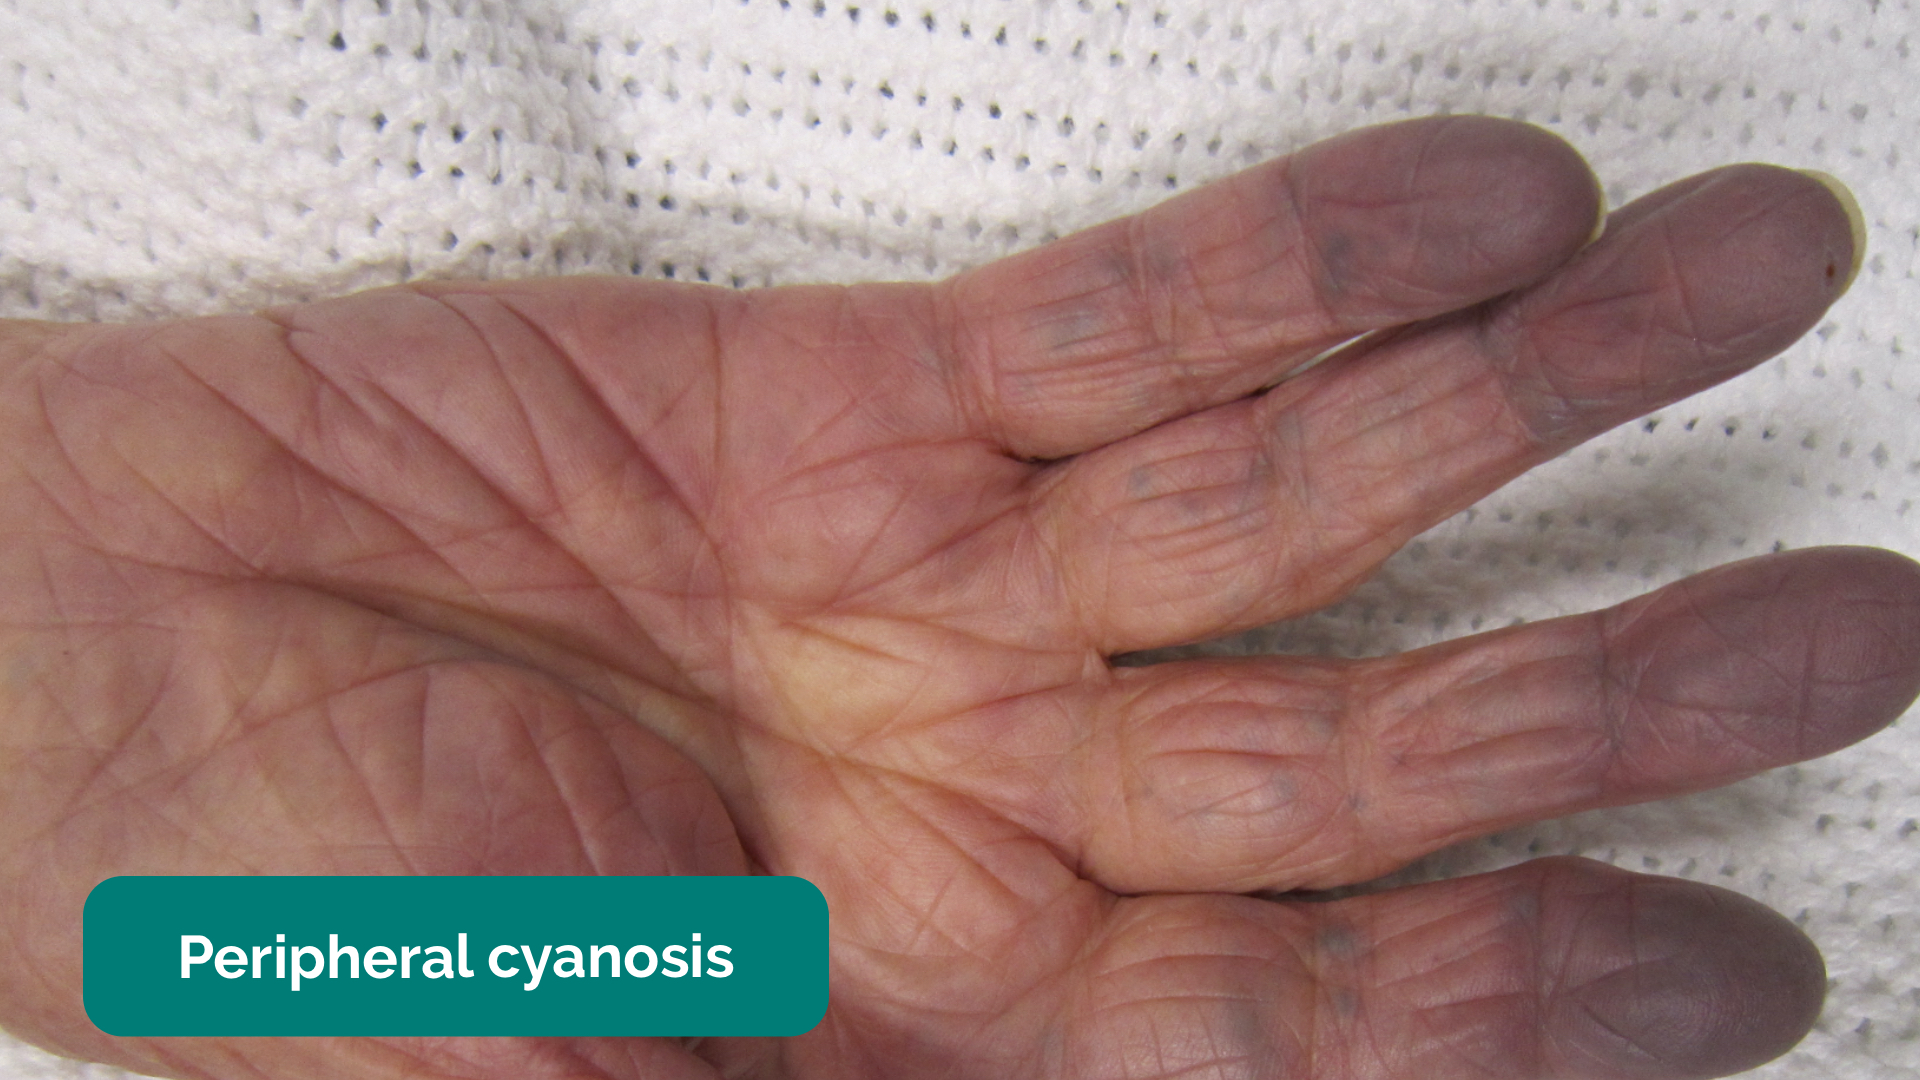
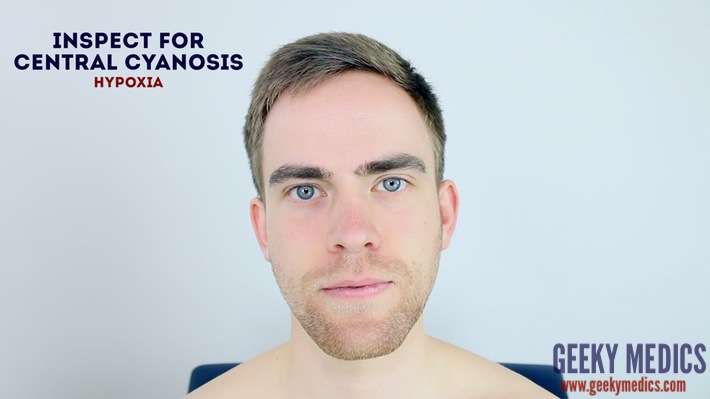
- Cyanosis: a bluish discolouration of the skin due to poor circulation (e.g. peripheral vasoconstriction secondary to hypovolaemia) or inadequate oxygenation of the blood (e.g. right-to-left cardiac shunting).
- Shortness of breath: may indicate underlying cardiovascular (e.g. congestive heart failure, pericarditis) or respiratory disease (e.g. pneumonia, pulmonary embolism).
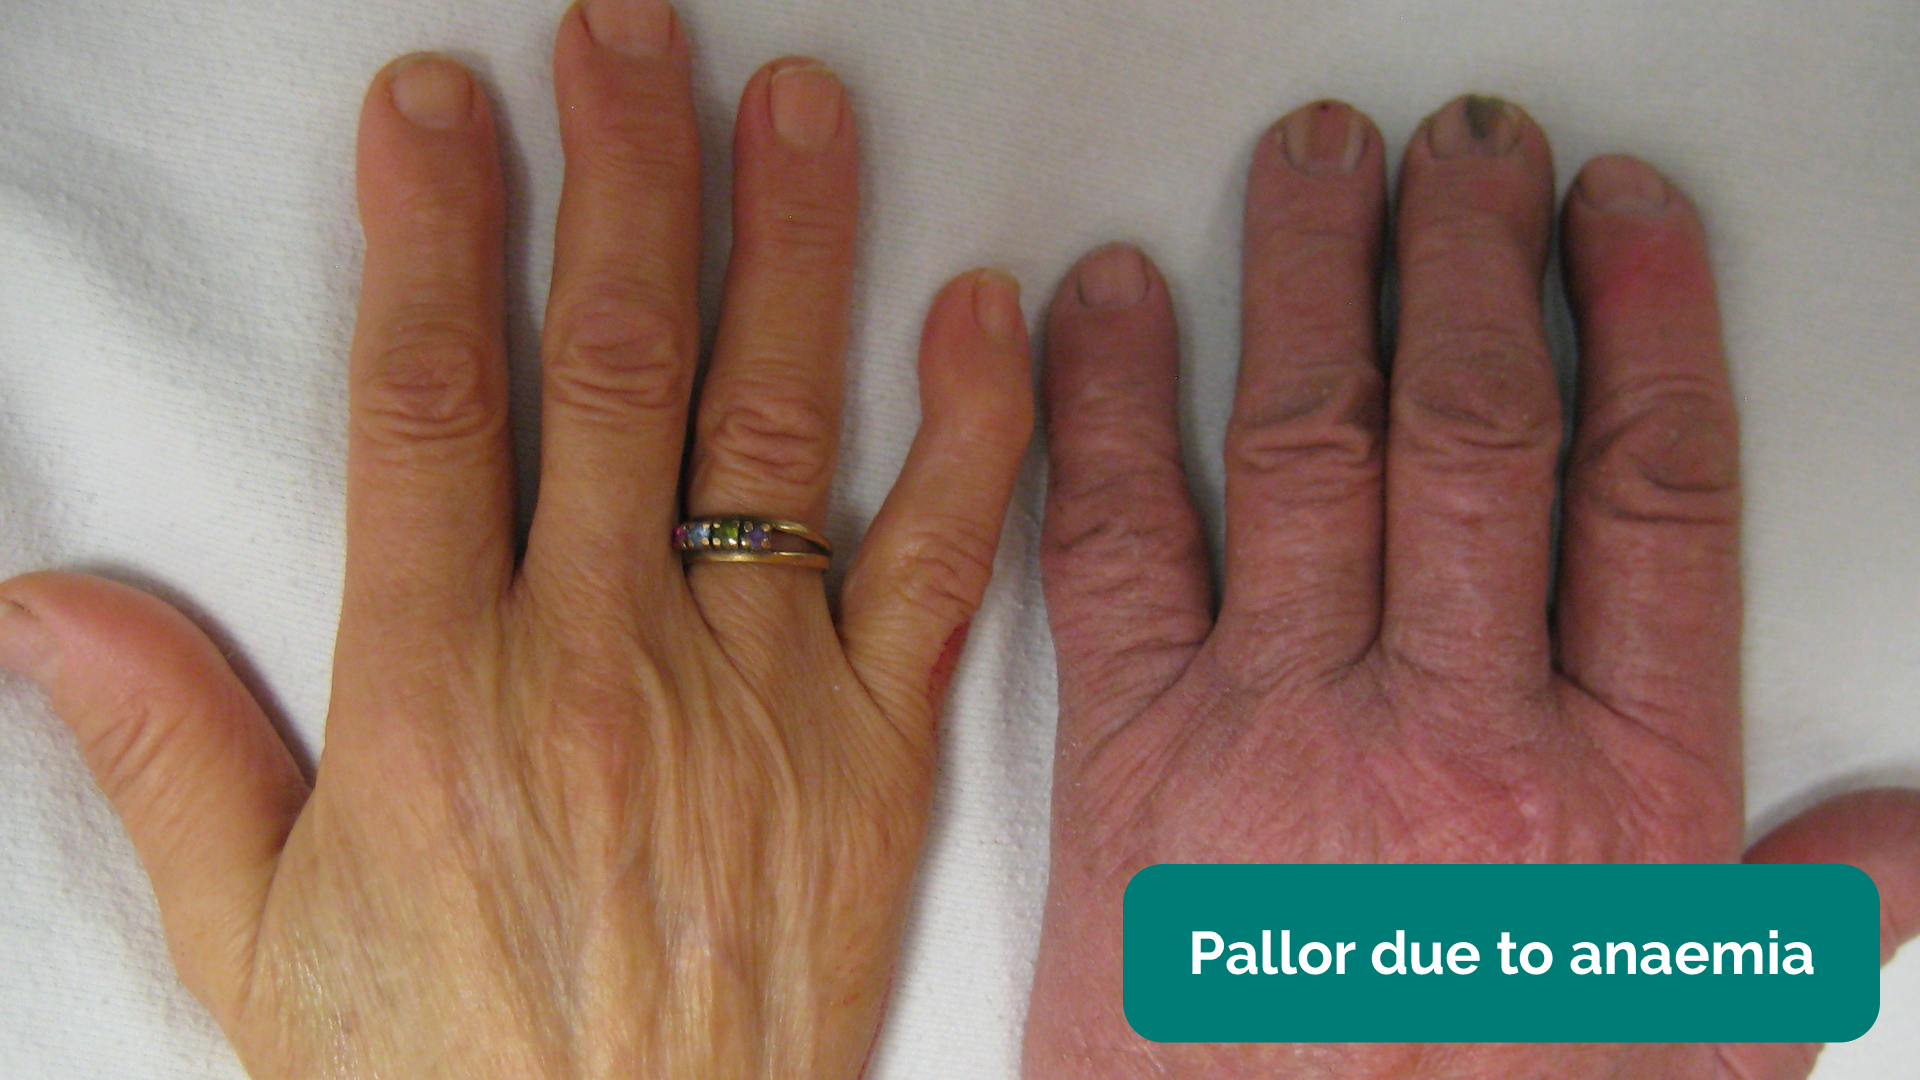
- Pallor: a pale colour of the skin that can suggest underlying anaemia (e.g. haemorrhage, chronic disease) or poor perfusion (e.g. congestive cardiac failure). It should be noted that a healthy individual may have a pale complexion that mimics pallor, however, pathological causes should be ruled out.
- Malar flush: plum-red discolouration of the cheeks associated with mitral stenosis.
- Oedema: typically presents with swelling of the limbs (e.g. pedal oedema) or abdomen (i.e. ascites). There are many causes of oedema, but in the context of a cardiovascular examination OSCE station, congestive heart failure is the most likely culprit.
Hands
The hands can provide lots of clinically relevant information and therefore a focused, structured assessment is essential.
Inspection
General observations
Inspect the hands for clinical signs relevant to the cardiovascular system:
- Colour: pallor suggests poor peripheral perfusion (e.g. congestive heart failure) and cyanosis may indicate underlying hypoxaemia.
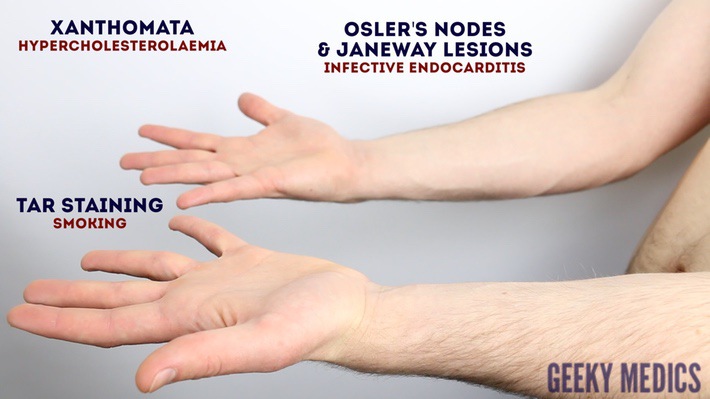
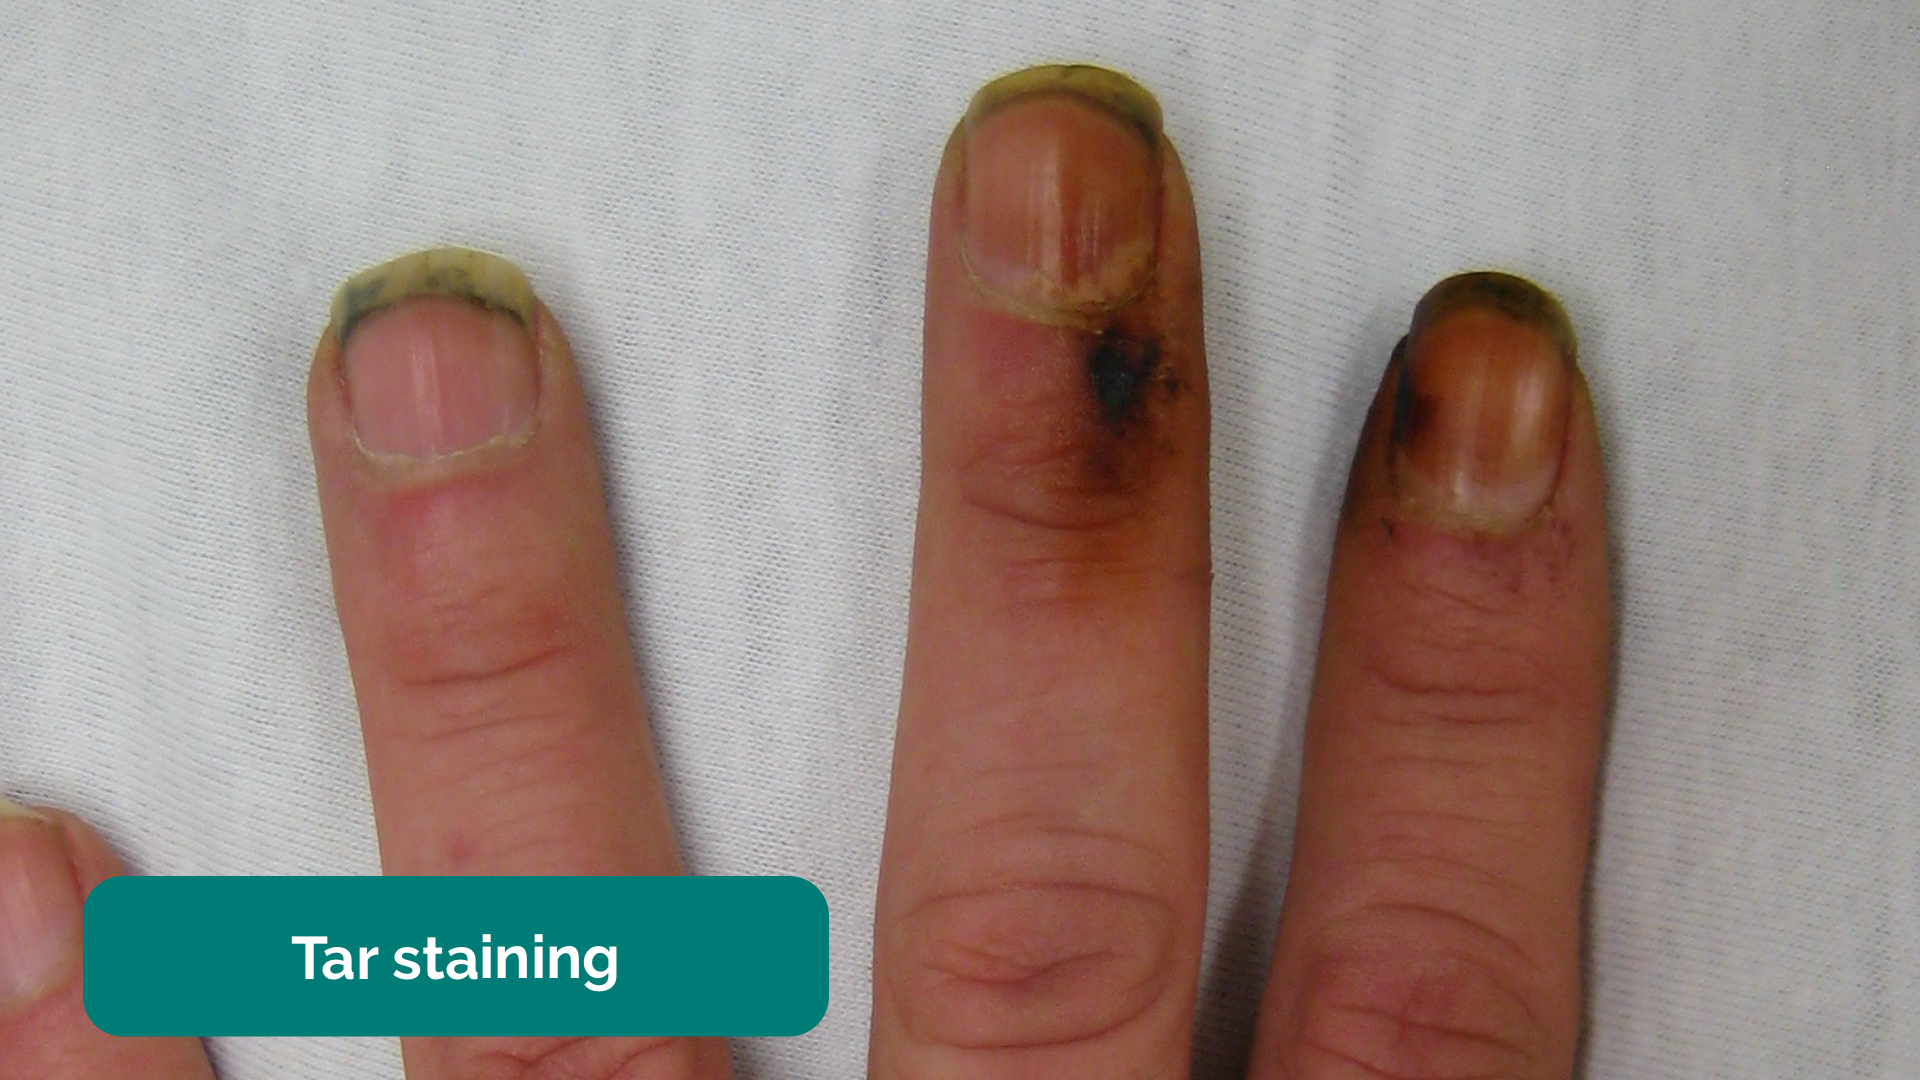
- Tar staining: caused by smoking, a significant risk factor for cardiovascular disease (e.g. coronary artery disease, hypertension).
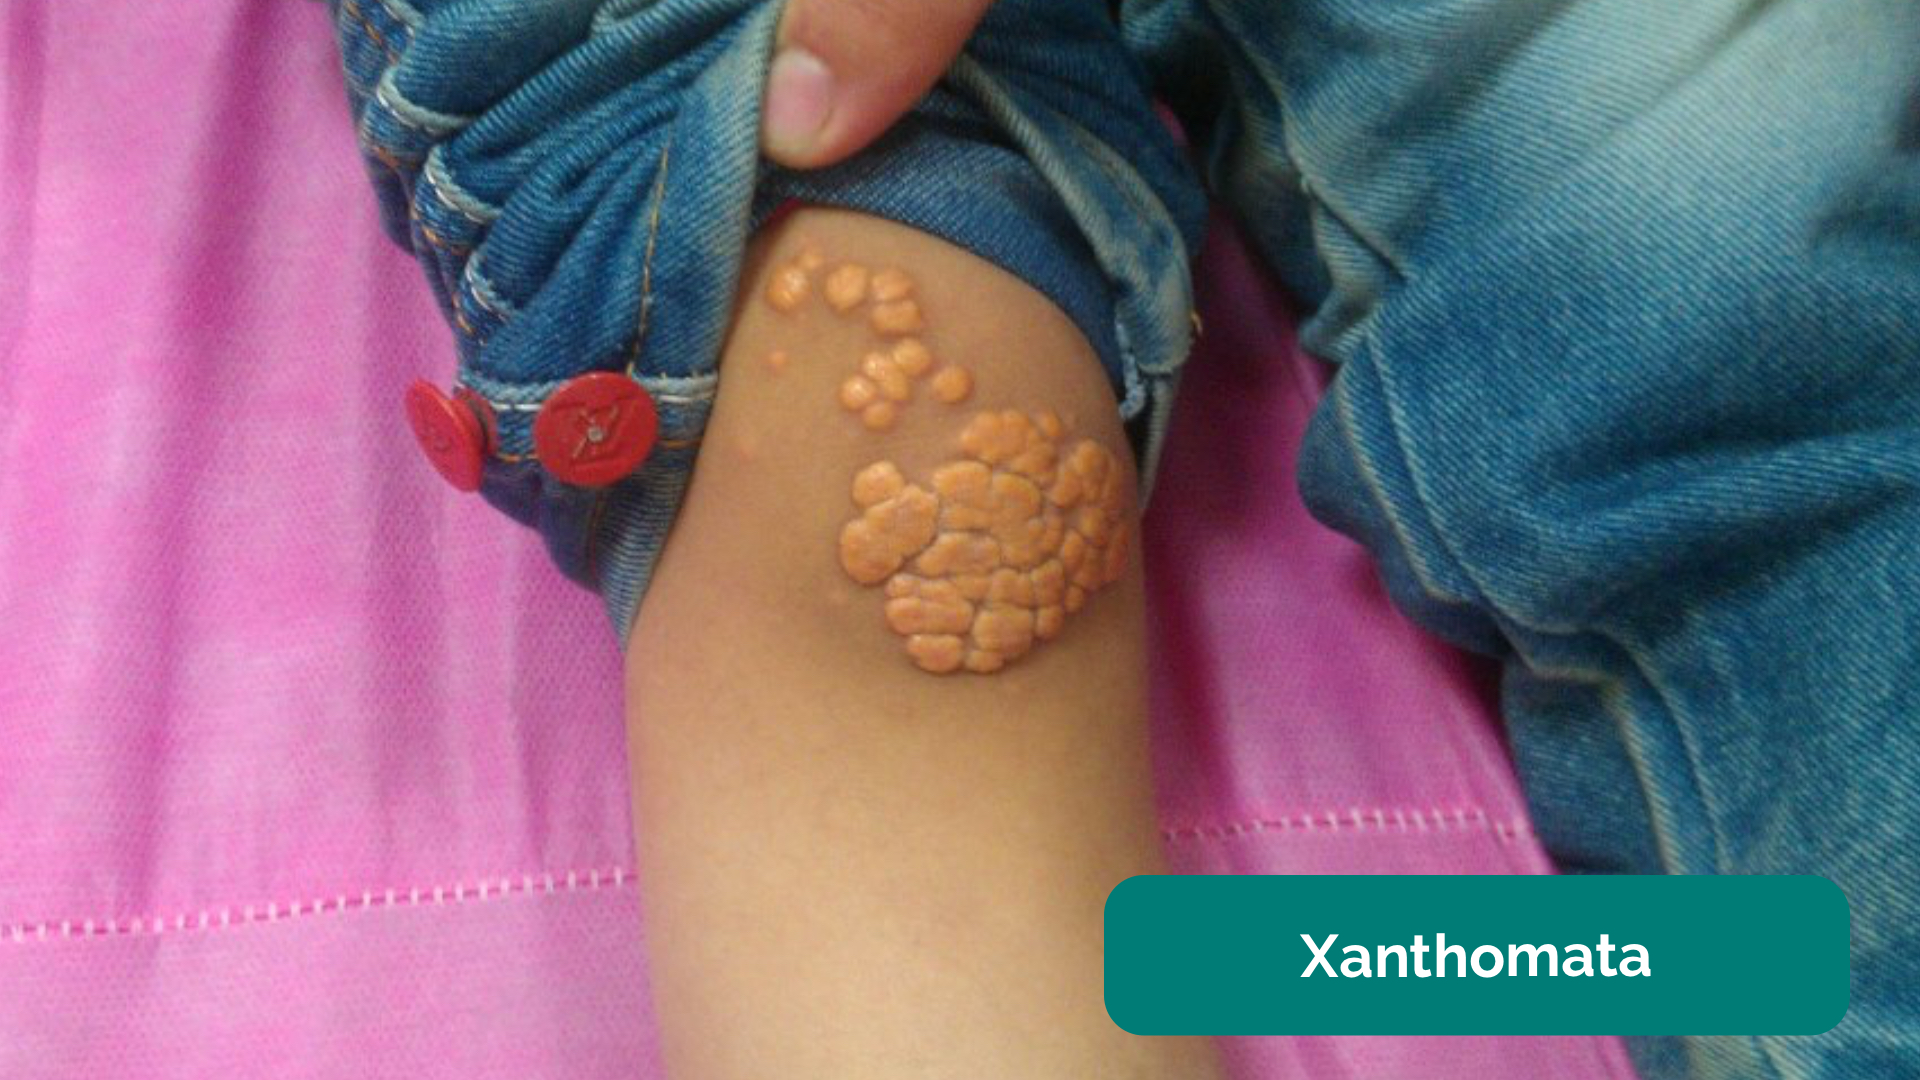
- Xanthomata: raised yellow cholesterol-rich deposits that are often noted on the palm, tendons of the wrist and elbow. Xanthomata are associated with hyperlipidaemia (typically familial hypercholesterolaemia), another important risk factor for cardiovascular disease (e.g. coronary artery disease, hypertension).
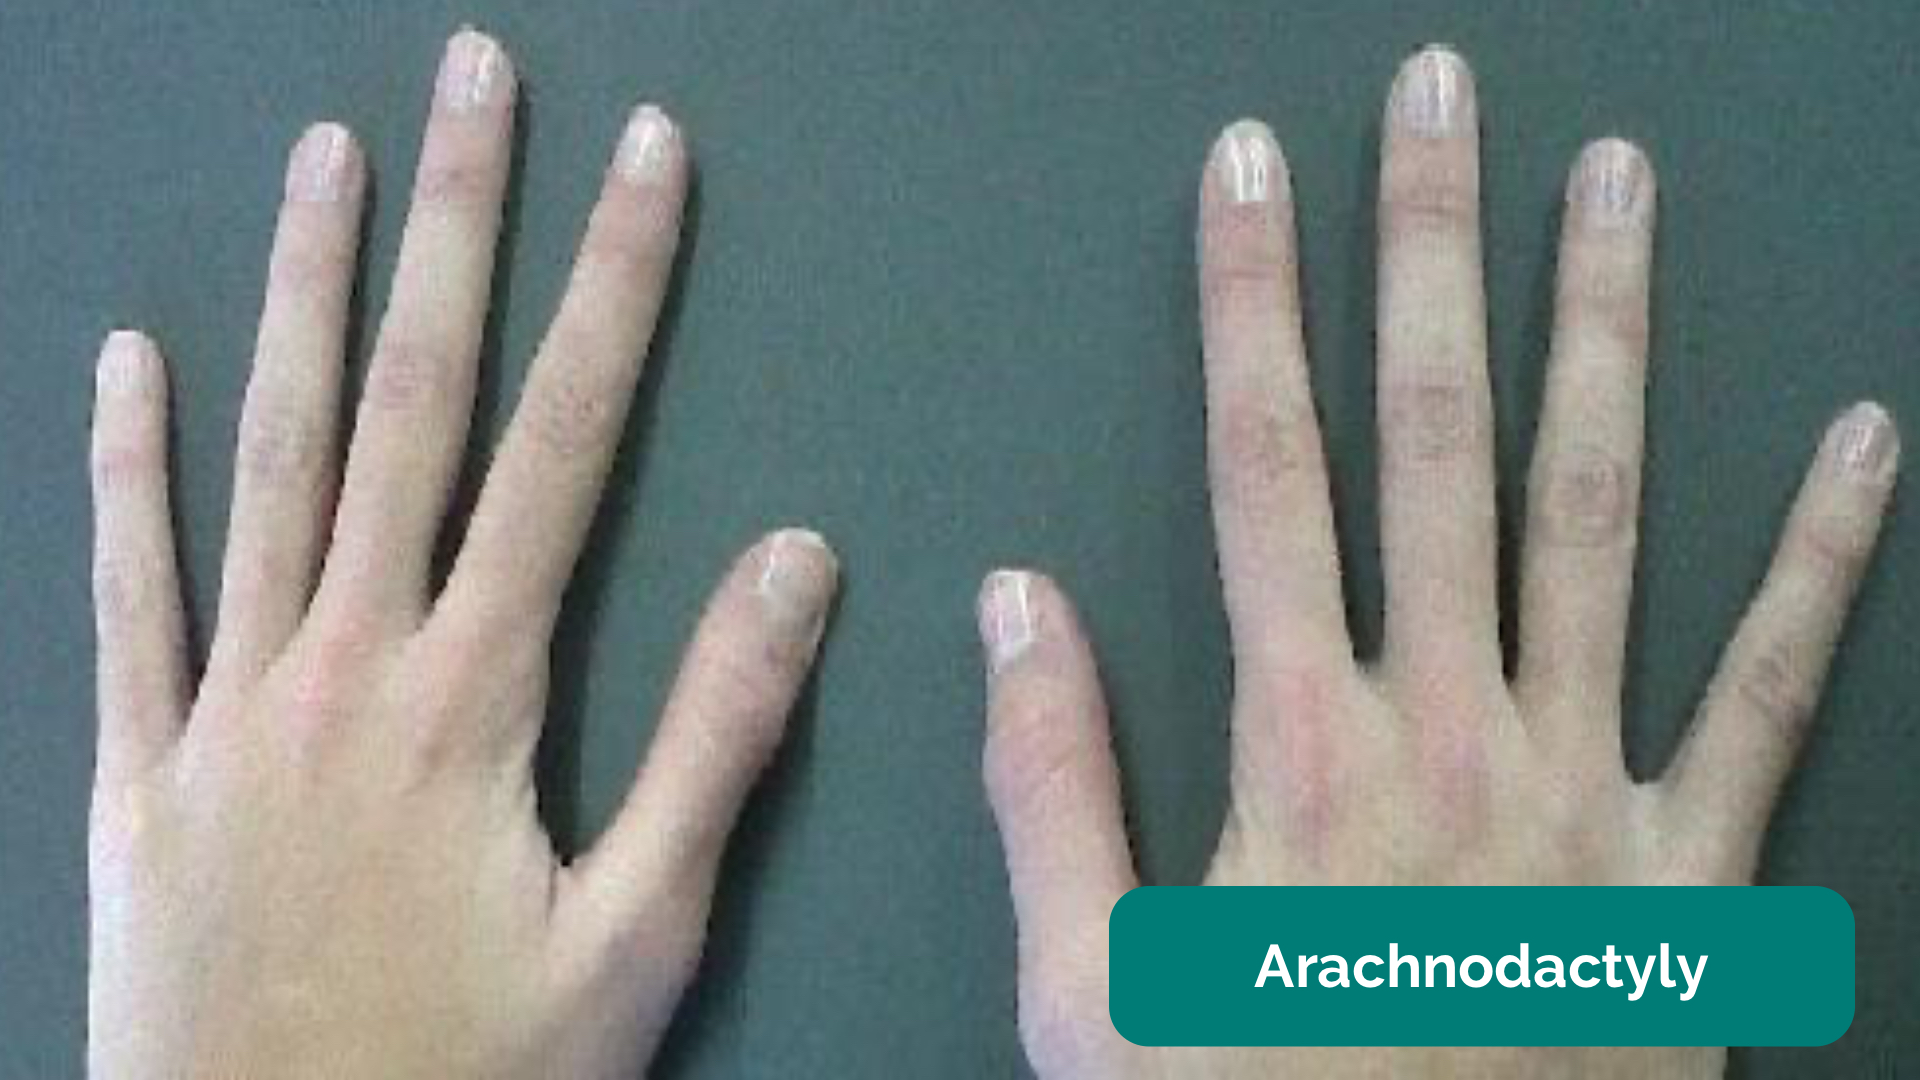
- Arachnodactyly (‘spider fingers’): fingers and toes are abnormally long and slender, in comparison to the palm of the hand and arch of the foot. Arachnodactyly is a feature of Marfan’s syndrome, which is associated with mitral/aortic valve prolapse and aortic dissection.
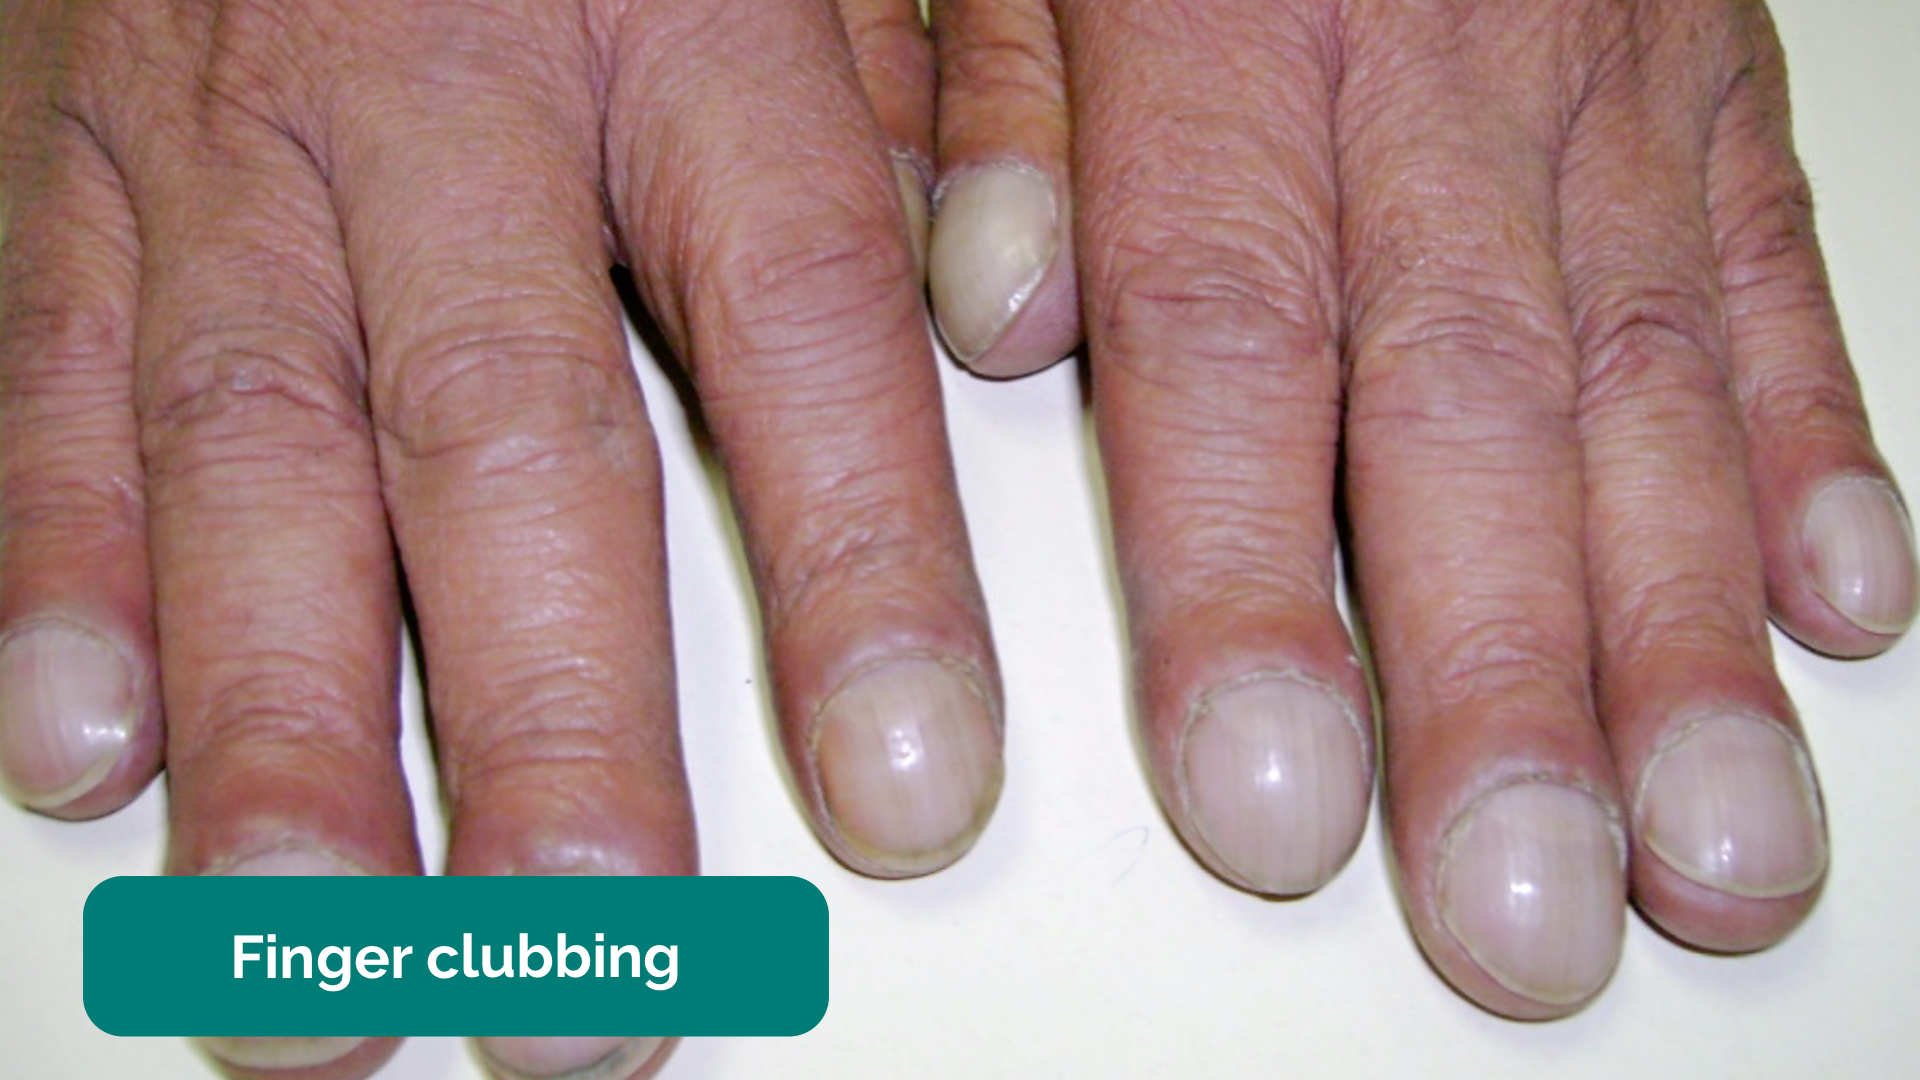
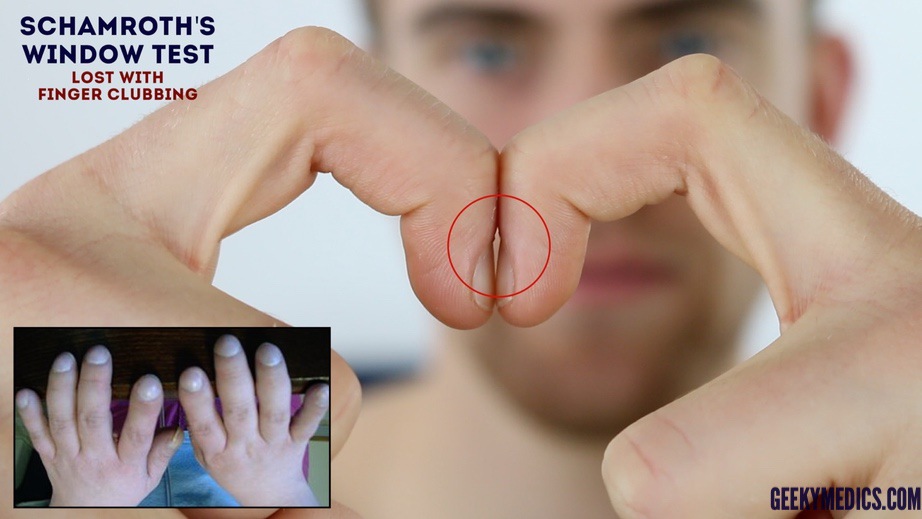
Finger clubbing
Finger clubbing involves uniform soft tissue swelling of the terminal phalanx of a digit with subsequent loss of the normal angle between the nail and the nail bed. Finger clubbing is associated with several underlying disease processes, but those most likely to appear in a cardiovascular OSCE station include congenital cyanotic heart disease, infective endocarditis and atrial myxoma (very rare).
To assess for finger clubbing:
- Ask the patient to place the nails of their index fingers back to back.
- In a healthy individual, you should be able to observe a small diamond-shaped window (known as Schamroth’s window)
- When finger clubbing develops, this window is lost.
Signs in the hands associated with endocarditis
There are several other signs in the hands that are associated with endocarditis including:
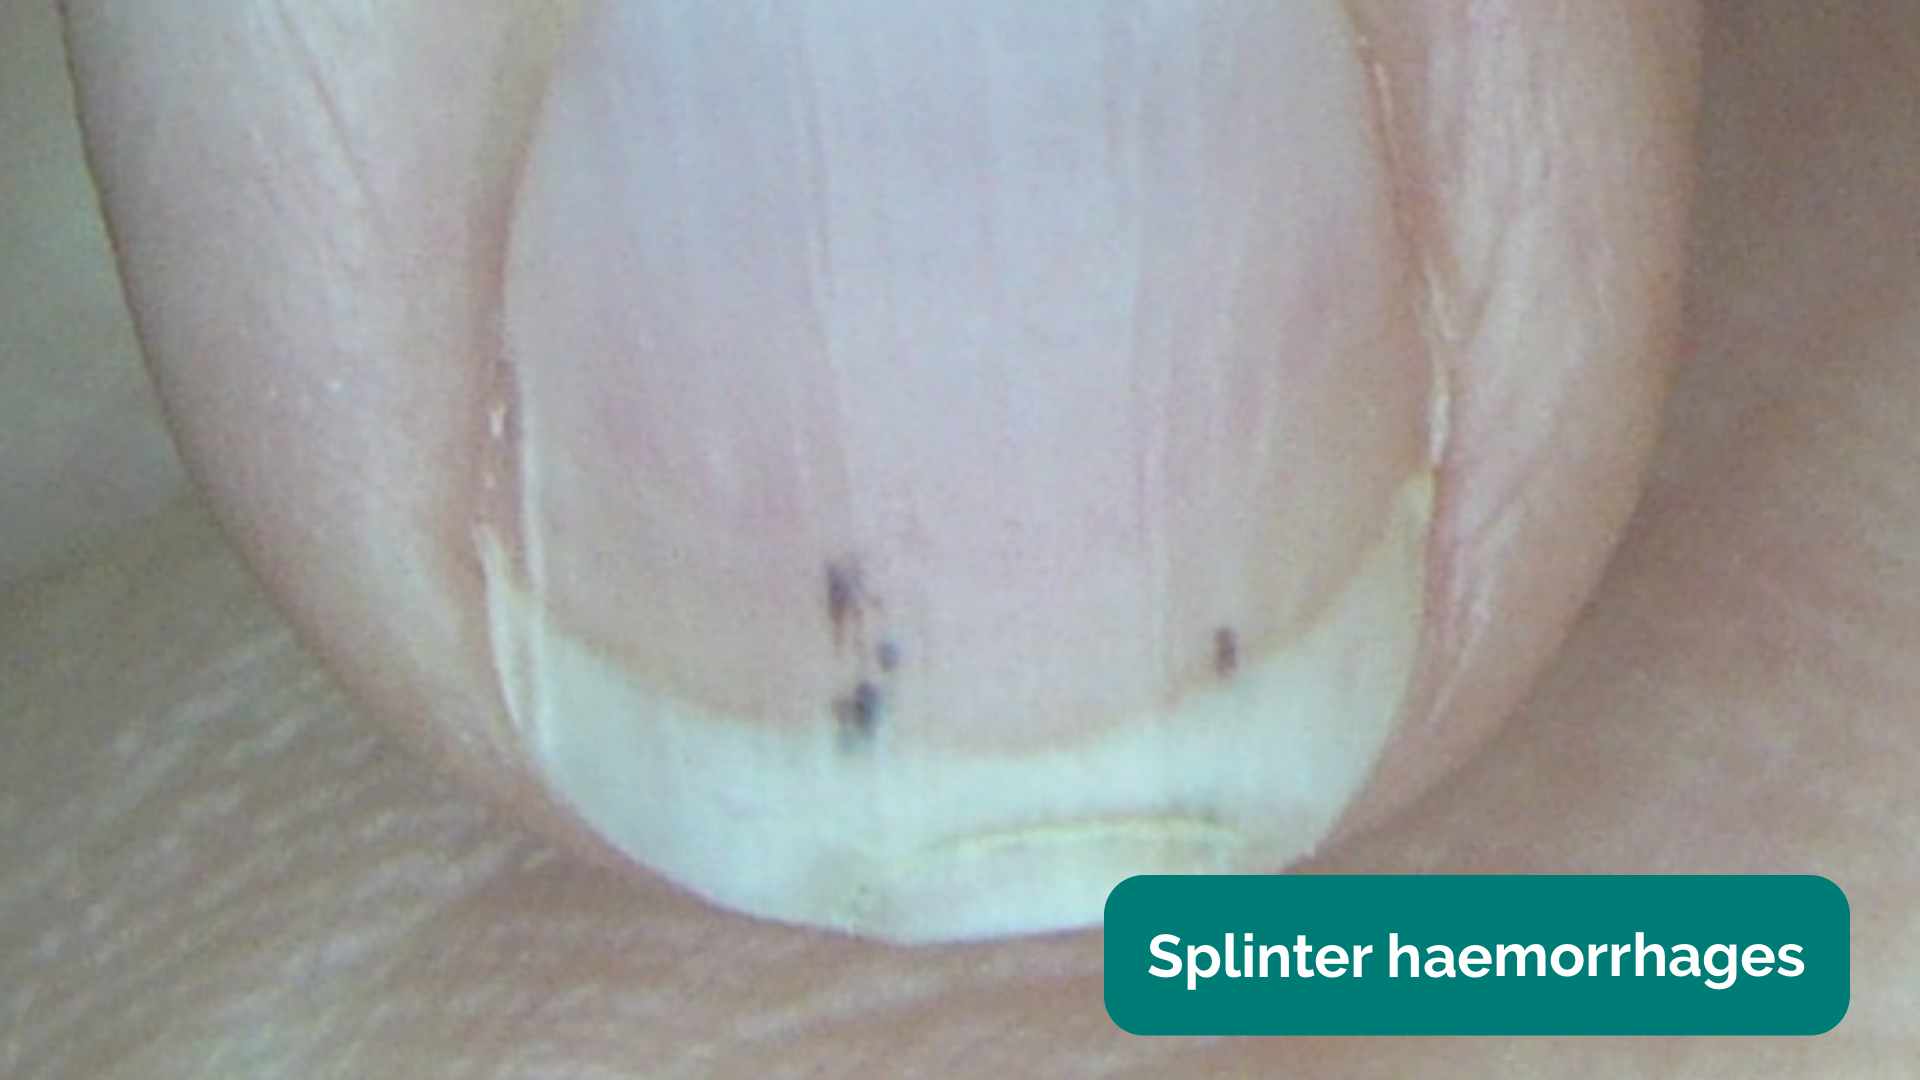
- Splinter haemorrhages: a longitudinal, red-brown haemorrhage under a nail that looks like a wood splinter. Causes include local trauma, infective endocarditis, sepsis, vasculitis and psoriatic nail disease.
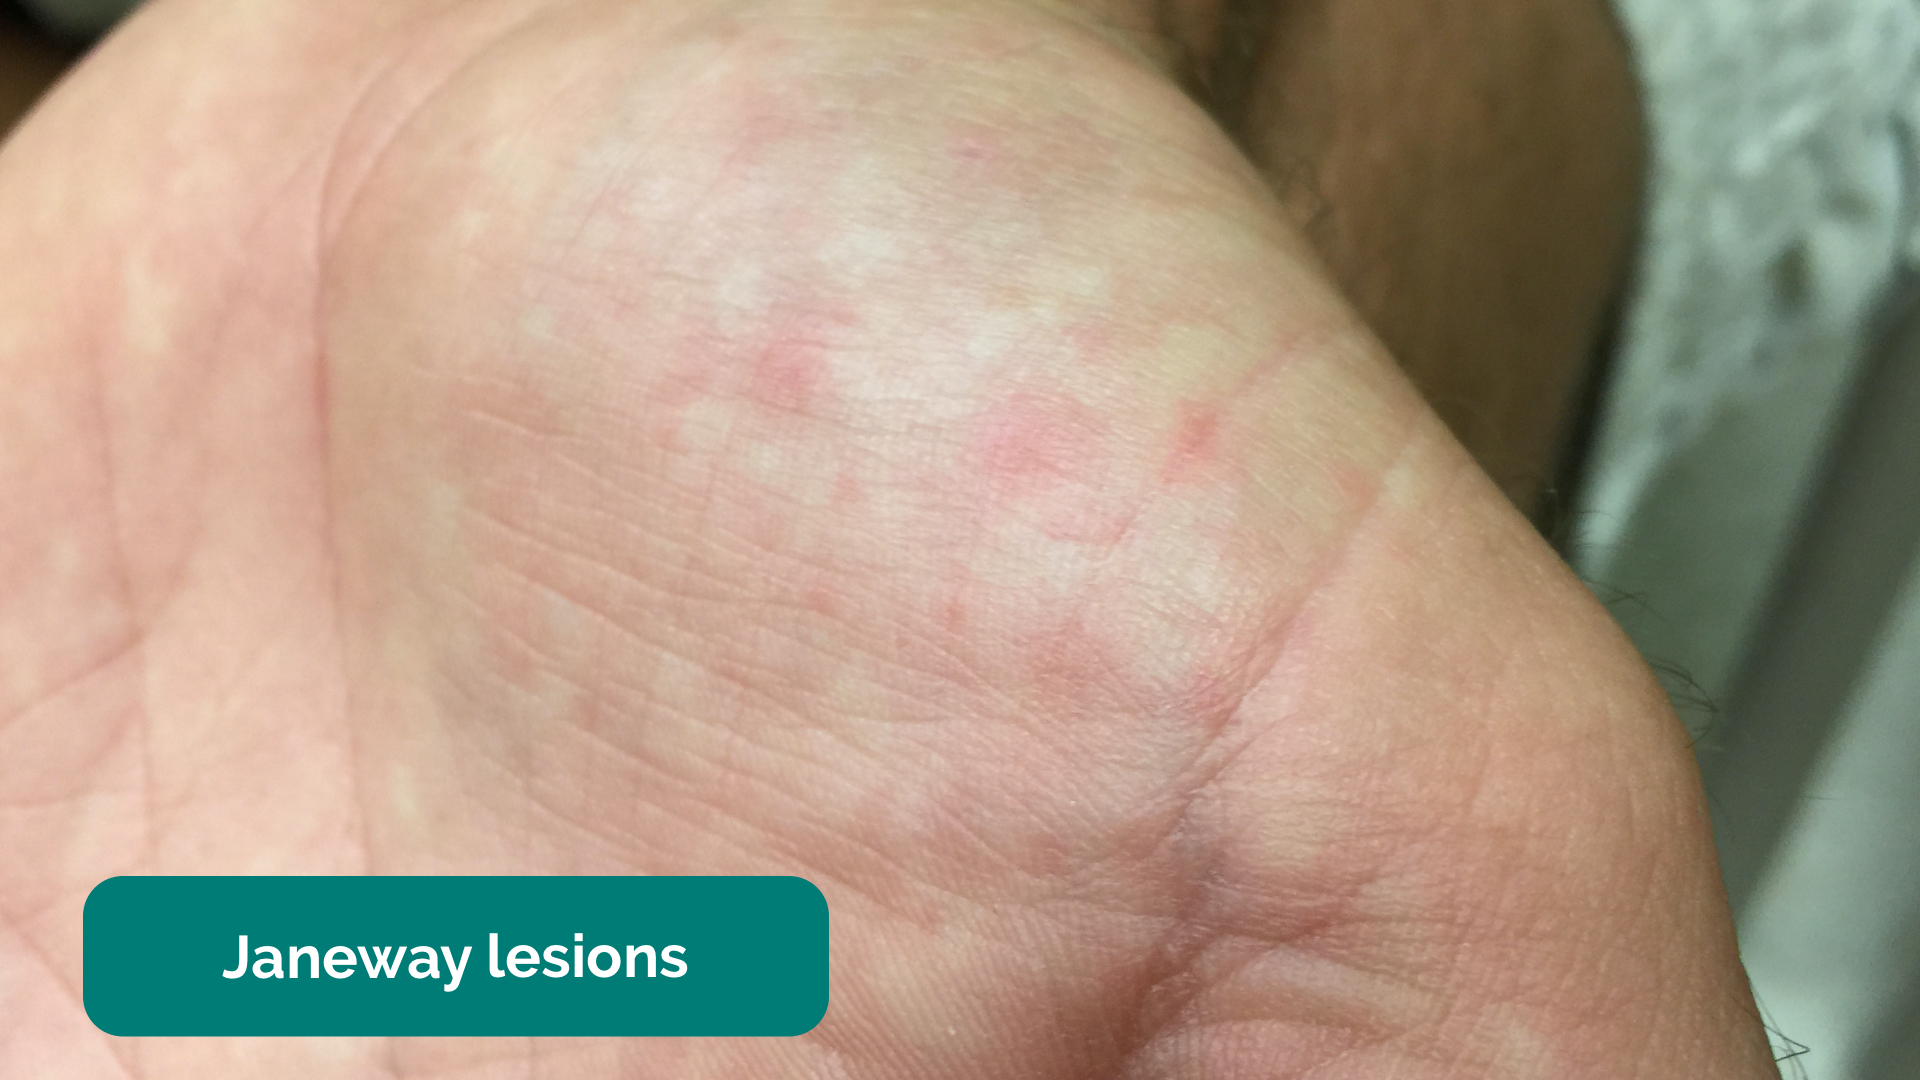
- Janeway lesions: non-tender, haemorrhagic lesions that occur on the thenar and hypothenar eminences of the palms (and soles). Janeway lesions are typically associated with infective endocarditis.
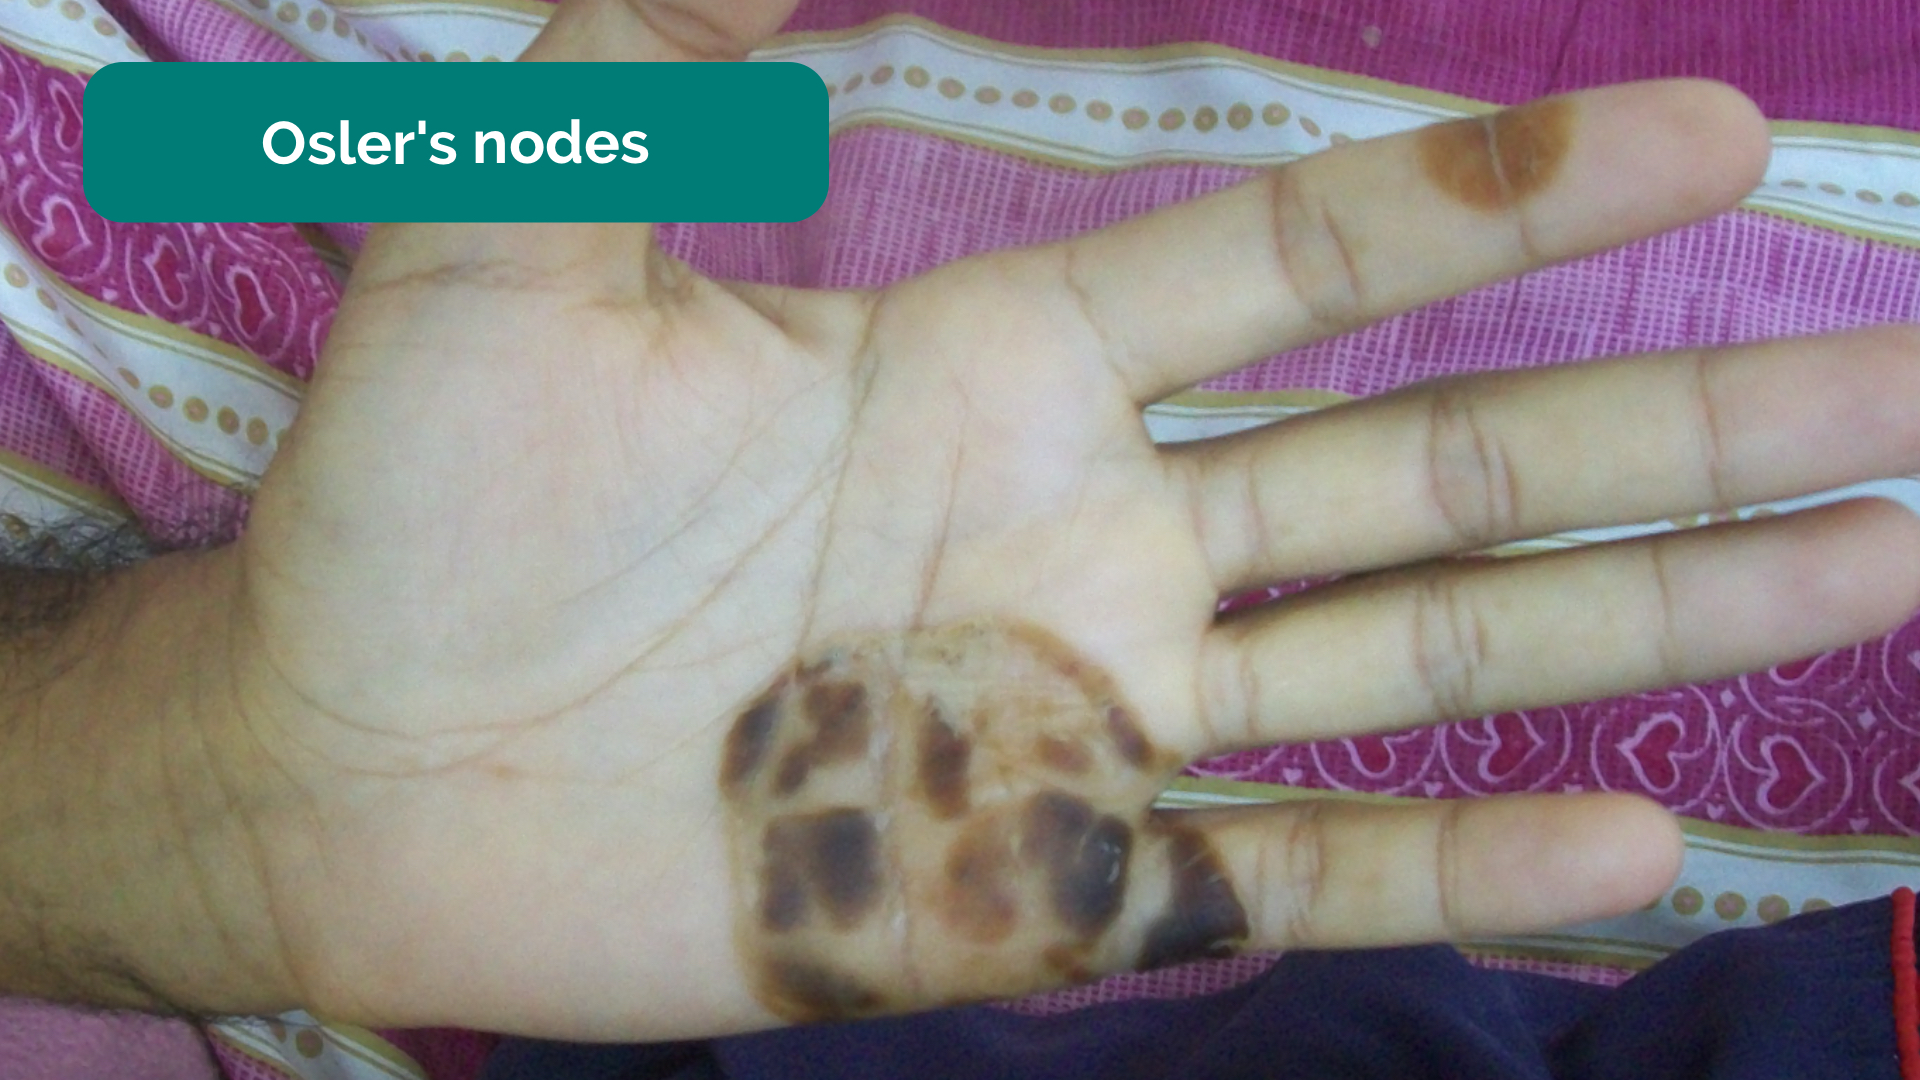
- Osler’s nodes: red-purple, slightly raised, tender lumps, often with a pale centre, typically found on the fingers or toes. They are typically associated with infective endocarditis.
Palpation
Temperature
Place the dorsal aspect of your hand onto the patient’s to assess temperature:
- In healthy individuals, the hands should be symmetrically warm, suggesting adequate perfusion.
- Cool hands may suggest poor peripheral perfusion (e.g. congestive cardiac failure, acute coronary syndrome).
- Cool and sweaty/clammy hands are typically associated with acute coronary syndrome.
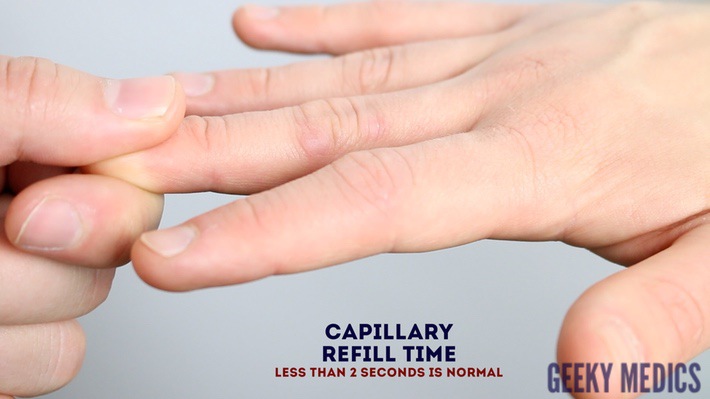
Capillary refill time (CRT)
Measuring capillary refill time (CRT) in the hands is a useful way of assessing peripheral perfusion:
- Apply five seconds of pressure to the distal phalanx of one of a patient’s fingers and then release.
- In healthy individuals, the initial pallor of the area you compressed should return to its normal colour in less than two seconds.
- A CRT that is greater than two seconds suggests poor peripheral perfusion (e.g. hypovolaemia, congestive heart failure) and the need to assess central capillary refill time.
Inspect the hands
Check for finger clubbing
Inspect the palms
Check capillary refill time (CRT)
Pallor due to anaemia 2
Peripheral cyanosis 3
Tar staining on the hands 4
Xanthomata 5
Arachnodactyly
Finger clubbing 6
Splinter haemorrhages
Janeway lesions 7
Osler’s nodes 8
Pulses and blood pressure
Radial pulse
Palpate the patient’s radial pulse, located at the radial side of the wrist, with the tips of your index and middle fingers aligned longitudinally over the course of the artery.
Once you have located the radial pulse, assess the rate and rhythm.
Heart rate
Assessing heart rate:
- You can calculate the heart rate in a number of ways, including measuring for 60 seconds, measuring for 30 seconds and multiplying by 2 or measuring for 15 seconds and multiplying by 4. The shorter the interval used, the higher the risk of obtaining an inaccurate result, so wherever possible, you should palpate for a full 60 seconds.
- For irregular rhythms, you should measure the pulse for a full 60 seconds to improve accuracy.
Normal and abnormal heart rates
- In healthy adults, the pulse should be between 60-100 bpm.
- A pulse <60 bpm is known as bradycardia and has a wide range of aetiologies (e.g. healthy athletic individuals, atrioventricular block, medications, sick sinus syndrome).
- A pulse of >100 bpm is known as tachycardia and has a wide range of aetiologies (e.g. anxiety, supraventricular tachycardia, hypovolaemia, hyperthyroidism).
- An irregular rhythm is most commonly caused by atrial fibrillation, but other causes include ectopic beats in healthy individuals and atrioventricular blocks.
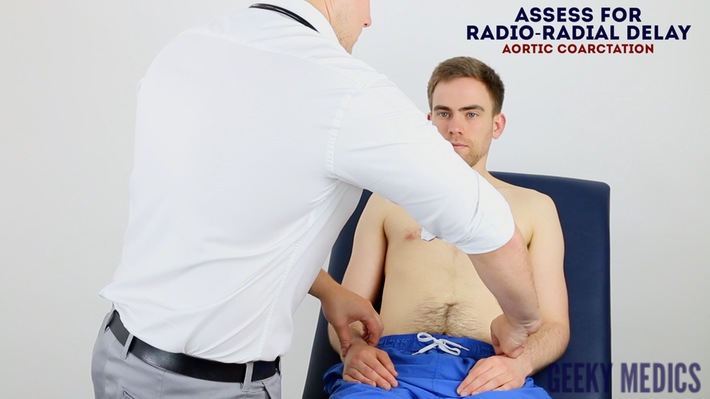
Radio-radial delay
Radio-radial delay describes a loss of synchronicity between the radial pulse on each arm, resulting in the pulses occurring at different times.
To assess for radio-radial delay:
- Palpate both radial pulses simultaneously.
- In healthy individuals, the pulses should occur at the same time.
- If the radial pulses are out of sync, this would be described as radio-radial delay.
Causes of radio-radial delay include:
- Subclavian artery stenosis (e.g. compression by a cervical rib)
- Aortic dissection
- Aortic coarctation
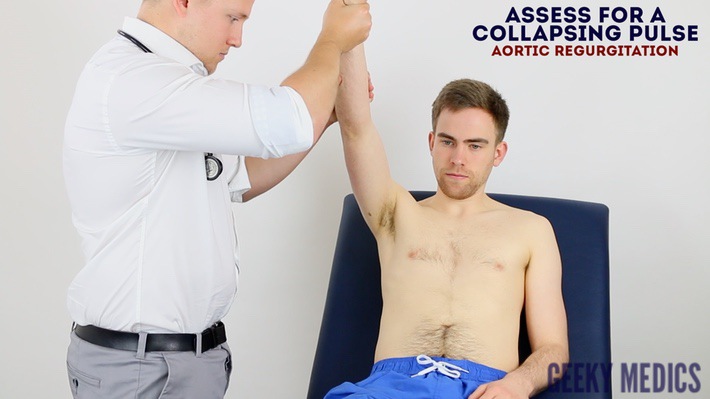
Collapsing pulse
A collapsing pulse is a forceful pulse that rapidly increases and subsequently collapses. It is also sometimes referred to as a ‘water hammer pulse’.
To assess for a collapsing pulse:
- Ask the patient if they have any pain in their right shoulder, as you will need to move it briskly as part of the assessment for a collapsing pulse (if they do, this assessment should be avoided).
- Palpate the radial pulse with your right hand wrapped around the patient’s wrist.
- Palpate the right arm with your left hand, whilst also supporting the patient’s elbow.
- Raise the patient’s arm above their head briskly.
- Palpate for a collapsing pulse: As blood rapidly empties from the arm in diastole, you should be able to feel a tapping impulse through the muscle bulk of the arm. This is caused by the sudden retraction of the column of blood within the arm during diastole.
Causes of a collapsing pulse
- Normal physiological states (e.g. fever, pregnancy)
- Cardiac lesions (e.g. aortic regurgitation, patent ductus arteriosus)
- High output states (e.g. anaemia, arteriovenous fistula, thyrotoxicosis)
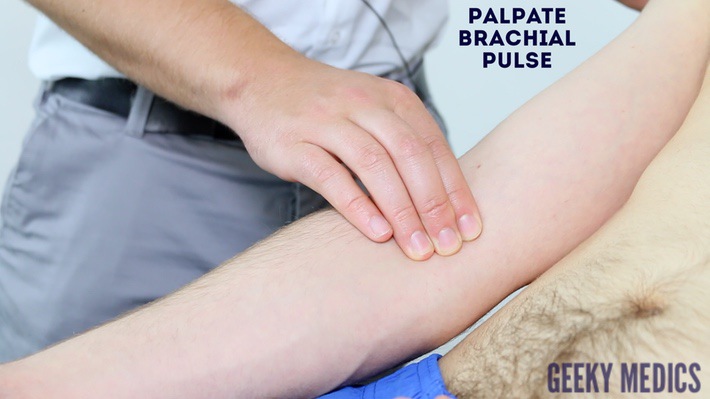
Brachial pulse
Palpate the brachial pulse
Palpate the brachial pulse in their right arm, assessing volume and character:
1. Support the patient’s right forearm with your left hand.
2. Position the patient so that their upper arm is abducted, their elbow is partially flexed and their forearm is externally rotated.
3. With your right hand, palpate medial to the biceps brachii tendon and lateral to the medial epicondyle of the humerus. Deeper palpation is required (compared to radial pulse palpation) due to the location of the brachial artery.
Types of pulse character
- Normal
- Slow-rising (associated with aortic stenosis)
- Bounding (associated with aortic regurgitation as well as CO2 retention)
- Thready (associated with intravascular hypovolaemia in conditions such as sepsis)
Blood pressure
Measure the blood pressure
Measure the patient’s blood pressure in both arms (see our blood pressure guide for more details).
A comprehensive blood pressure assessment should also include lying and standing blood pressure.
In a cardiovascular examination OSCE station, you are unlikely to have to carry out a thorough blood pressure assessment due to time restraints, however, you should demonstrate that you have an awareness of what this would involve.
Blood pressure abnormalities
Blood pressure abnormalities may include:
- Hypertension: blood pressure of greater than or equal to 140/90 mmHg if under 80 years old or greater than or equal to 150/90 mmHg if you’re over 80 years old.
- Hypotension: blood pressure of less than 90/60 mmHg.
- Narrow pulse pressure: less than 25 mmHg of difference between the systolic and diastolic blood pressure. Causes include aortic stenosis, congestive heart failure and cardiac tamponade.
- Wide pulse pressure: more than 100 mmHg of difference between systolic and diastolic blood pressure. Causes include aortic regurgitation and aortic dissection.
- Difference between arms: more than 20 mmHg difference in blood pressure between each arm is abnormal and may suggest aortic dissection.
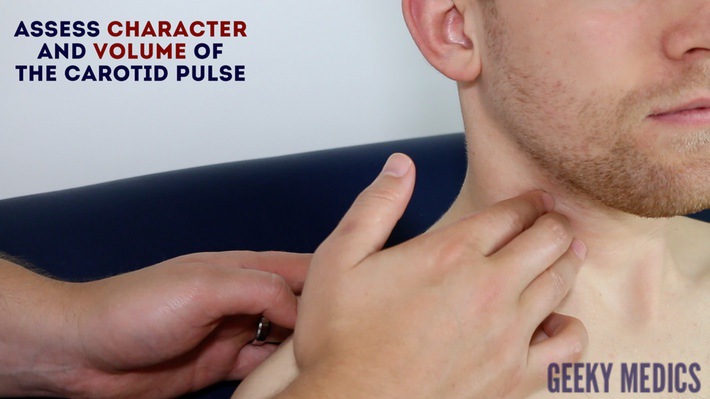
Carotid pulse
The carotid pulse can be located between the larynx and the anterior border of the sternocleidomastoid muscle.
Palpate the carotid pulse
1. Ensure the patient is positioned safely on the bed, as there is a risk of inducing reflex bradycardia when palpating the carotid artery (potentially causing a syncopal episode).
2. Gently place your fingers between the larynx and the anterior border of the sternocleidomastoid muscle to locate the carotid pulse.
3. Assess the character (e.g. slow-rising, thready) and volume of the pulse.
Palpate the radial pulse
Assess for radio-radial delay
Palpate the brachial pulse
Assess for a collapsing pulse
Palpate the carotid pulse
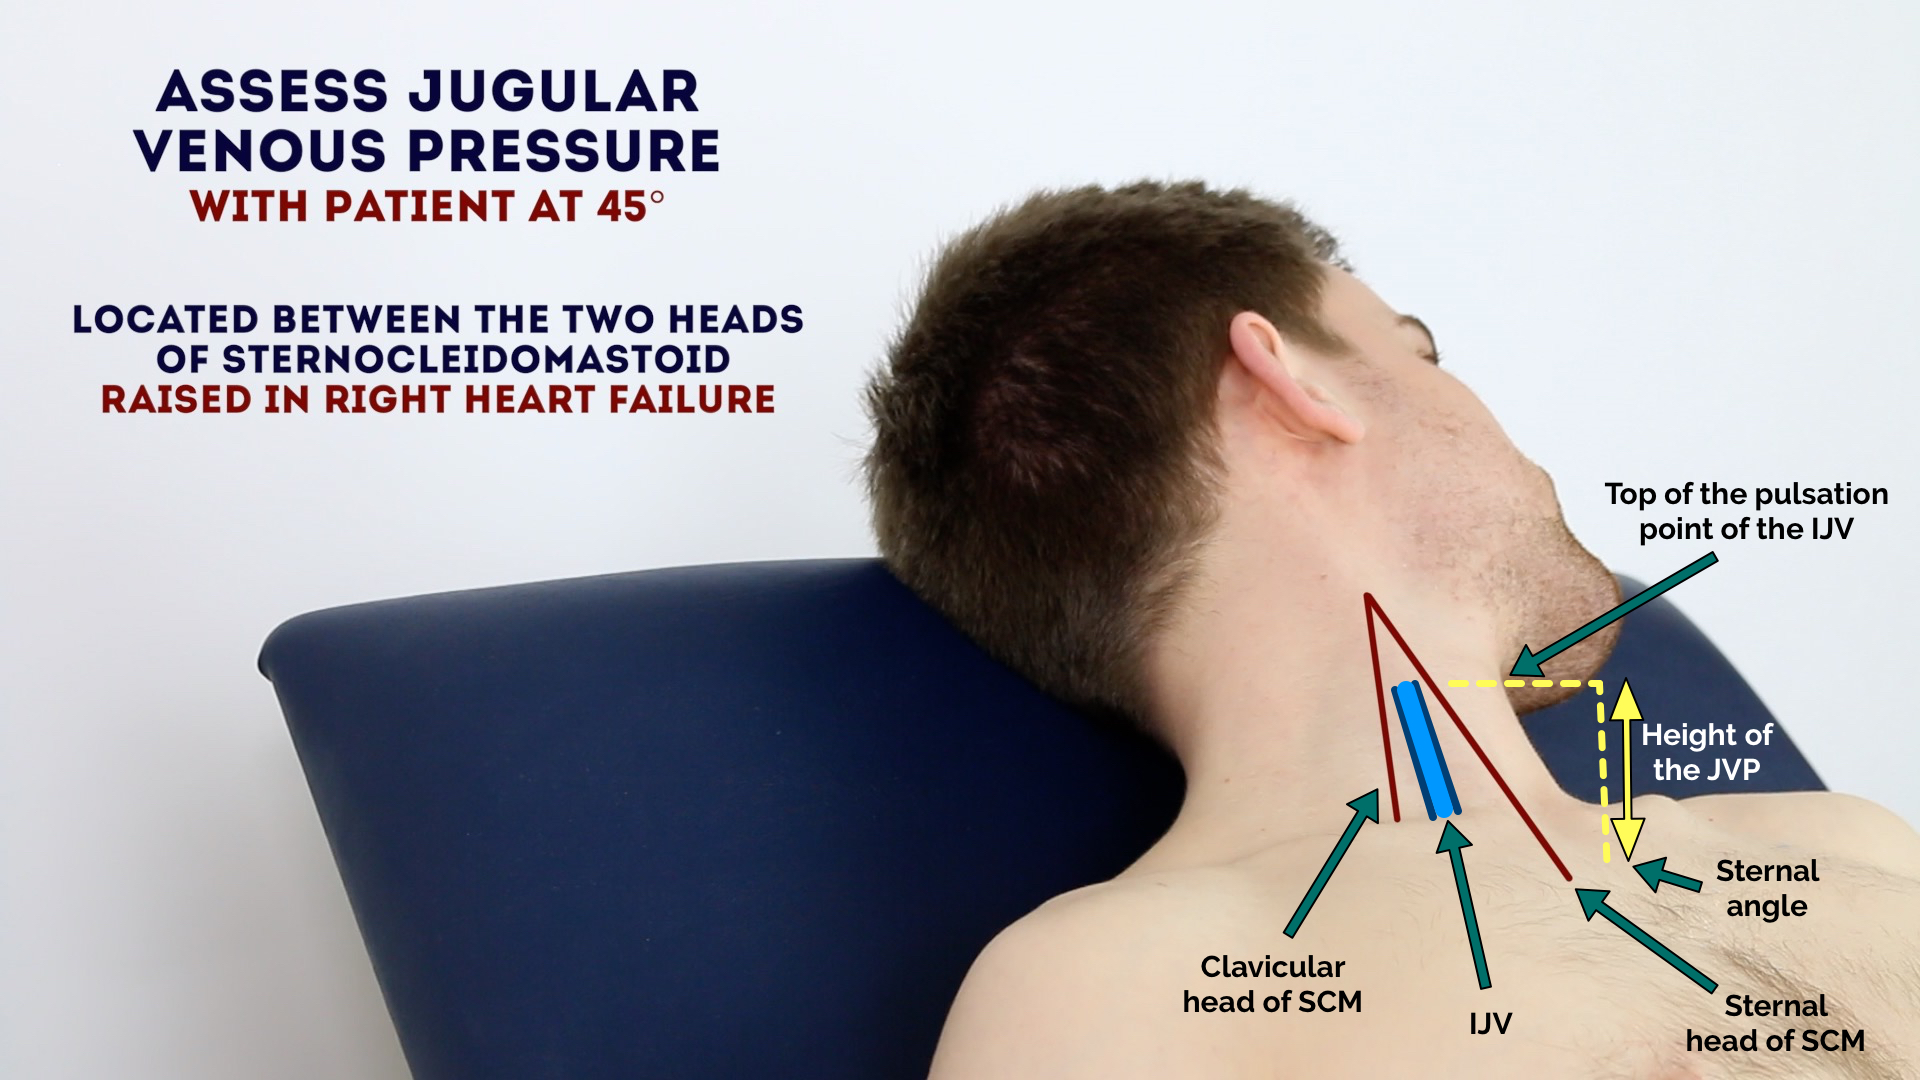
Jugular venous pressure (JVP)
Jugular venous pressure (JVP) provides an indirect measure of central venous pressure. This is possible because the internal jugular vein (IJV) connects to the right atrium without any intervening valves, resulting in a continuous column of blood. The presence of this continuous column of blood means that changes in right atrial pressure are reflected in the IJV (e.g. raised right atrial pressure results in distension of the IJV).
The IJV runs between the medial end of the clavicle and the ear lobe, under the medial aspect of the sternocleidomastoid, making it difficult to visualise (its double waveform pulsation is, however, sometimes visible due to transmission through the sternocleidomastoid muscle).
Because of the inability to easily visualise the IJV, it’s tempting to use the external jugular vein (EJV) as a proxy for assessment of central venous pressure during clinical assessment. However, because the EJV typically branches at a right angle from the subclavian vein (unlike the IJV which sits in a straight line above the right atrium) it is a less reliable indicator of central venous pressure.
See our guide to jugular venous pressure (JVP) for more details.
Measure the JVP
1. Position the patient in a semi-recumbent position (at 45°).
2. Ask the patient to turn their head slightly to the left.
3. Inspect for evidence of the IJV, running between the medial end of the clavicle and the ear lobe, under the medial aspect of the sternocleidomastoid (it may be visible between just above the clavicle between the sternal and clavicular heads of the sternocleidomastoid. The IJV has a double waveform pulsation, which helps to differentiate it from the pulsation of the external carotid artery.
4. Measure the JVP by assessing the vertical distance between the sternal angle and the top of the pulsation point of the IJV (in healthy individuals, this should be no greater than 3 cm).
Causes of a raised JVP
A raised JVP indicates the presence of venous hypertension. Cardiac causes of a raised JVP include:
- Right-sided heart failure: commonly caused by left-sided heart failure. Pulmonary hypertension is another cause of right-sided heart failure, often occurring due to chronic obstructive pulmonary disease or interstitial lung disease.
- Tricuspid regurgitation: causes include infective endocarditis and rheumatic heart disease.
- Constrictive pericarditis: often idiopathic, but rheumatoid arthritis and tuberculosis are also possible underlying causes.
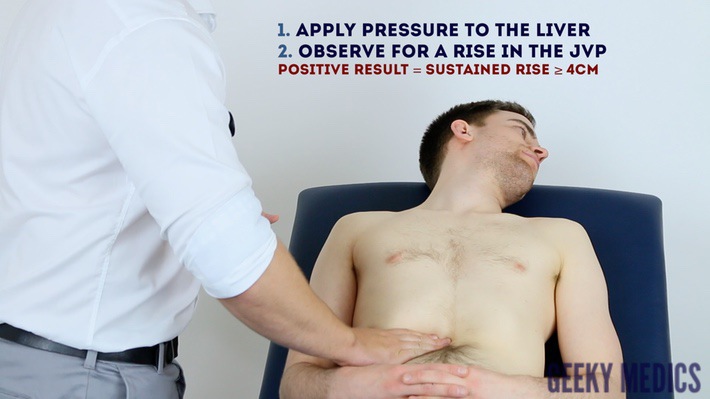
Hepatojugular reflux test
The hepatojugular reflux test involves the application of pressure to the liver whilst observing for a sustained rise in JVP.
Eliciting hepatojugular reflux
To be able to perform the test, there should be at least a 3cm distance from the upper margin of the baseline JVP to the angle of the mandible:
- Position the patient in a semi-recumbent position (45º).
- Apply direct pressure to the liver.
- Closely observe the IJV for a rise.
- In healthy individuals, this rise should last no longer than 1-2 cardiac cycles (it should then fall).
- If the rise in JVP is sustained and equal to or greater than 4cm this is deemed a positive result.
- This assessment can be uncomfortable for the patient and therefore it should only be performed when felt necessary (an examiner will often prevent you from performing it in an OSCE but you should mention it).
Conditions associated with hepatojugular reflux
A positive hepatojugular reflux result suggests the right ventricle is unable to accommodate an increased venous return, but it is not diagnostic of any specific condition. The following conditions frequently produce a positive hepatojugular reflux test:
- Constrictive pericarditis
- Right ventricular failure
- Left ventricular failure
- Restrictive cardiomyopathy
Assess the JVP
Assess for hepatojugular reflux
Face
Eyes
Inspect the eyes for signs relevant to the cardiovascular system
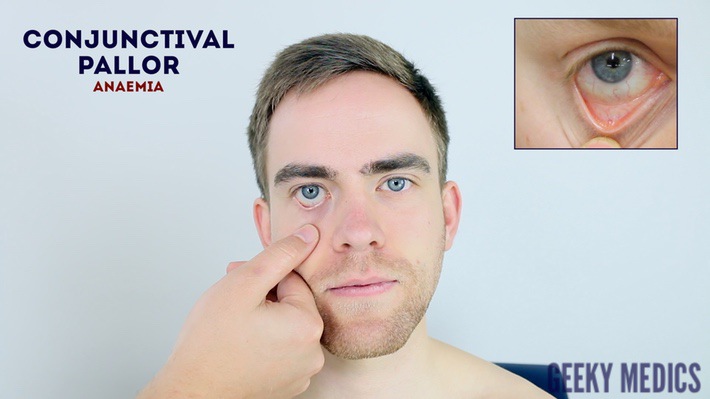
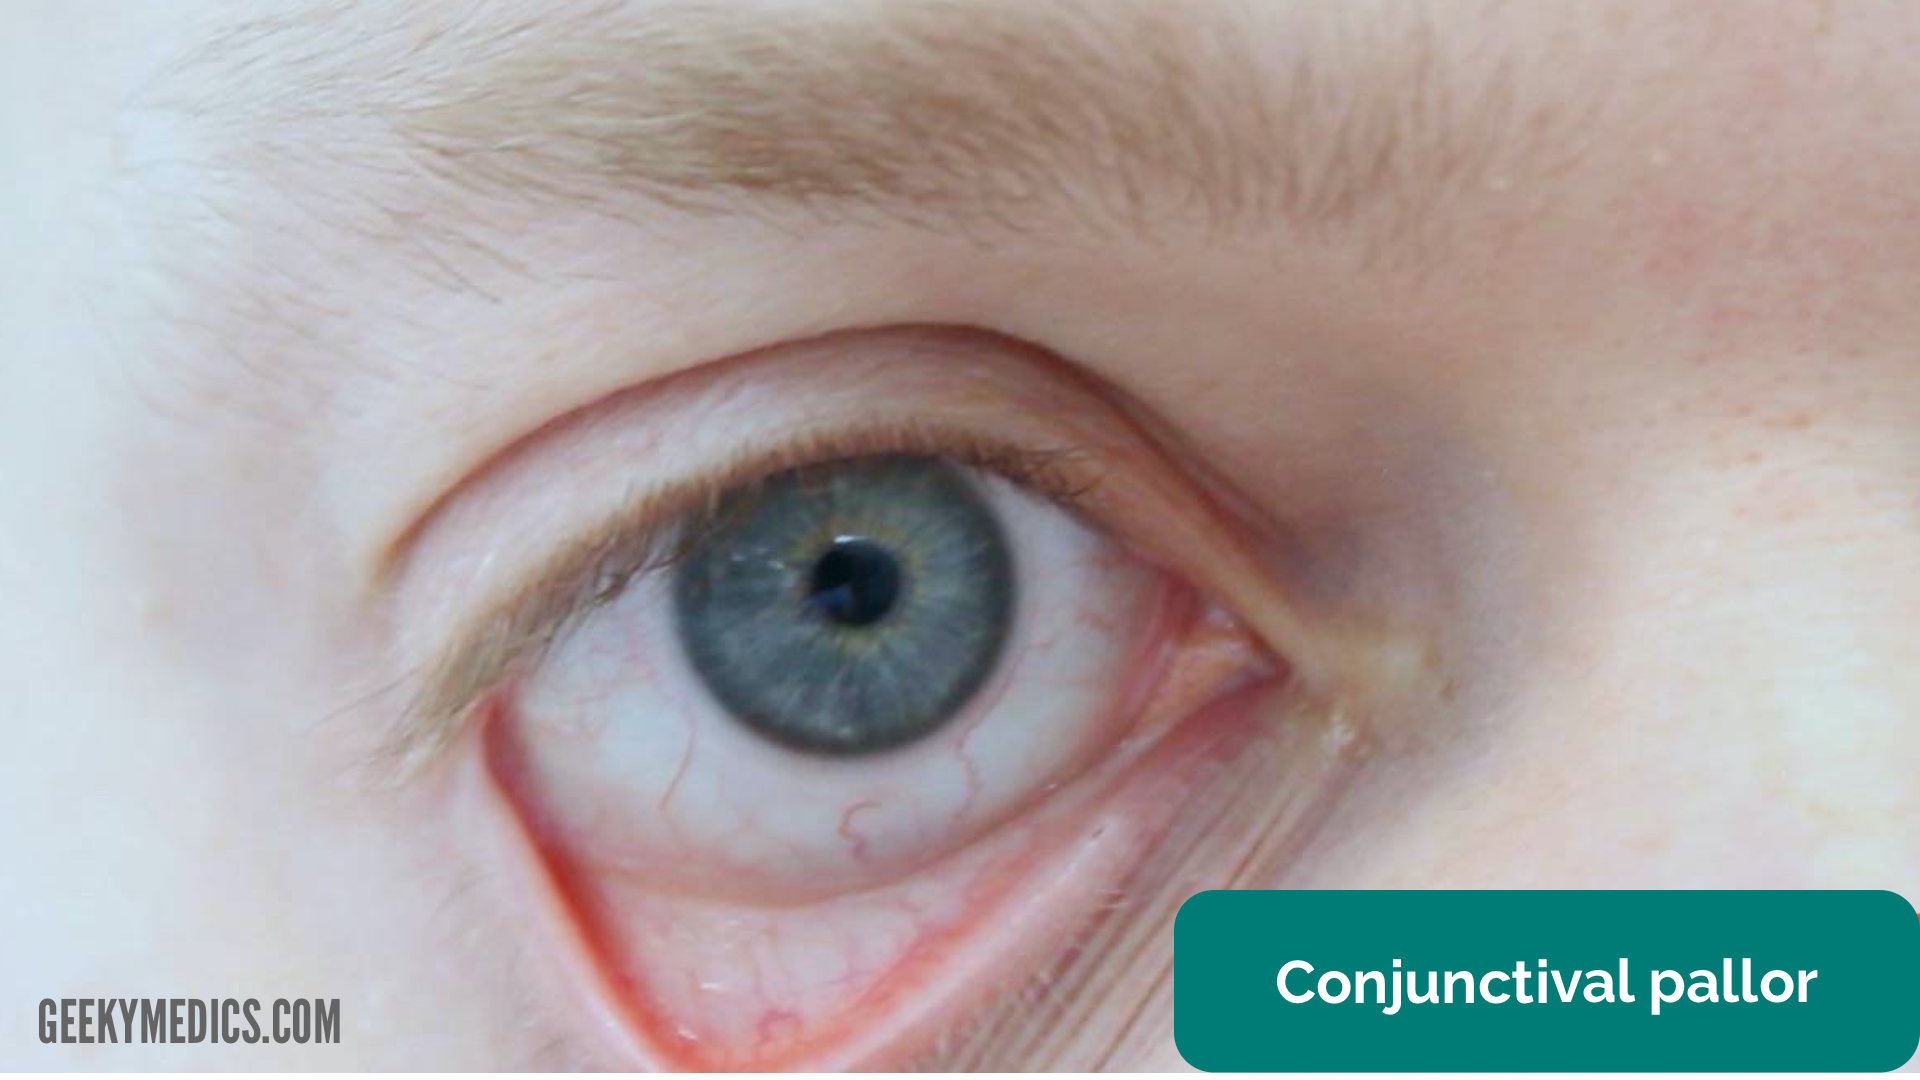
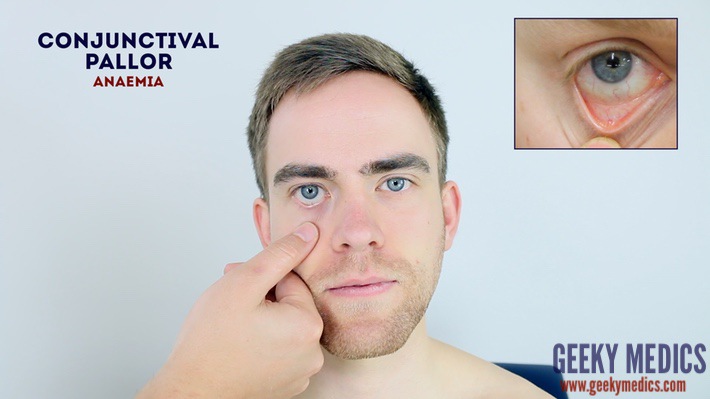
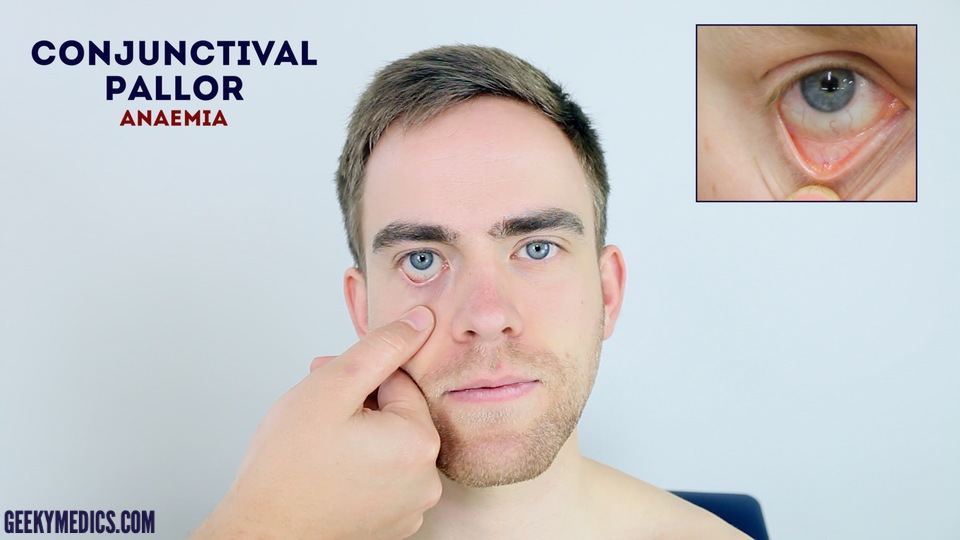
- Conjunctival pallor: suggestive of underlying anaemia. Ask the patient to gently pull down their lower eyelid to allow you to inspect the conjunctiva.
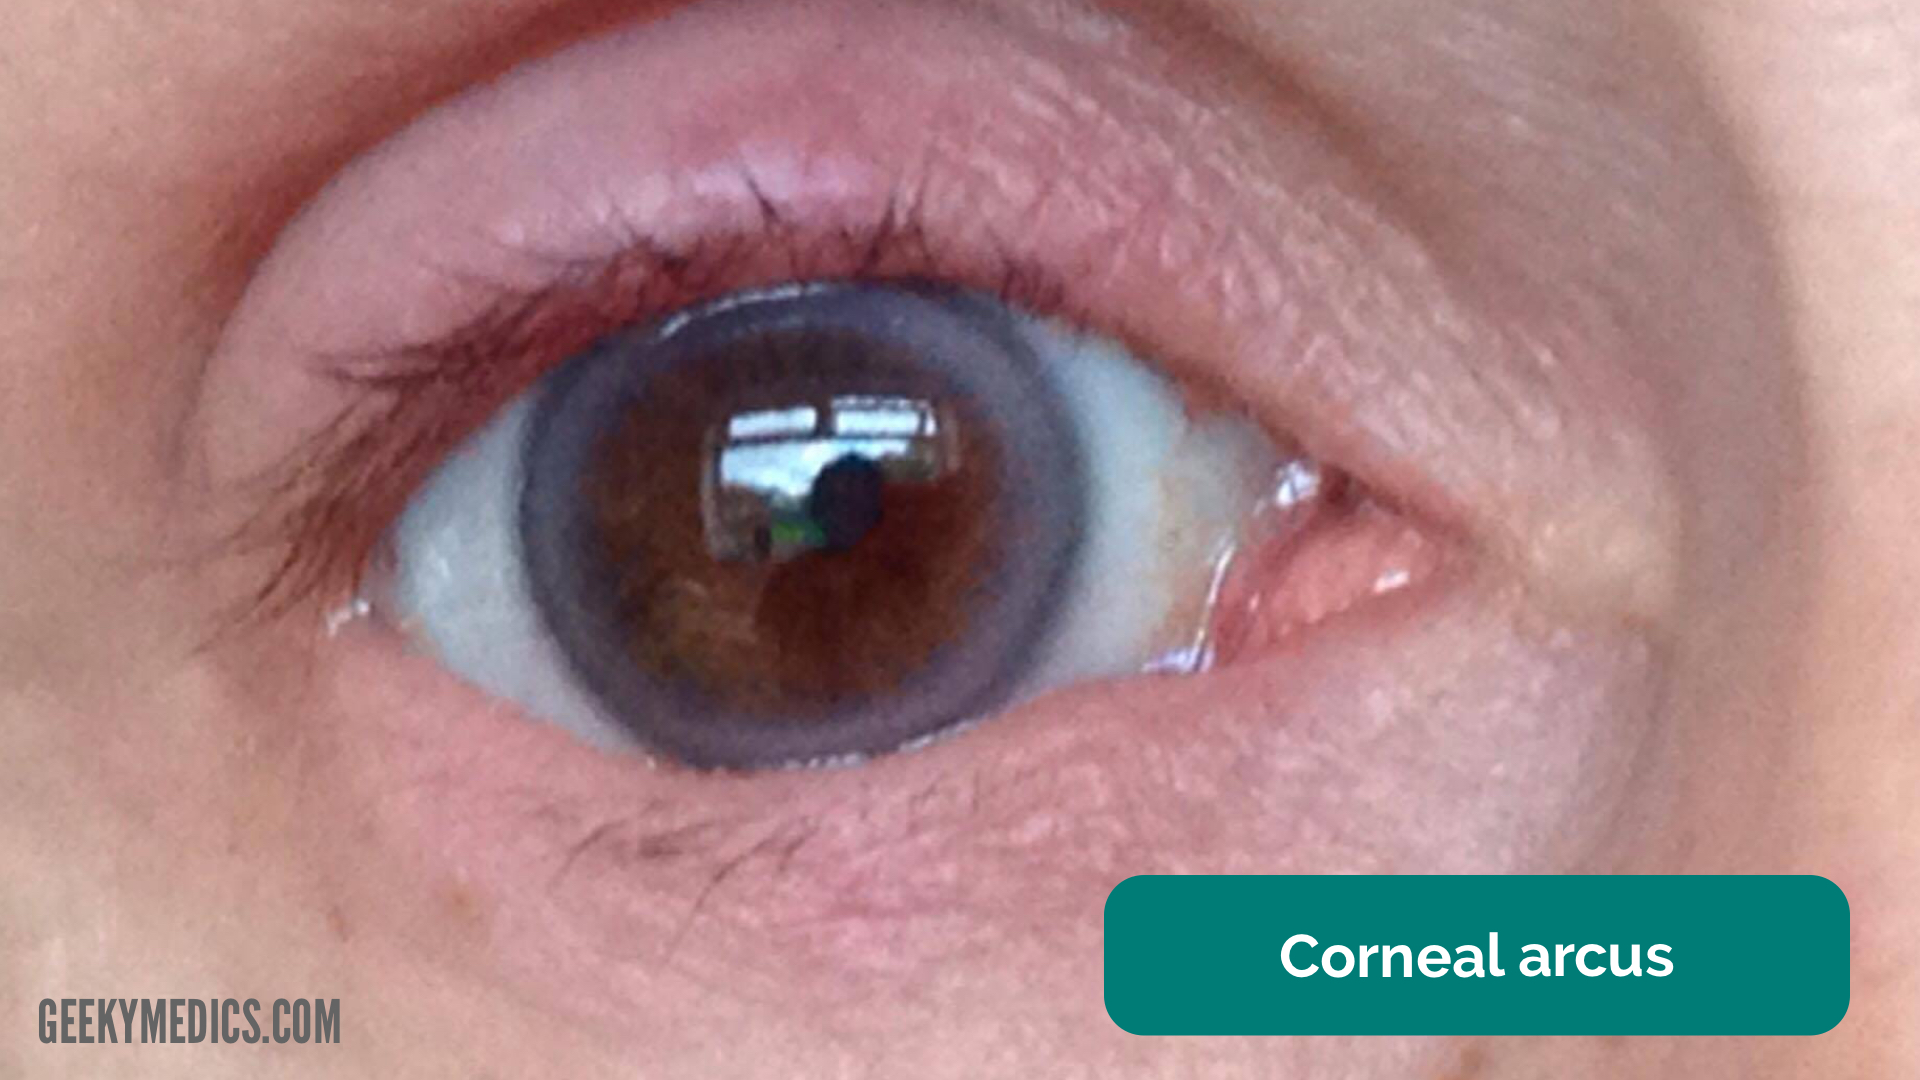
- Corneal arcus: a hazy white, grey or blue opaque ring located in the peripheral cornea, typically occurring in patients over the age of 60. In older patients, the condition is considered benign, however, its presence in patients under the age of 50 suggests underlying hypercholesterolaemia.
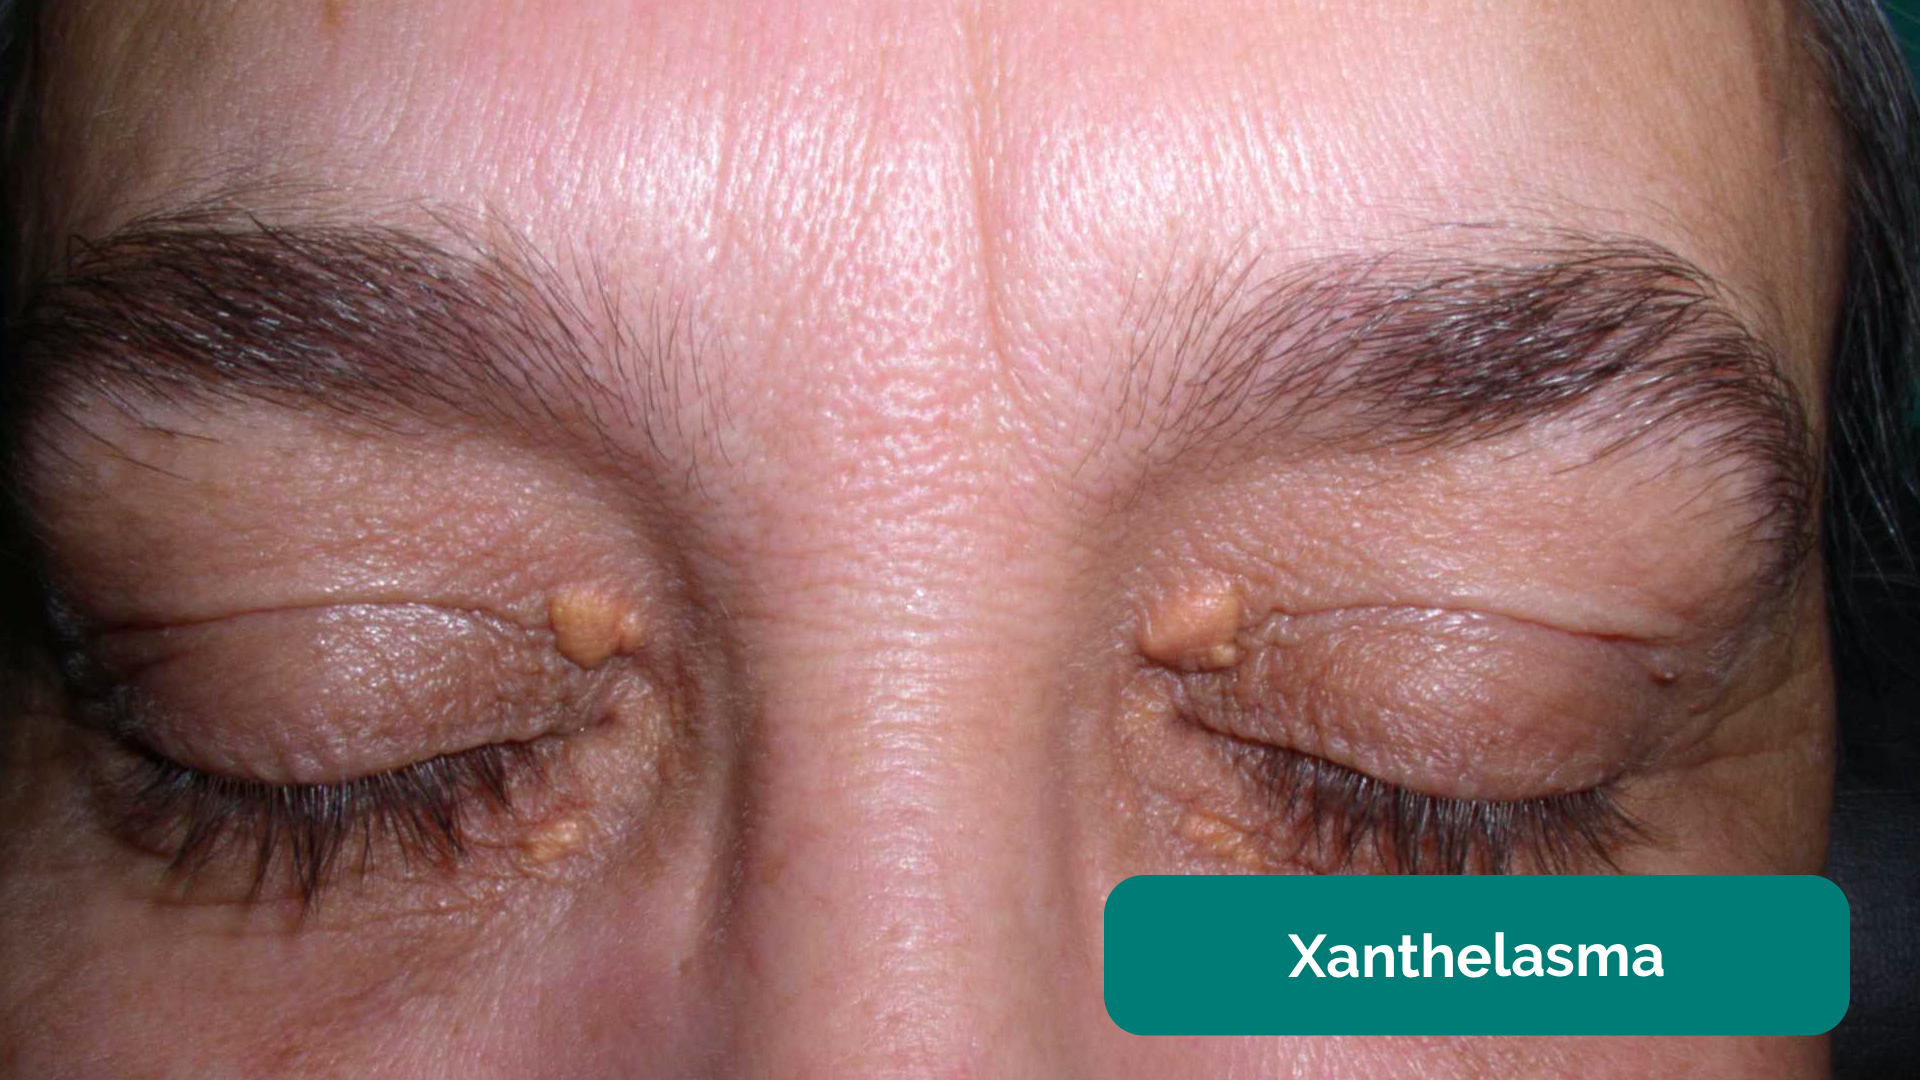
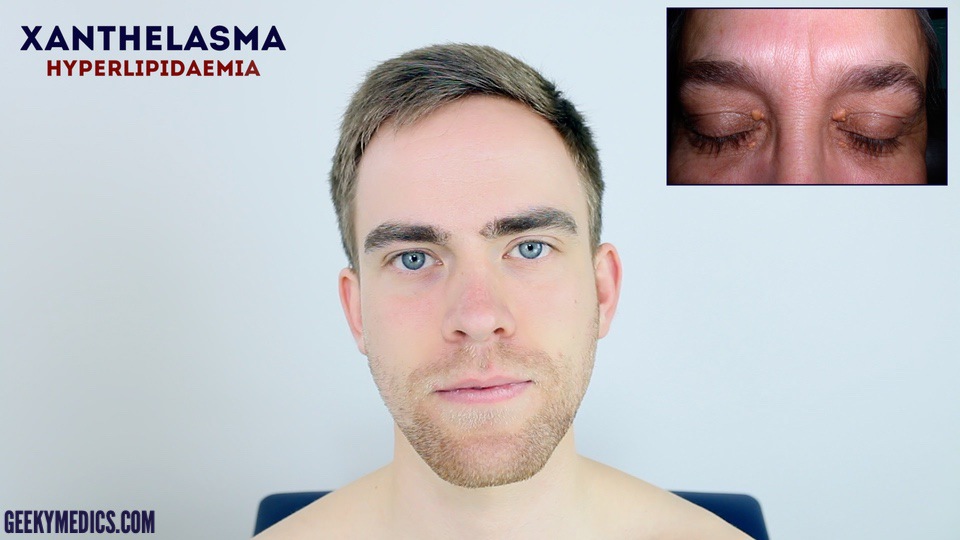
- Xanthelasma: yellow, raised cholesterol-rich deposits around the eyes associated with hypercholesterolaemia.
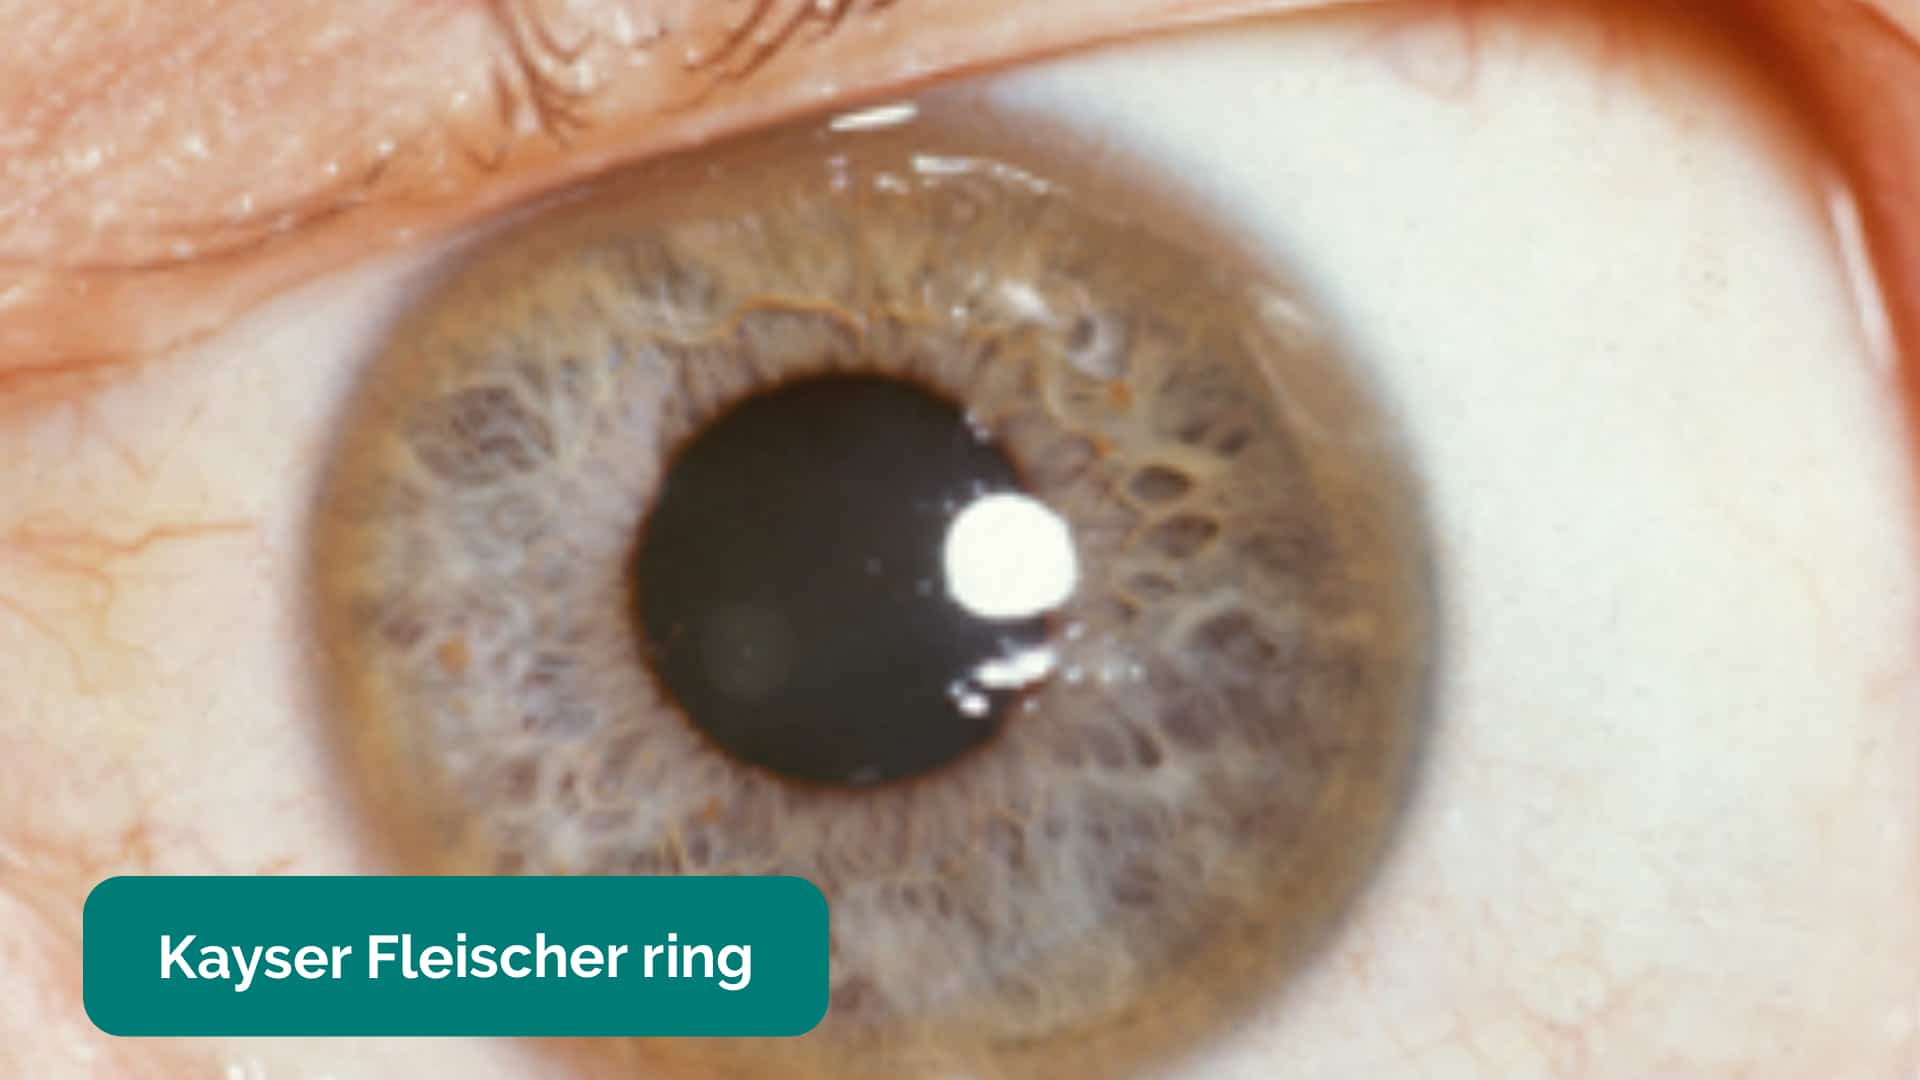
- Kayser-Fleischer rings: dark rings that encircle the iris associated with Wilson’s disease. The disease involves abnormal copper processing by the liver, resulting in accumulation and deposition in various tissues (including the heart where it can cause cardiomyopathy).
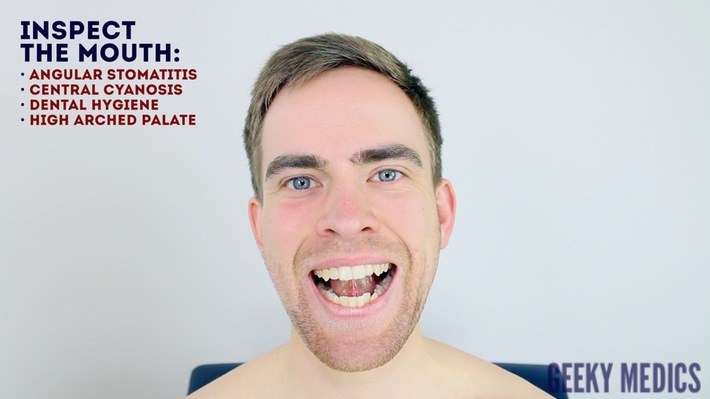
Mouth
Inspect the mouth for signs relevant to the cardiovascular system
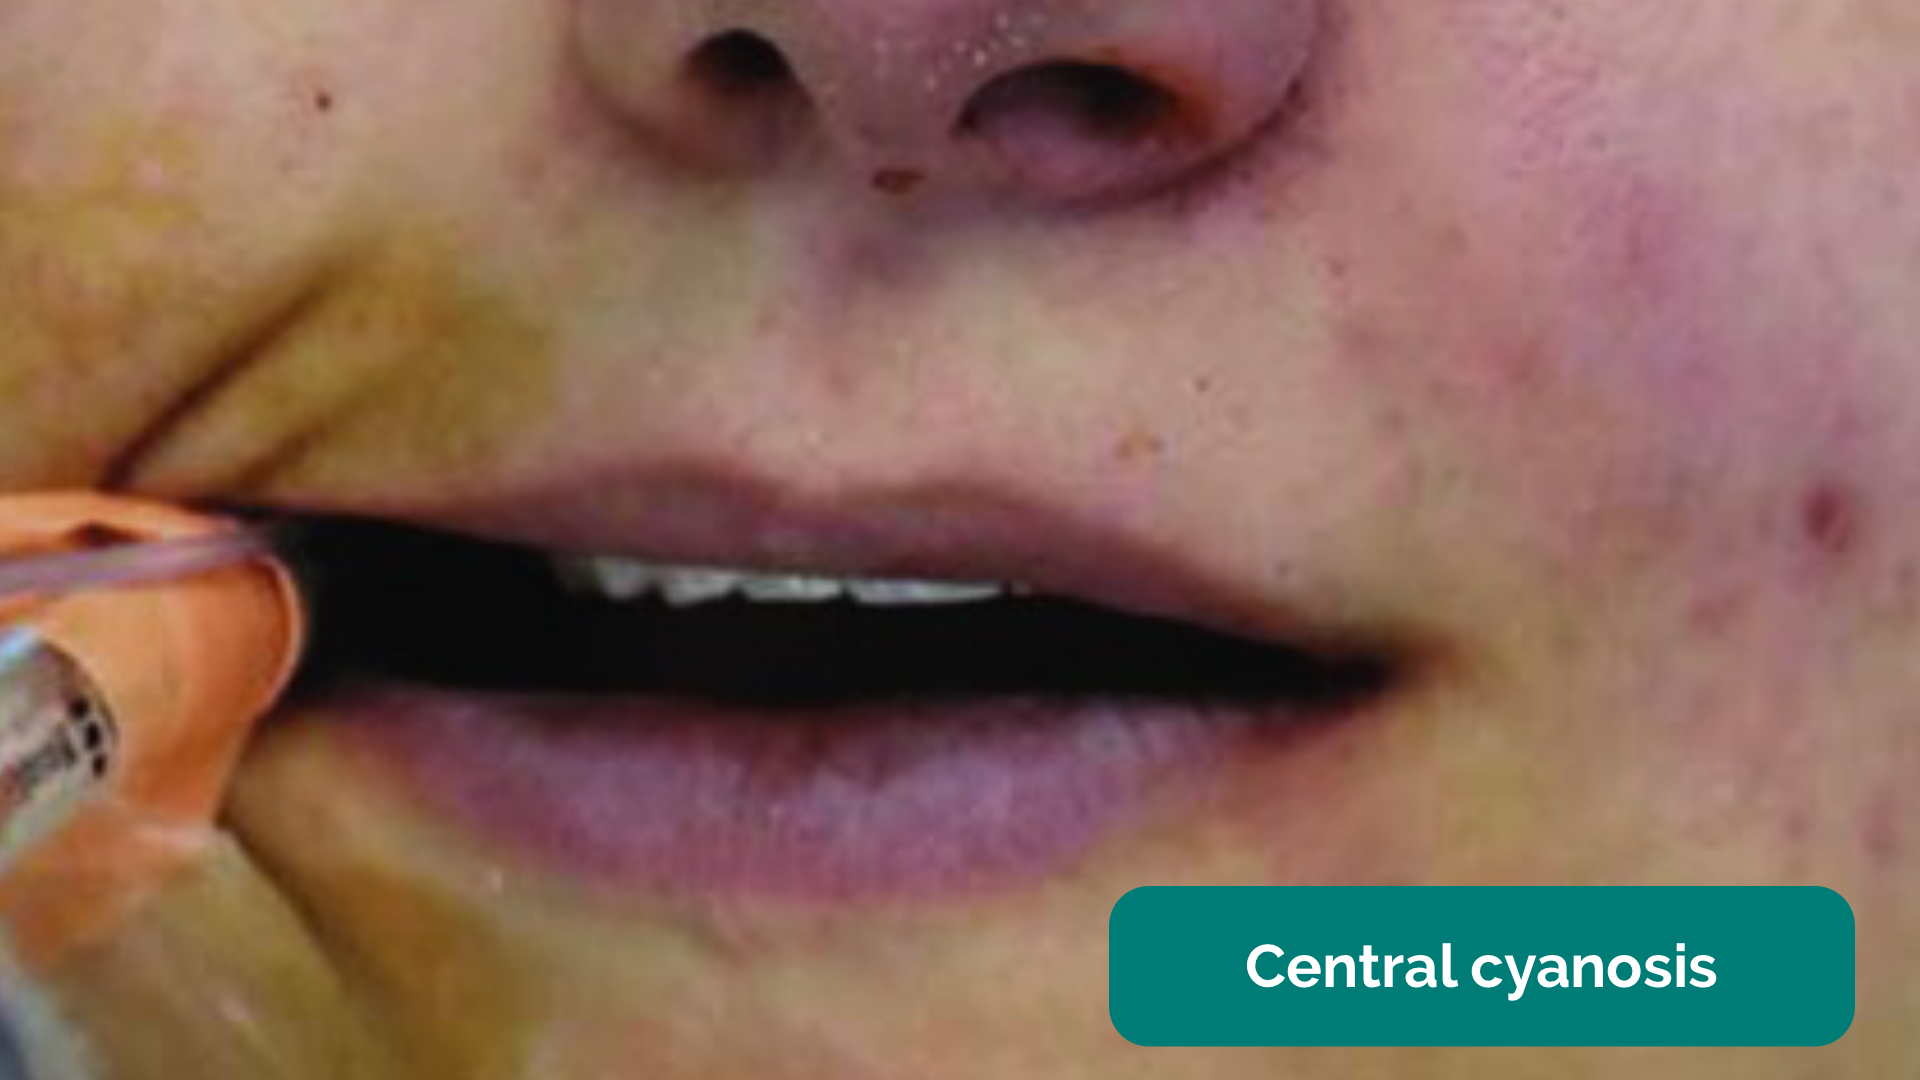
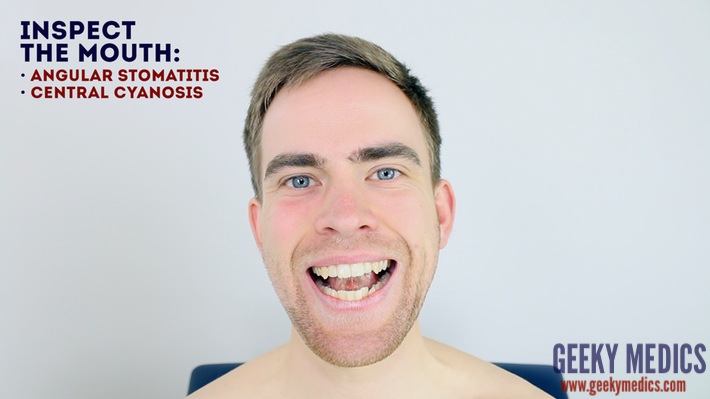
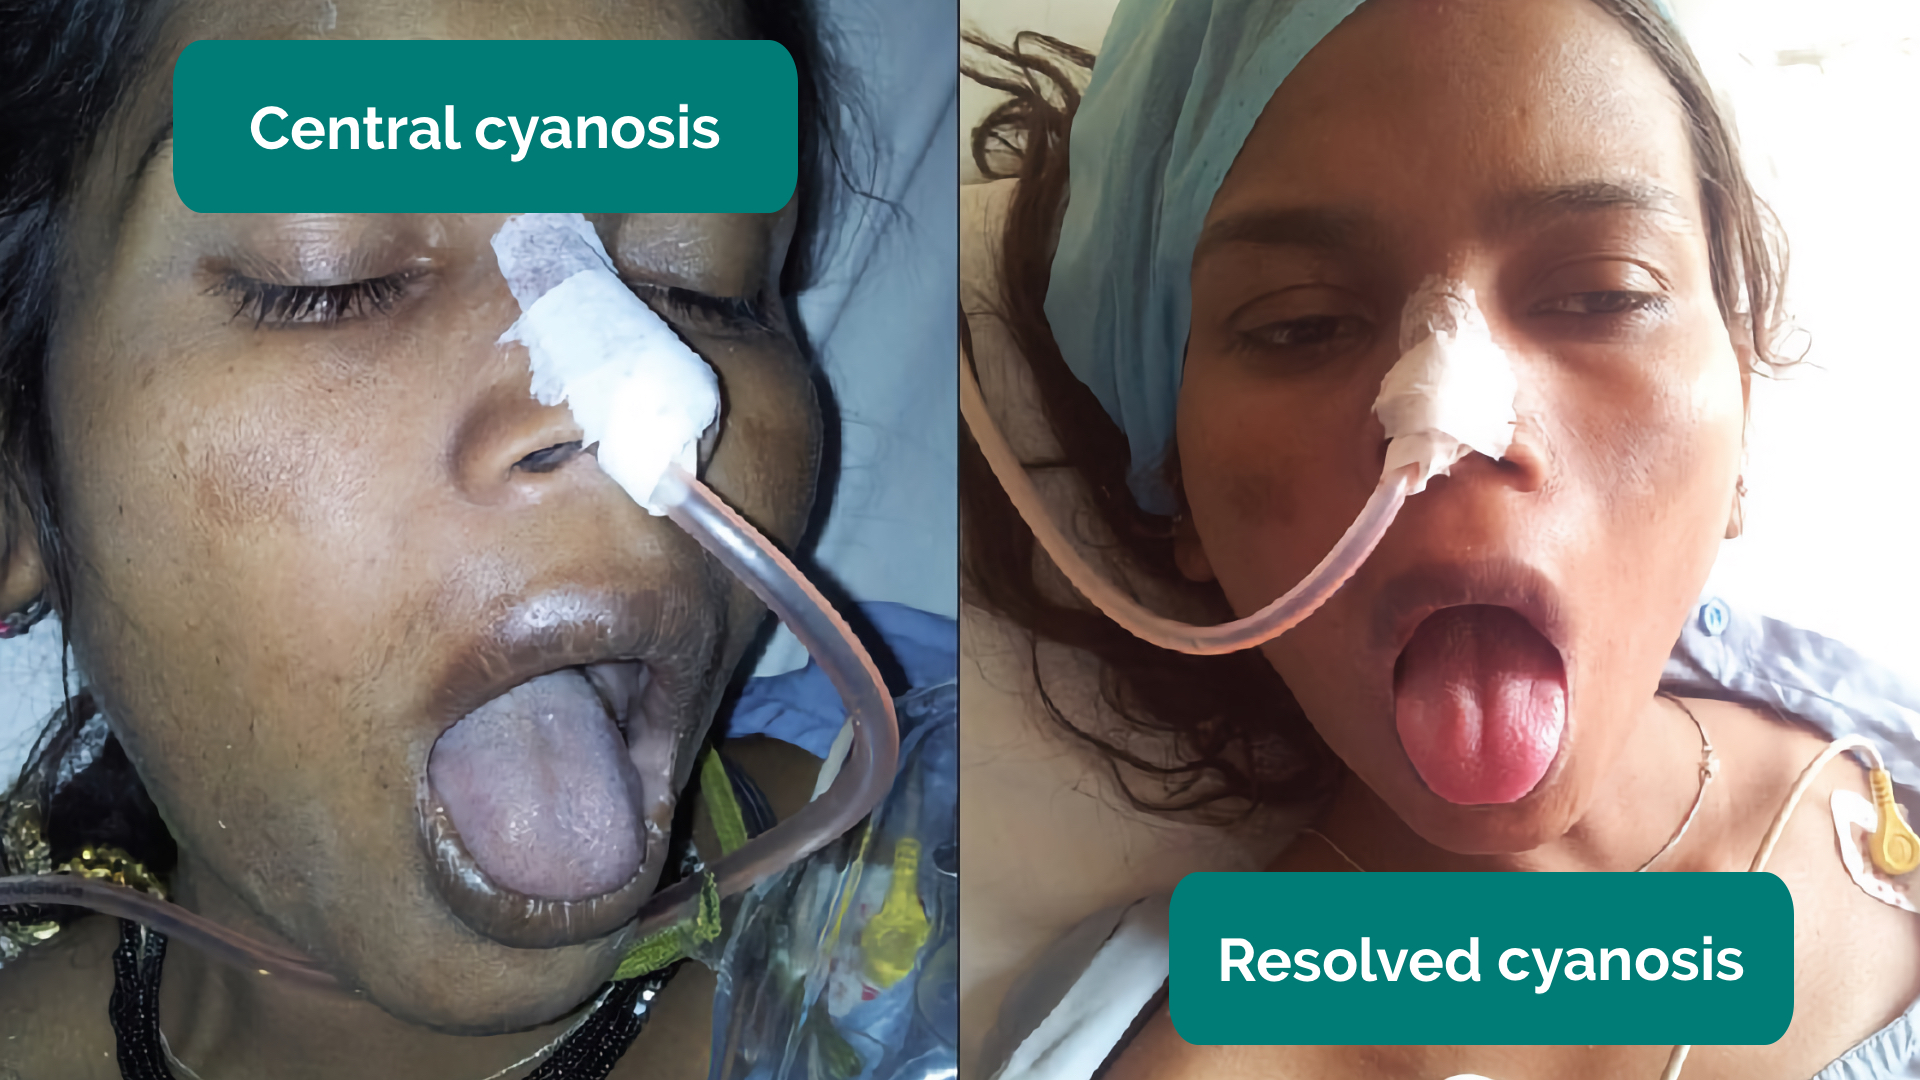
- Central cyanosis: bluish discolouration of the lips and/or the tongue associated with hypoxaemia (e.g. a right to left cardiac shunt)
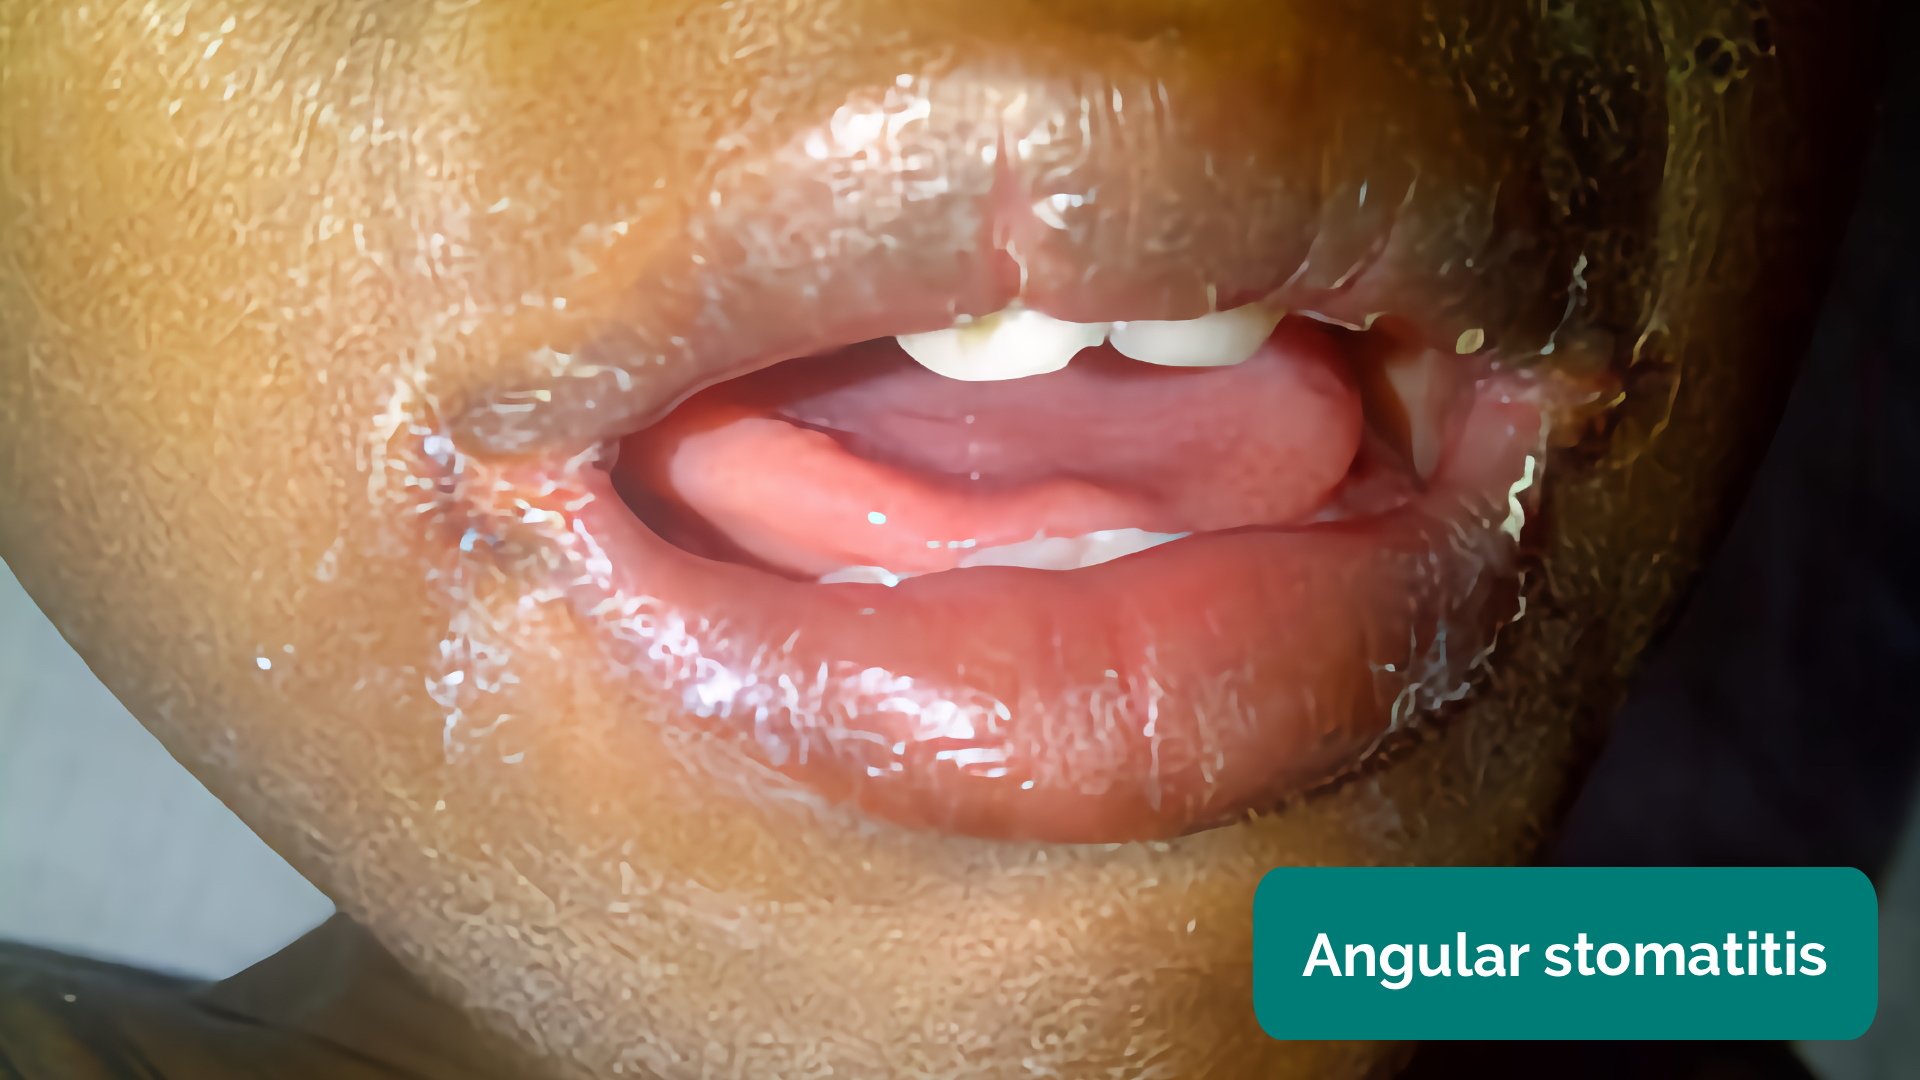
- Angular stomatitis: a common inflammatory condition affecting the corners of the mouth. It has a wide range of causes including iron deficiency.
- High arched palate: a feature of Marfan syndrome which is associated with mitral/aortic valve prolapse and aortic dissection.
- Dental hygiene: poor dental hygiene is a risk factor for infective endocarditis.
Inspect the eyes
Look for conjunctival pallor
Inspect the mouth
Conjunctival pallor
Corneal arcus
Xanthelasma 9
Kayser-Fleischer ring 10
Central cyanosis 11
Central cyanosis 14
Angular stomatitis 12
Angular stomatitis 15
Close inspection of the chest
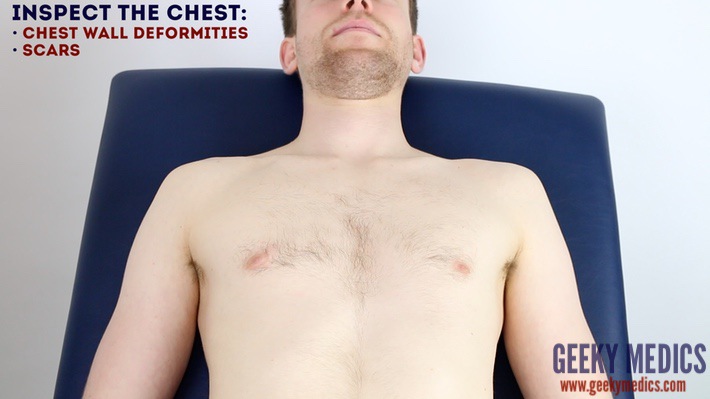
Closely inspect the anterior chest
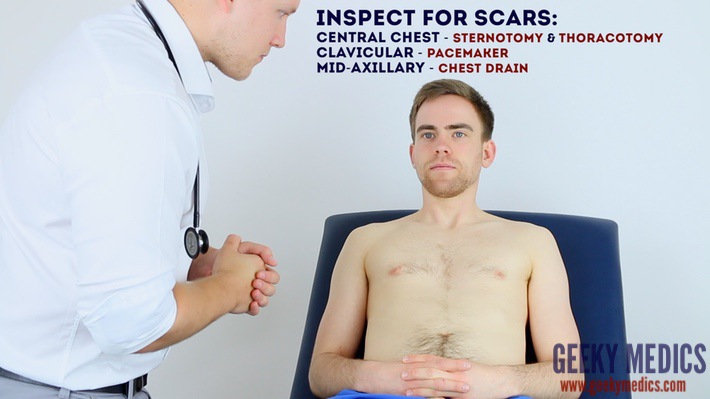
Look for clinical signs that may provide clues as to the patient’s past medical/surgical history:
- Scars suggestive of previous thoracic surgery: see the thoracic scars section below.
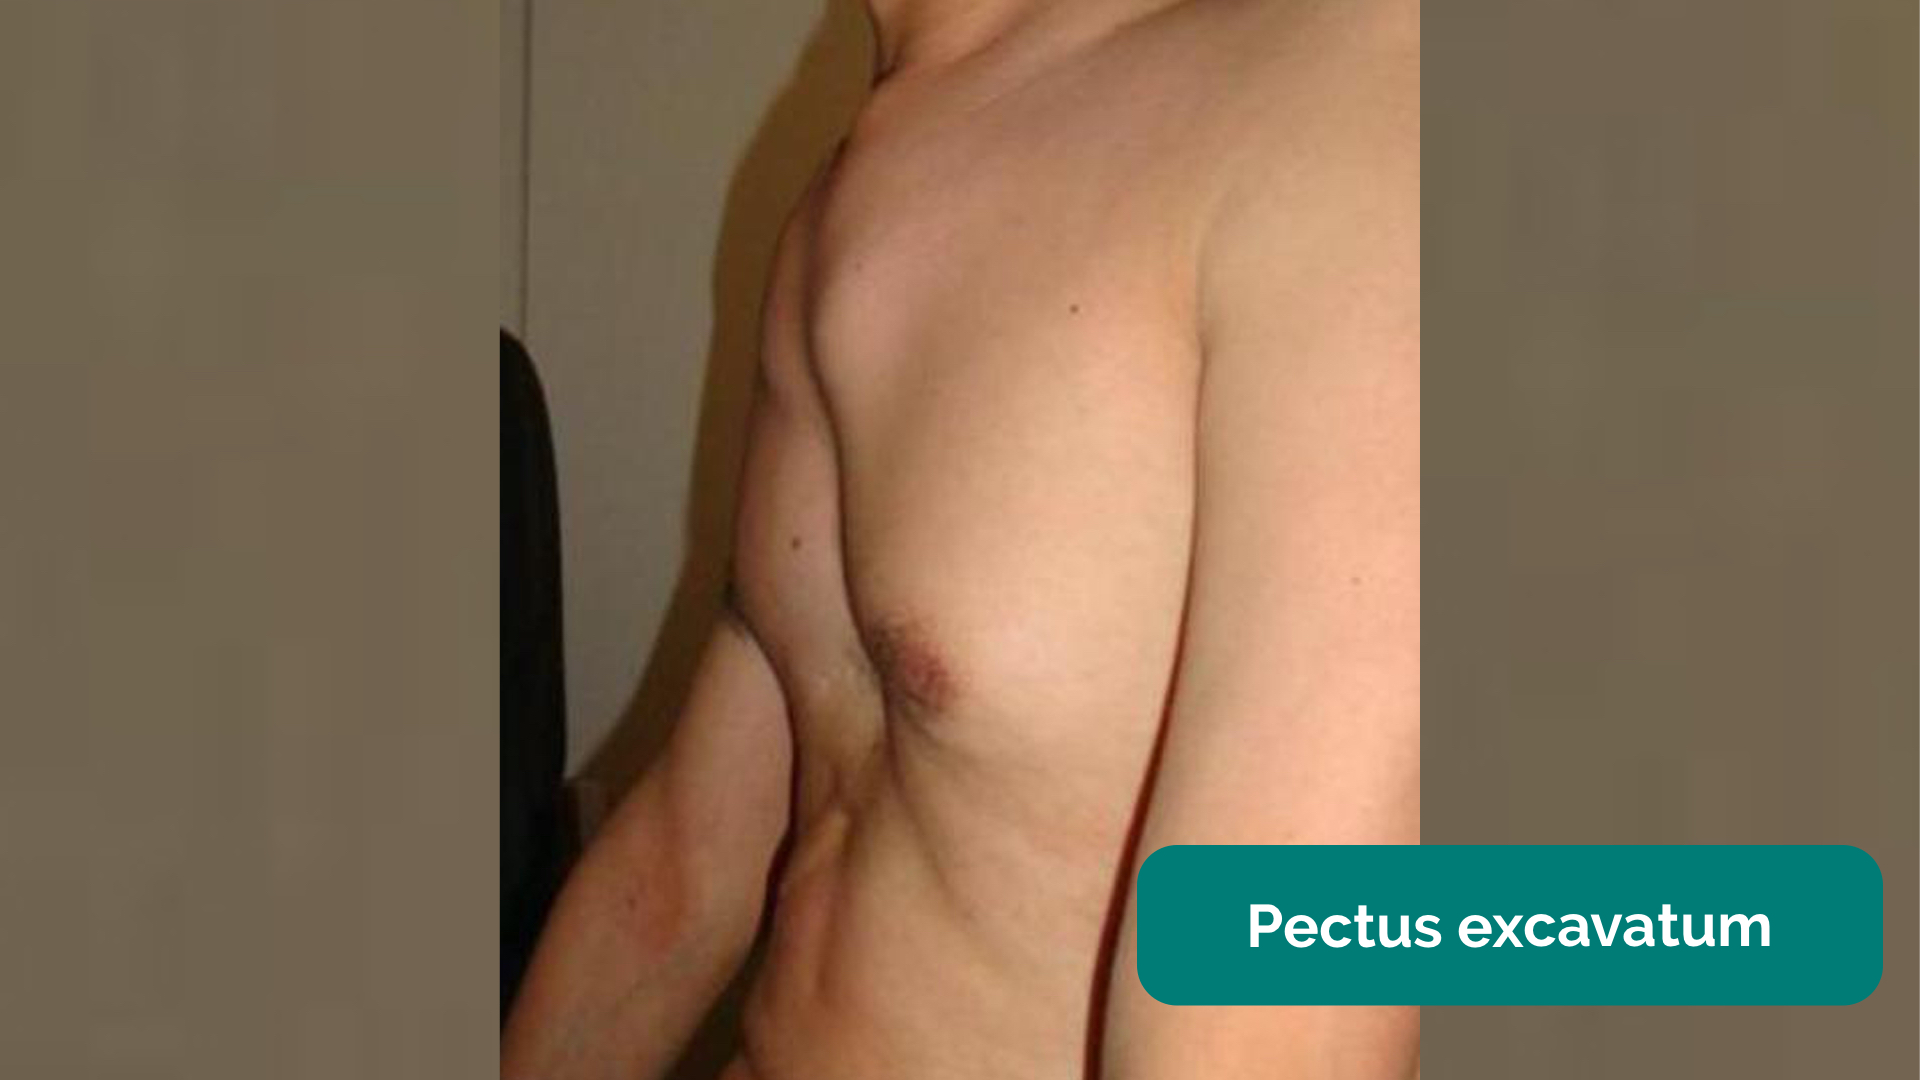
- Pectus excavatum: a caved-in or sunken appearance of the chest.
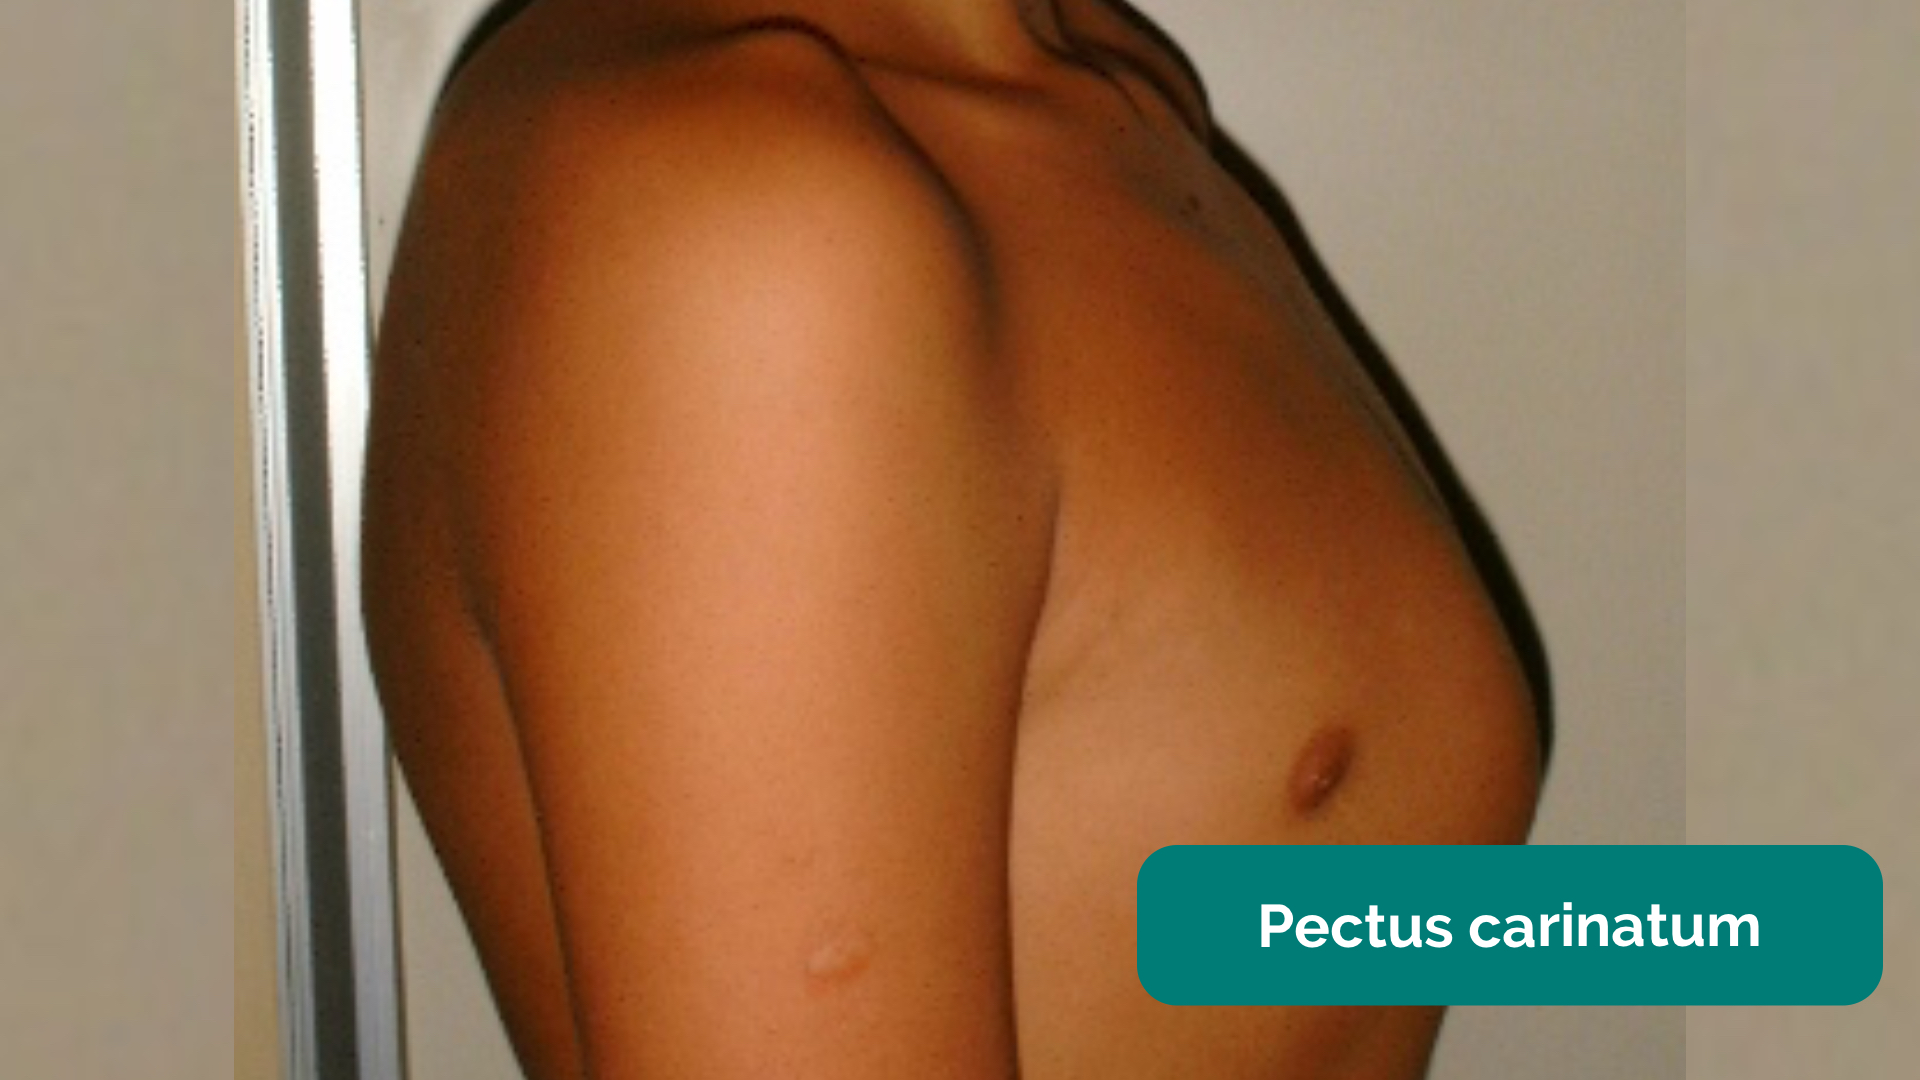
- Pectus carinatum: protrusion of the sternum and ribs.
- Visible pulsations: a forceful apex beat may be visible secondary to underlying ventricular hypertrophy.
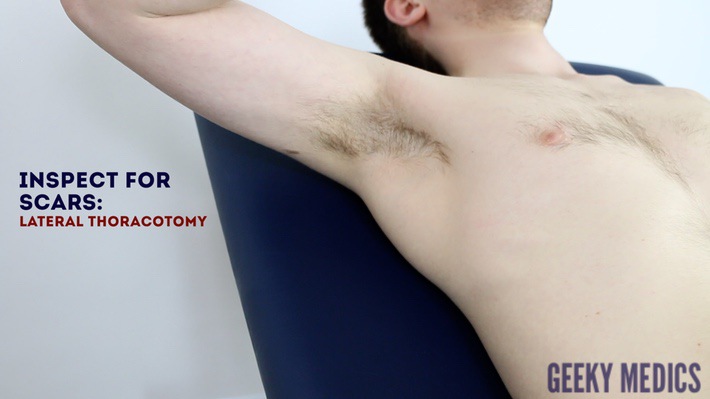
Thoracic scars
- Median sternotomy scar: located in the midline of the thorax. This surgical approach is used for cardiac valve replacement and coronary artery bypass grafts (CABG).
- Anterolateral thoracotomy scar: located between the lateral border of the sternum and the mid-axillary line at the 4th or 5th intercostal space. This surgical approach is used for minimally invasive cardiac valve surgery.
- Infraclavicular scar: located in the infraclavicular region (on either side). This surgical approach is used forpacemaker insertion.
- Left mid-axillary scar: this surgical approach is used for the insertion of a subcutaneous implantable cardioverter-defibrillator (ICD).
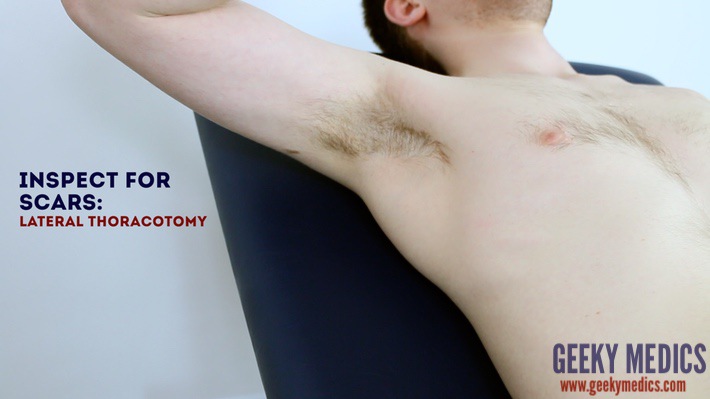
Inspect for thoracic scars
Inspect for lateral thoracotomy scars
Palpation
Palpate the chest to assess the location of the apex beat and to identify heaves or thrills.
Apex beat
- Palpate the apex beat with your fingers placed horizontally across the chest.
- In healthy individuals, it is typically located in the 5th intercostal space in the midclavicular line. Ask the patient to lift their breast to allow palpation of the appropriate area if relevant.
- Displacement of the apex beat from its usual location can occur due to ventricular hypertrophy.
Heaves
- A parasternal heave is a precordial impulse that can be palpated.
- Place the heel of your hand parallel to the left sternal edge (fingers vertical) to palpate for heaves.
- If heaves are present you should feel the heel of your hand being lifted with each systole.
- Parasternal heaves are typically associated with right ventricular hypertrophy.
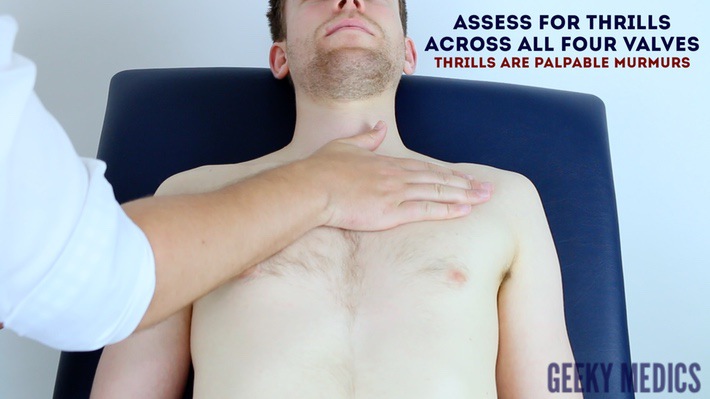
Thrills
- A thrill is a palpable vibration caused by turbulent blood flow through a heart valve (a thrill is a palpable murmur).
- You should assess for a thrill across each of the heart valves in turn (see valve locations below).
- To do this place your hand horizontally across the chest wall, with the flats of your fingers and palm over the valve to be assessed.
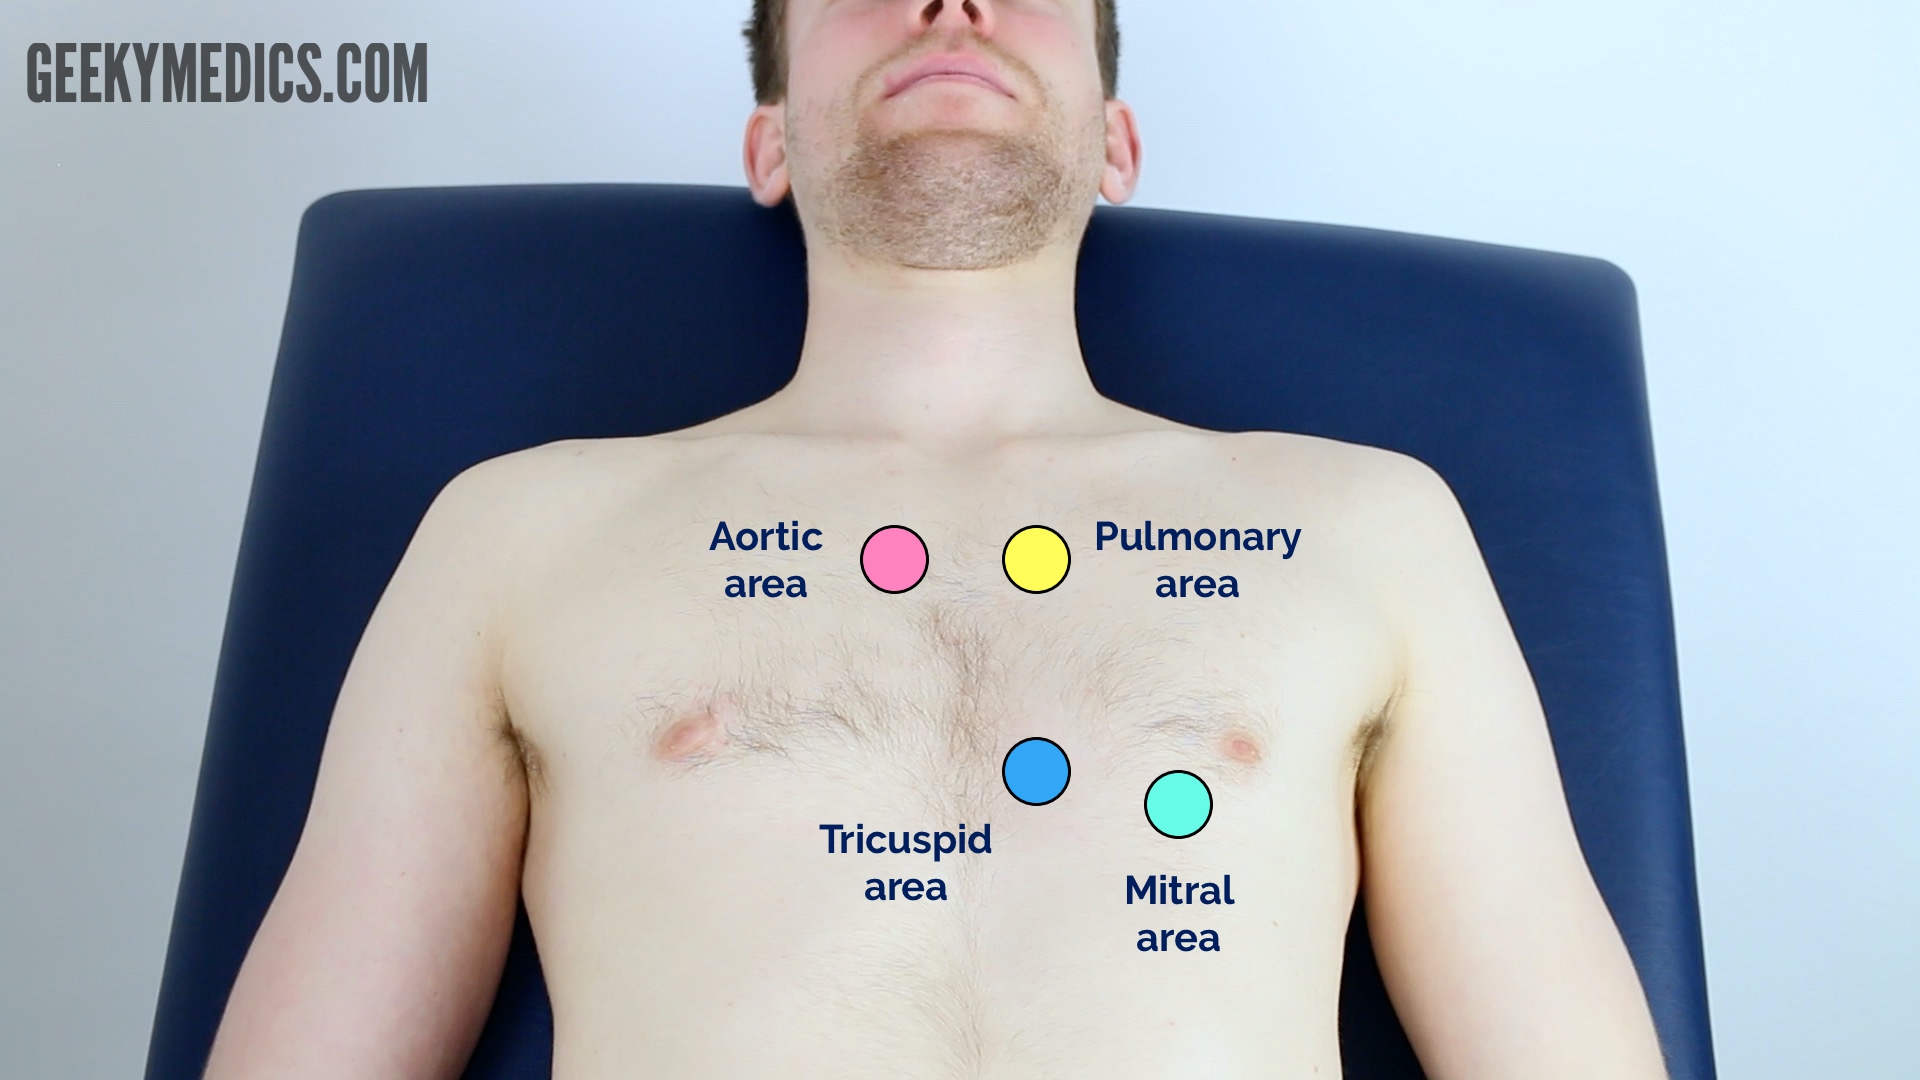
Valve locations
- Mitral valve: 5th intercostal space in the midclavicular line.
- Tricuspid valve: 4th or 5th intercostal space at the lower left sternal edge.
- Pulmonary valve: 2nd intercostal space at the left sternal edge.
- Aortic valve: 2nd intercostal space at the right sternal edge.
Palpate the apex beat
Assess for a parasternal heave
Assess for thrills
Heart valve locations
Auscultation
Auscultate the four heart valves
A systematic routine will ensure you remember all the steps whilst giving you several chances to listen to each valve area. Your routine should avoid excess repetition whilst each step should ‘build’ upon the information gathered by the previous steps. Ask the patient to lift their breast to allow auscultation of the appropriate area if relevant.
1. Palpate the carotid pulse to determine the first heart sound.
2. Auscultate ‘upwards’ through the valve areas using the diaphragm of the stethoscope whilst continuing to palpate the carotid pulse:
- Mitral valve: 5th intercostal space in the midclavicular line.
- Tricuspid valve: 4th or 5th intercostal space at the lower left sternal edge.
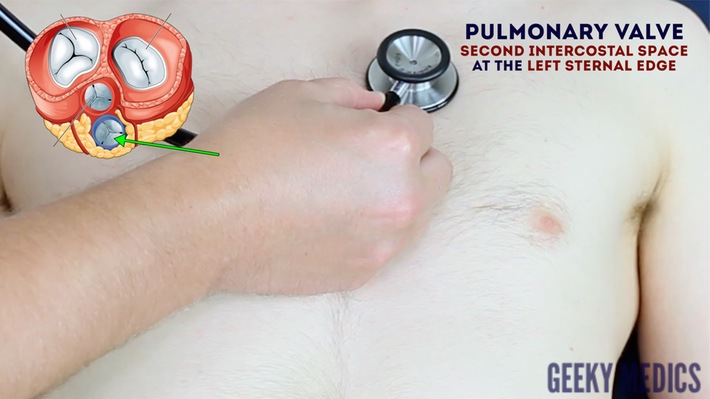
- Pulmonary valve: 2nd intercostal space at the left sternal edge.
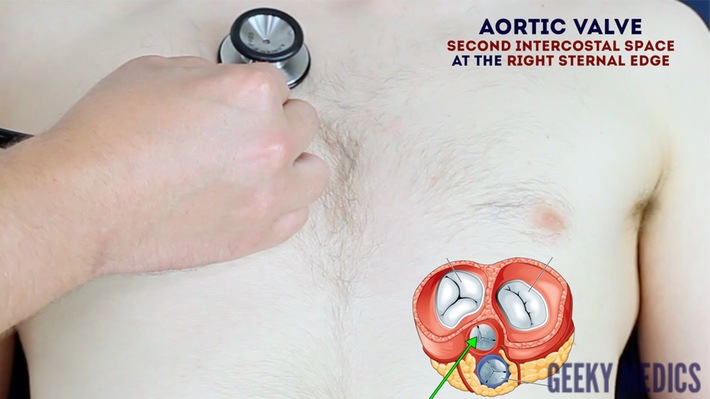
- Aortic valve: 2nd intercostal space at the right sternal edge.
3. Repeat auscultation across the four valves with the bell of the stethoscope.
Accentuation manoeuvres
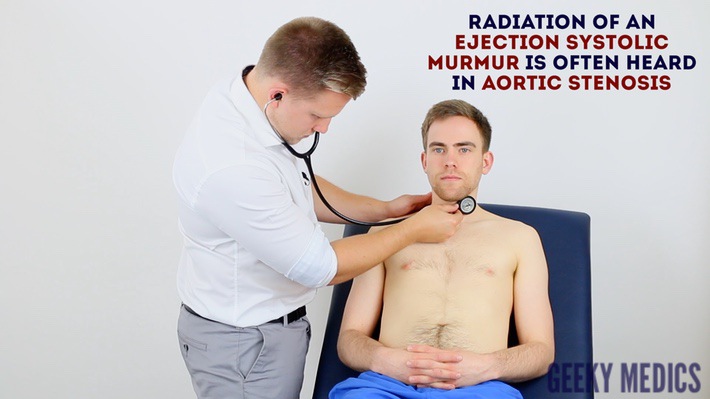
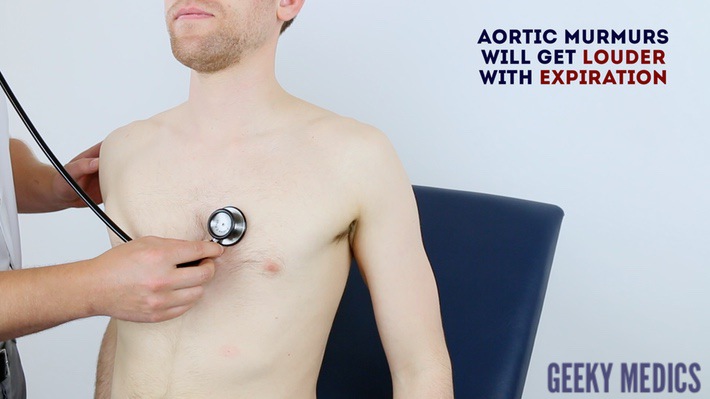
4. Auscultate the carotid arteries using the diaphragm of the stethoscope whilst the patient holds their breath to listen for radiation of an ejection systolic murmur caused by aortic stenosis.
5. Sit the patient forwards and auscultate over the lower left sternal border (3rd/4th intercostal space) with the diaphragm of the stethoscope during expiration to listen for an early diastolic murmur caused by aortic regurgitation.
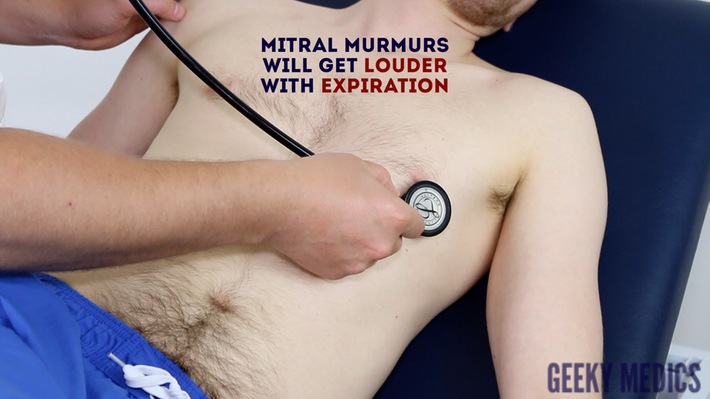
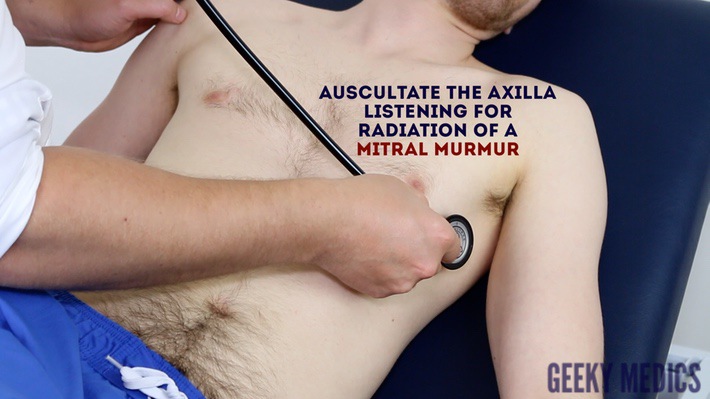
6. Roll the patient onto their left side and listen over the mitral area with the diaphragm of the stethoscope during expiration to listen for a pansystolic murmur caused by mitral regurgitation. Continue to auscultate into the axilla to identify radiation of this murmur.
7. With the patient still on their left side, listen again over the mitral area using the bell of the stethoscope during expiration for a mid-diastolic murmur caused by mitral stenosis.
Bell vs diaphragm
The bell of the stethoscope is more effective at detecting low-frequency sounds, including the mid-diastolic murmur of mitral stenosis.
The diaphragm of the stethoscope is more effective at detecting high-frequency sounds, including the ejection systolic murmur of aortic stenosis, the early diastolic murmur of aortic regurgitation and the pansystolic murmur of mitral regurgitation.
Palpate the carotid pulse to identify the first heart sound
Auscultate the mitral valve
Auscultate the tricuspid valve
Auscultate the pulmonary valve
Auscultate over the aortic valve
Repeat auscultation of the four heart valves using the bell of the stethoscope
Auscultate the carotid arteries for radiation of a murmur
Sit the patient forwards and auscultate over the aortic area with the diaphragm of the stethoscope during expiration
Auscultate over the mitral area
Auscultate the axilla listening for radiation of a mitral murmur
Final steps
Posterior chest wall
Inspection
Inspect the posterior chest wall for any deformities or scars (e.g. posterolateral thoracotomy scar associated with previous lung surgery).
Auscultation
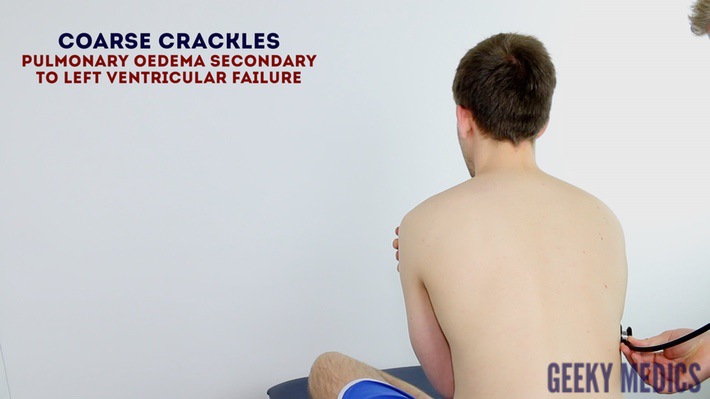
Auscultate the lung fields posteriorly:
- Coarse crackles are suggestive of pulmonary oedema (associated with left ventricular failure).
- Absent air entry and stony dullness on percussion are suggestive of an underlying pleural effusion (associated with left ventricular failure).
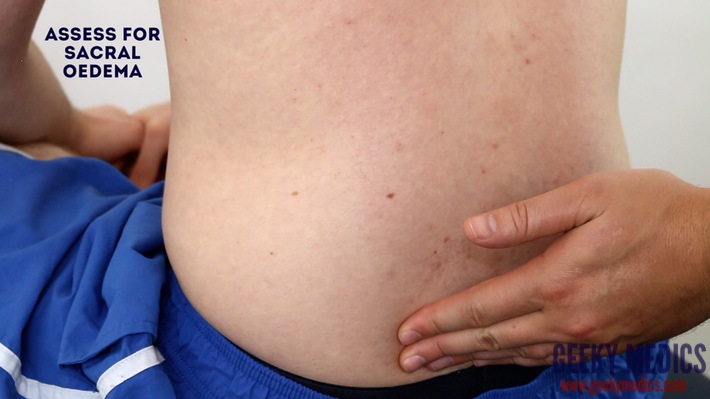
Sacral oedema
Inspect and palpate the sacrum for evidence of pitting oedema.
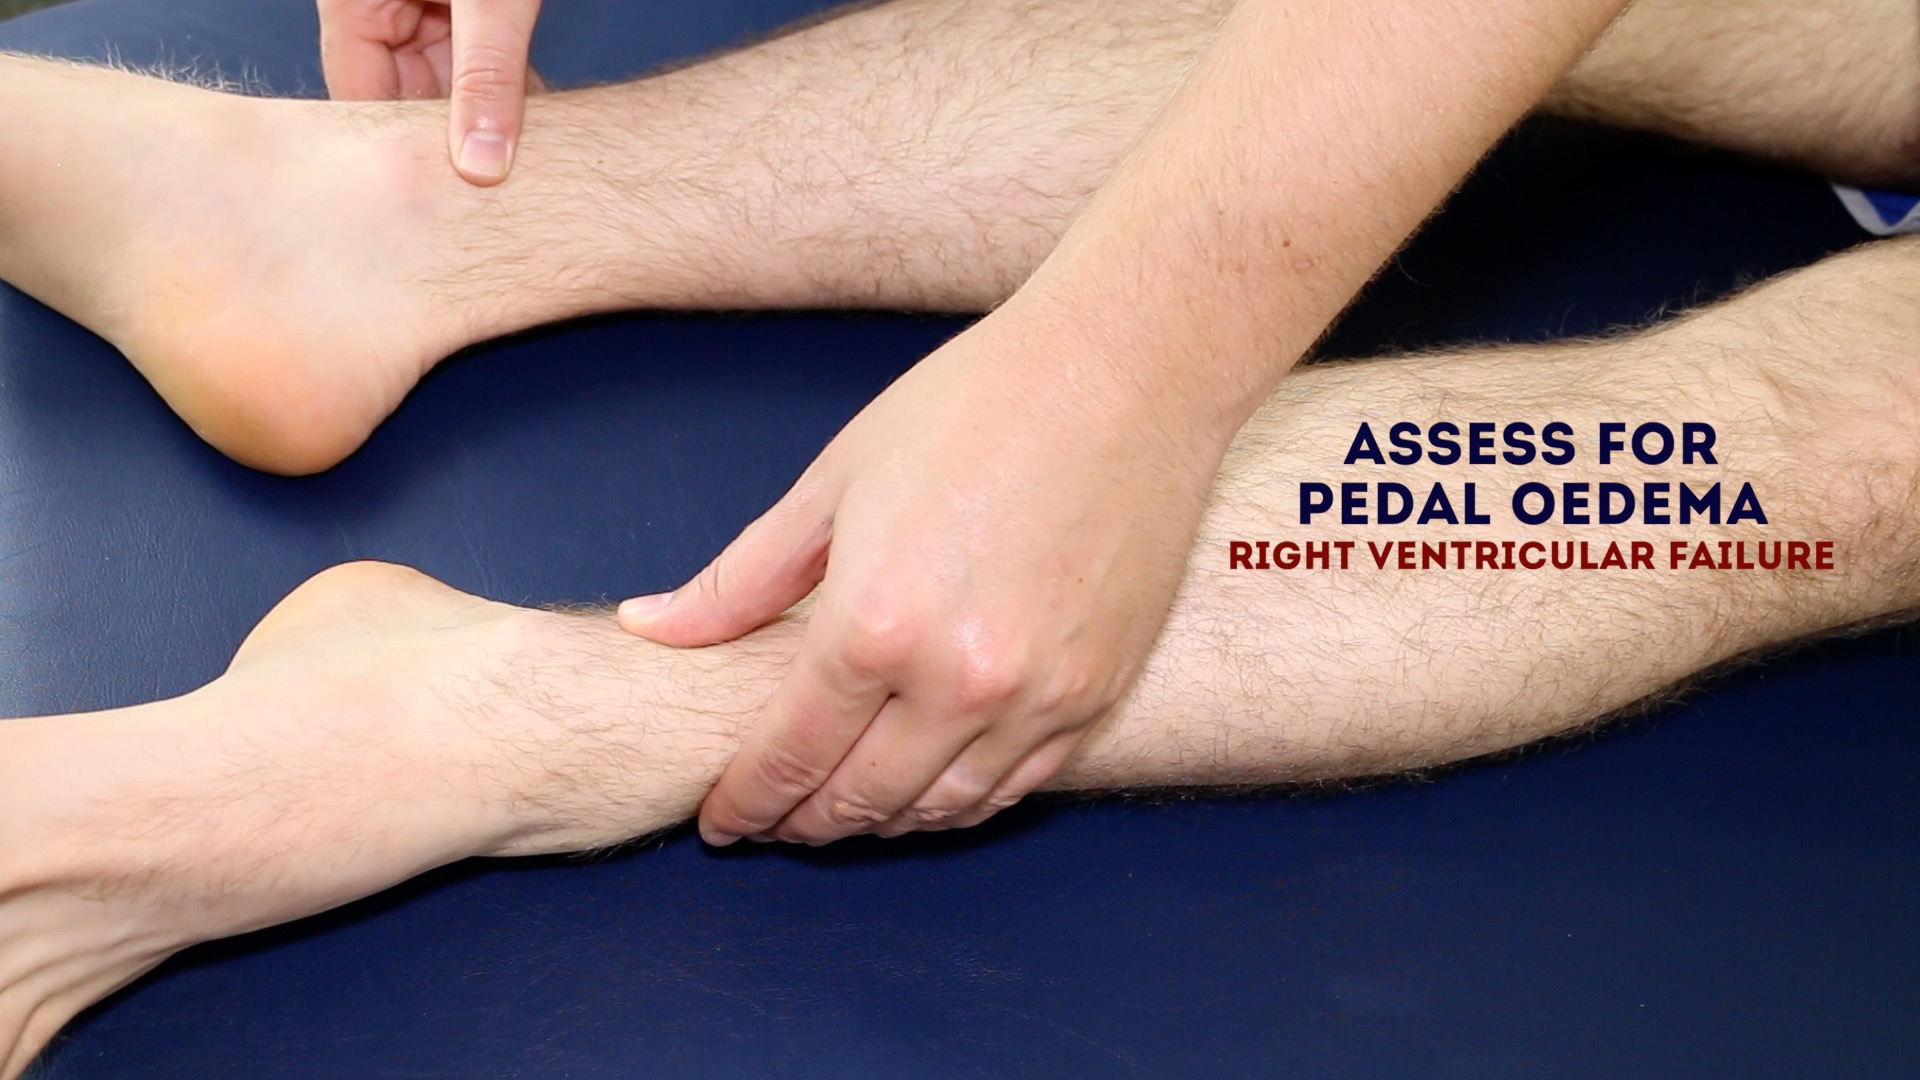
Legs
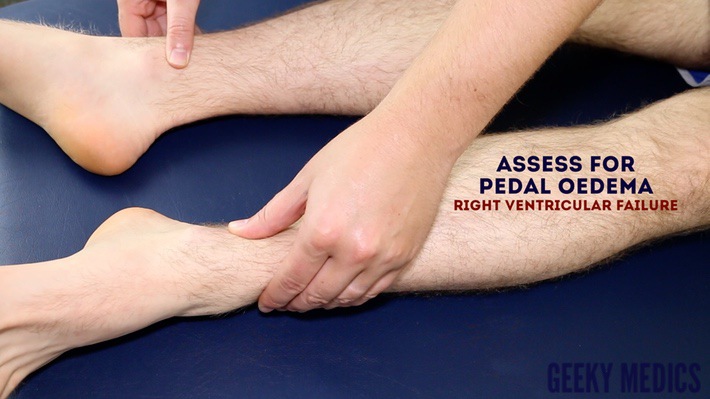
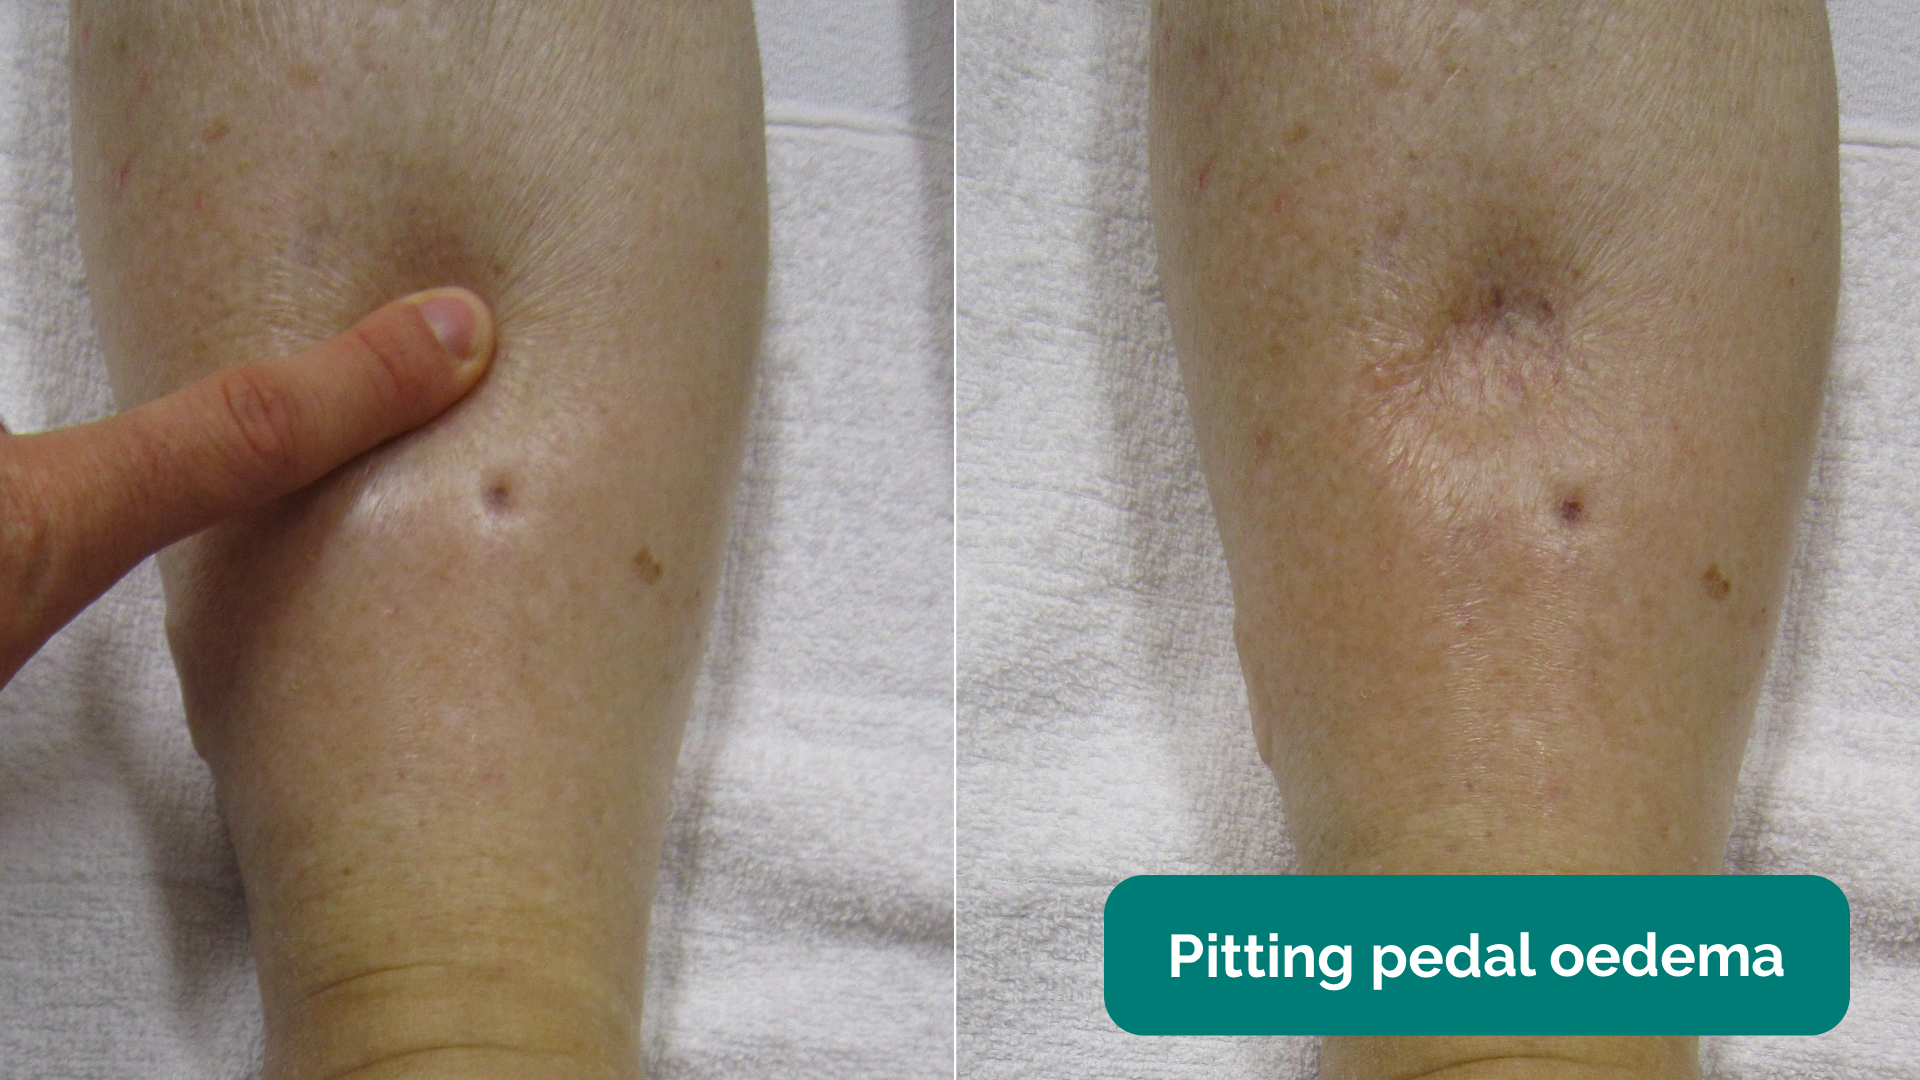
Inspect and palpate the patient’s ankles for evidence of pitting pedal oedema (associated with right ventricular failure).
Inspect the patient’s legs for evidence of saphenous vein harvesting (performed as part of a coronary artery bypass graft).
Auscultate the posterior lung fields
Palpate for sacral oedema
Assess for pedal oedema
Pitting pedal oedema 13
Lung examination
Clinical signs
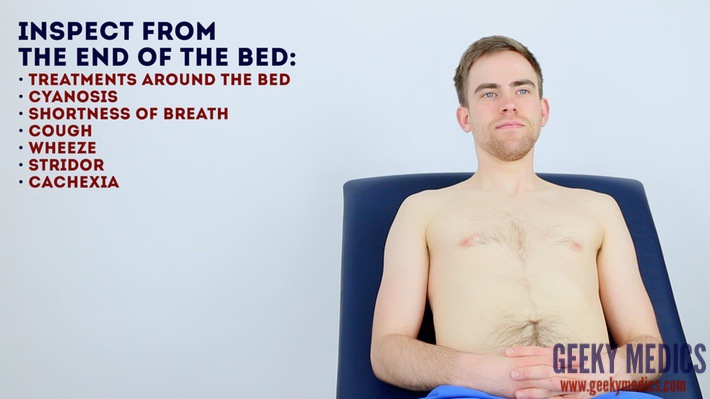
Inspect the patient from the end of the bed whilst at rest, looking for clinical signs suggestive of underlying pathology:
- Age: the patient’s approximate age is helpful when considering the most likely underlying pathology, with younger patients more likely to have diagnoses such as asthma or cystic fibrosis (CF) and older patients more likely to have chronic obstructive pulmonary disease (COPD), interstitial lung disease or malignancy.
- Cyanosis: bluish discolouration of the skin due to poor circulation (e.g. peripheral vasoconstriction secondary to hypovolaemia) or inadequate oxygenation of the blood (e.g. right-to-left cardiac shunting).
- Shortness of breath: signs may include nasal flaring, pursed lips, use of accessory muscles, intercostal muscle recession and the tripod position (sitting or standing leaning forward and supporting the upper body with hands on knees or other surfaces). Shortness of breath is a common feature of most respiratory pathology, however possible underlying diagnoses in an OSCE could include asthma, pulmonary oedema, pulmonary fibrosis, lung cancer and COPD. The inability to speak in full sentences is an indicator of significant shortness of breath.
- Cough: a productive cough can be associated with several respiratory pathologies including pneumonia, bronchiectasis, COPD and CF. A dry cough may suggest a diagnosis of asthma or interstitial lung disease.
- Wheeze: a continuous, coarse, whistling sound produced in the respiratory airways during breathing. Wheeze is often associated with asthma, COPD and bronchiectasis.
- Stridor: a high-pitched extra-thoracic breath sound resulting from turbulent airflow through narrowed upper airways. Stridor has a wide range of causes, including foreign body inhalation (acute) and subglottic stenosis (chronic).
- Pallor: a pale colour of the skin that can suggest underlying anaemia (e.g. haemorrhage/chronic disease) or poor perfusion (e.g. congestive cardiac failure). It should be noted that healthy individuals may have a pale complexion that mimics pallor.
- Oedema: typically presents with swelling of the limbs (e.g. pedal oedema) or abdomen (i.e. ascites) and is often associated with right ventricular failure. Pulmonary oedema often occurs secondary to left ventricular failure.
- Cachexia: ongoing muscle loss that is not entirely reversed with nutritional supplementation. Cachexia is commonly associated with underlying malignancy (e.g. lung cancer) and other end-stage respiratory diseases (e.g. COPD).
Objects and equipment
Look for objects or equipment on or around the patient that may provide useful insights into their medical history and current clinical status:
- Oxygen delivery devices: note the type of oxygen device (e.g. Venturi mask, non-rebreathing mask, nasal cannulae) and the current flow rate of oxygen (e.g. 2L, 4L, 10L, 15L). Look for other forms of respiratory support such as CPAP or BiPAP.
- Sputum pot: note the volume and colour of the contents (e.g. COPD/bronchiectasis).
- Other medical equipment: ECG leads, medications (e.g. inhalers/nebulisers in asthma/COPD), catheters (note volume/colour of urine) and intravenous access.
- Cigarettes or vaping equipment: smoking is a significant risk factor for lung cancer and chronic lung disease (e.g. COPD).
- Mobility aids: items such as wheelchairs and walking aids give an indication of the patient’s current mobility status.
- Vital signs: charts on which vital signs are recorded will give an indication of the patient’s current clinical status and how their physiological parameters have changed over time.
- Fluid balance: fluid balance charts will give an indication of the patient’s current fluid status which may be relevant if a patient appears fluid overloaded or dehydrated.
- Prescriptions: prescribing charts or personal prescriptions can provide useful information about the patient’s recent medications.
Perform general inspection
Hands
The hands can provide lots of clinically relevant information and therefore a focused, structured assessment is essential.
Inspection
General observations
Observe the hands and note your findings:
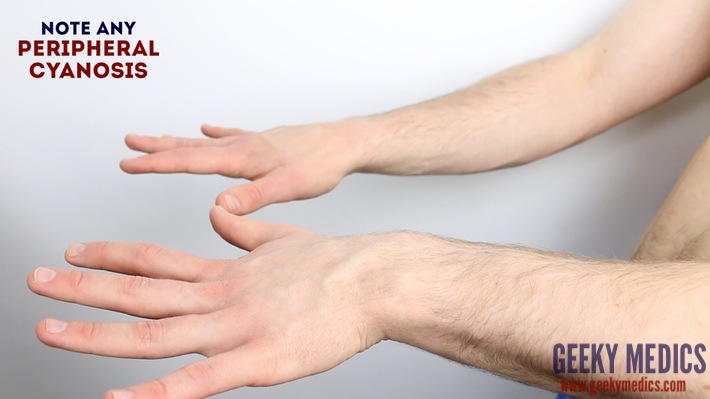
- Colour: cyanosis of the hands may suggest underlying hypoxaemia.
- Tar staining: caused by smoking, a significant risk factor for respiratory disease (e.g. COPD, lung cancer).
- Skin changes: bruising and thinning of the skin can be associated with long-term steroid use (e.g. asthma, COPD, interstitial lung disease).
- Joint swelling or deformity: may be associated with rheumatoid arthritis which has several extra-articular manifestations that affect the respiratory system (e.g. pleural effusions/pulmonary fibrosis).
Finger clubbing
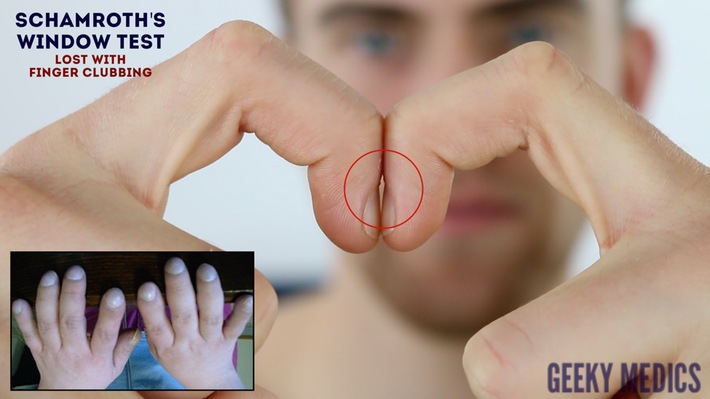
Finger clubbing involves uniform soft tissue swelling of the terminal phalanx of a digit with subsequent loss of the normal angle between the nail and the nail bed. Finger clubbing is associated with several underlying disease processes, but those most likely to appear in a respiratory OSCE station include lung cancer, interstitial lung disease, cystic fibrosis and bronchiectasis.
To assess for finger clubbing:
- Ask the patient to place the nails of their index fingers back to back.
- In a healthy individual, you should be able to observe a small diamond-shaped window (known as Schamroth’s window).
- When finger clubbing develops, this window is lost
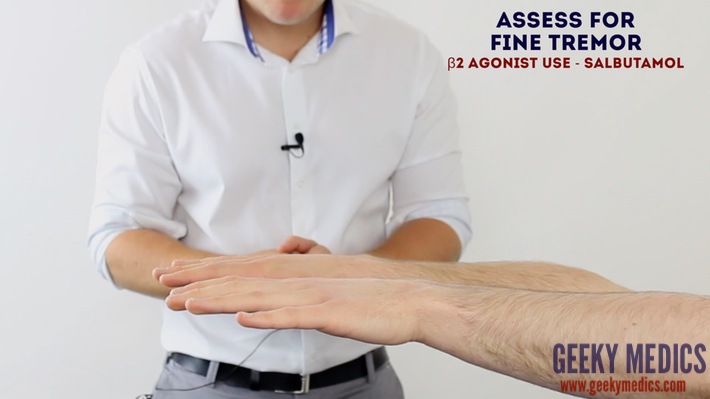
Fine tremor
Assess for the presence of a fine tremor:
- Ask the patient to hold out their hands in an outstretched position and observe for a fine tremor which is typically associated with beta-2-agonist use (e.g. salbutamol).
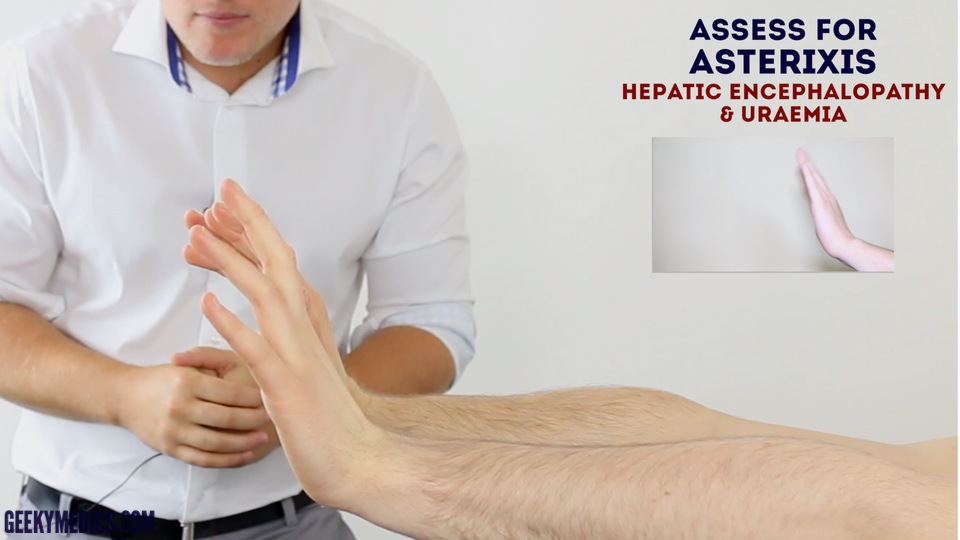
Asterixis (flapping tremor)
Asterixis (also known as ‘flapping tremor’) is a type of negative myoclonus characterised by irregular lapses of posture causing a flapping motion of the hands. In the context of a respiratory examination, the most likely underlying cause is CO2 retention in conditions that result in type 2 respiratory failure (e.g. COPD). Other causes of asterixis include uraemia and hepatic encephalopathy.
- Whilst the patient still has their hands stretched outwards, ask them to cock their hands backwards at the wrist joint and hold the position for 30 seconds.
- Observe for evidence of asterixis during this time period.
Palpation
Temperature
Place the dorsal aspect of your hand onto the patient’s to assess temperature:
- In healthy individuals, the hands should be symmetrically warm, suggesting adequate perfusion.
- Cool hands may suggest poor peripheral perfusion.
- Excessively warm and sweaty hands can be associated with CO2 retention.
Heart rate
Assessing heart rate:
- Palpate the patient’s radial pulse, located at the radial side of the wrist, with the tips of your index and middle fingers aligned longitudinally over the course of the artery.
- Once you have located the radial pulse, assess the rate and rhythm.
Calculating heart rate:
- You can calculate the heart rate in a number of ways, including measuring for 60 seconds, measuring for 30 seconds and multiplying by 2 or measuring for 15 seconds and multiplying by 4. The shorter the interval used, the higher the risk of obtaining an inaccurate result, so wherever possible, you should palpate for a full 60 seconds.
- For irregular rhythms, you should measure the pulse for a full 60 seconds to improve accuracy.
Pulse abnormalities
- Bounding pulse: can be associated with underlying CO2 retention (e.g. type 2 respiratory failure).
- Pulsus paradoxus: pulse wave volume decreases significantly during the inspiratory phase. This is a late sign of cardiac tamponade, severe acute asthma and severe exacerbations of COPD (therefore it is unlikely to be relevant to most OSCE scenarios).
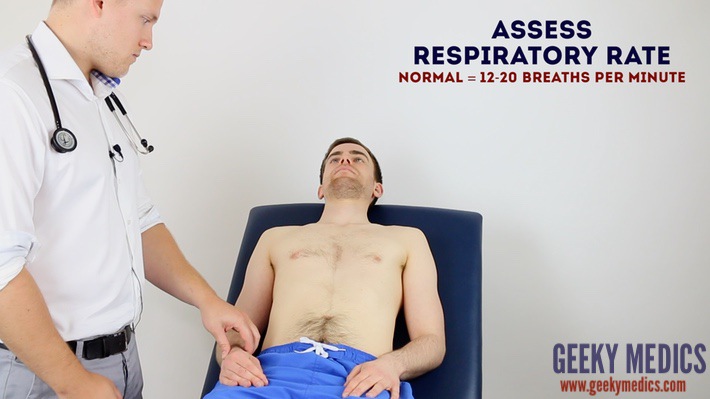
Respiratory rate
Assessing respiratory rate:
- Whilst still palpating the radial pulse (but no longer counting it), assess the patient’s respiratory rate (palpation of the radial pulse at this stage purely to avoid making the patient aware you are directly observing their breathing, as this can itself alter the respiratory rate).
- Note any asymmetries in the expiratory and inspiratory phases of respiration (e.g. the expiratory phase is often prolonged in asthma exacerbations and in patients with COPD).
Calculating respiratory rate:
- Assess the patient’s respiratory rate for 60 seconds to calculate the number of breaths per minute.
Respiratory rate abnormalities
- In healthy adults, the respiratory rate should be between 12-20 breaths per minute.
- A respiratory rate of fewer than 12 breaths per minute is referred to as bradypnoea (e.g. opiate overdose).
- A respiratory rate of more than 20 breaths per minute is referred to as tachypnoea (e.g. acute asthma).
Inspect the hands
Inspect the hands
Assess for finger clubbing
Assess for fine tremor
Assess for flapping tremor (asterixis)
Assess respiratory rate
Peripheral cyanosis 2
Pallor due to anaemia 3
Tar staining on the hands 4
Finger clubbing 5
Jugular venous pressure (JVP)
Jugular venous pressure (JVP) provides an indirect measure of central venous pressure. This is possible because the internal jugular vein (IJV) connects to the right atrium without any intervening valves, resulting in a continuous column of blood. The presence of this continuous column of blood means that changes in right atrial pressure are reflected in the IJV (e.g. raised right atrial pressure results in distension of the IJV).
The IJV runs between the medial end of the clavicle and the ear lobe, under the medial aspect of the sternocleidomastoid, making it difficult to visualise (its double waveform pulsation is, however, sometimes visible due to transmission through the sternocleidomastoid muscle).
Because of the inability to easily visualise the IJV, it’s tempting to use the external jugular vein (EJV) as a proxy for assessment of central venous pressure during clinical assessment. However, because the EJV typically branches at a right angle from the subclavian vein (unlike the IJV which sits in a straight line above the right atrium) it is a less reliable indicator of central venous pressure.
See our guide to jugular venous pressure (JVP) for more details.
Measure the JVP
1. Position the patient in a semi-recumbent position (at 45°).
2. Ask the patient to turn their head slightly to the left.
3. Inspect for evidence of the IJV, running between the medial end of the clavicle and the ear lobe, under the medial aspect of the sternocleidomastoid (it may be visible between just above the clavicle between the sternal and clavicular heads of the sternocleidomastoid. The IJV has a double waveform pulsation, which helps to differentiate it from the pulsation of the external carotid artery.
4. Measure the JVP by assessing the vertical distance between the sternal angle and the top of the pulsation point of the IJV (in healthy individuals, this should be no greater than 3 cm).
Respiratory causes of a raised JVP
A raised JVP indicates the presence of venous hypertension. Respiratory causes of a raised JVP include:
- Pulmonary hypertension: causes right-sided heart failure, often occurring due to COPD or interstitial lung disease.
- There are several other causes of a raised JVP that relate to the cardiovascular system (e.g. congestive heart failure, tricuspid regurgitation and constrictive pericarditis).
Hepatojugular reflux test
The hepatojugular reflux test involves the application of pressure to the liver whilst observing for a sustained rise in JVP. See our cardiovascular examination guide for details on how to elicit hepatojugular reflux.
Assess the JVP
Face
General
Inspect the face for any signs relevant to the respiratory system:
- Plethoric complexion: a congested red-faced appearance associated with polycythaemia (e.g. COPD) and CO2 retention (e.g. type 2 respiratory failure).
Eyes
Inspect the eyes for signs relevant to the respiratory system:
- Conjunctival pallor: suggestive of underlying anaemia. Ask the patient to gently pull down their lower eyelid to allow you to inspect the conjunctiva.
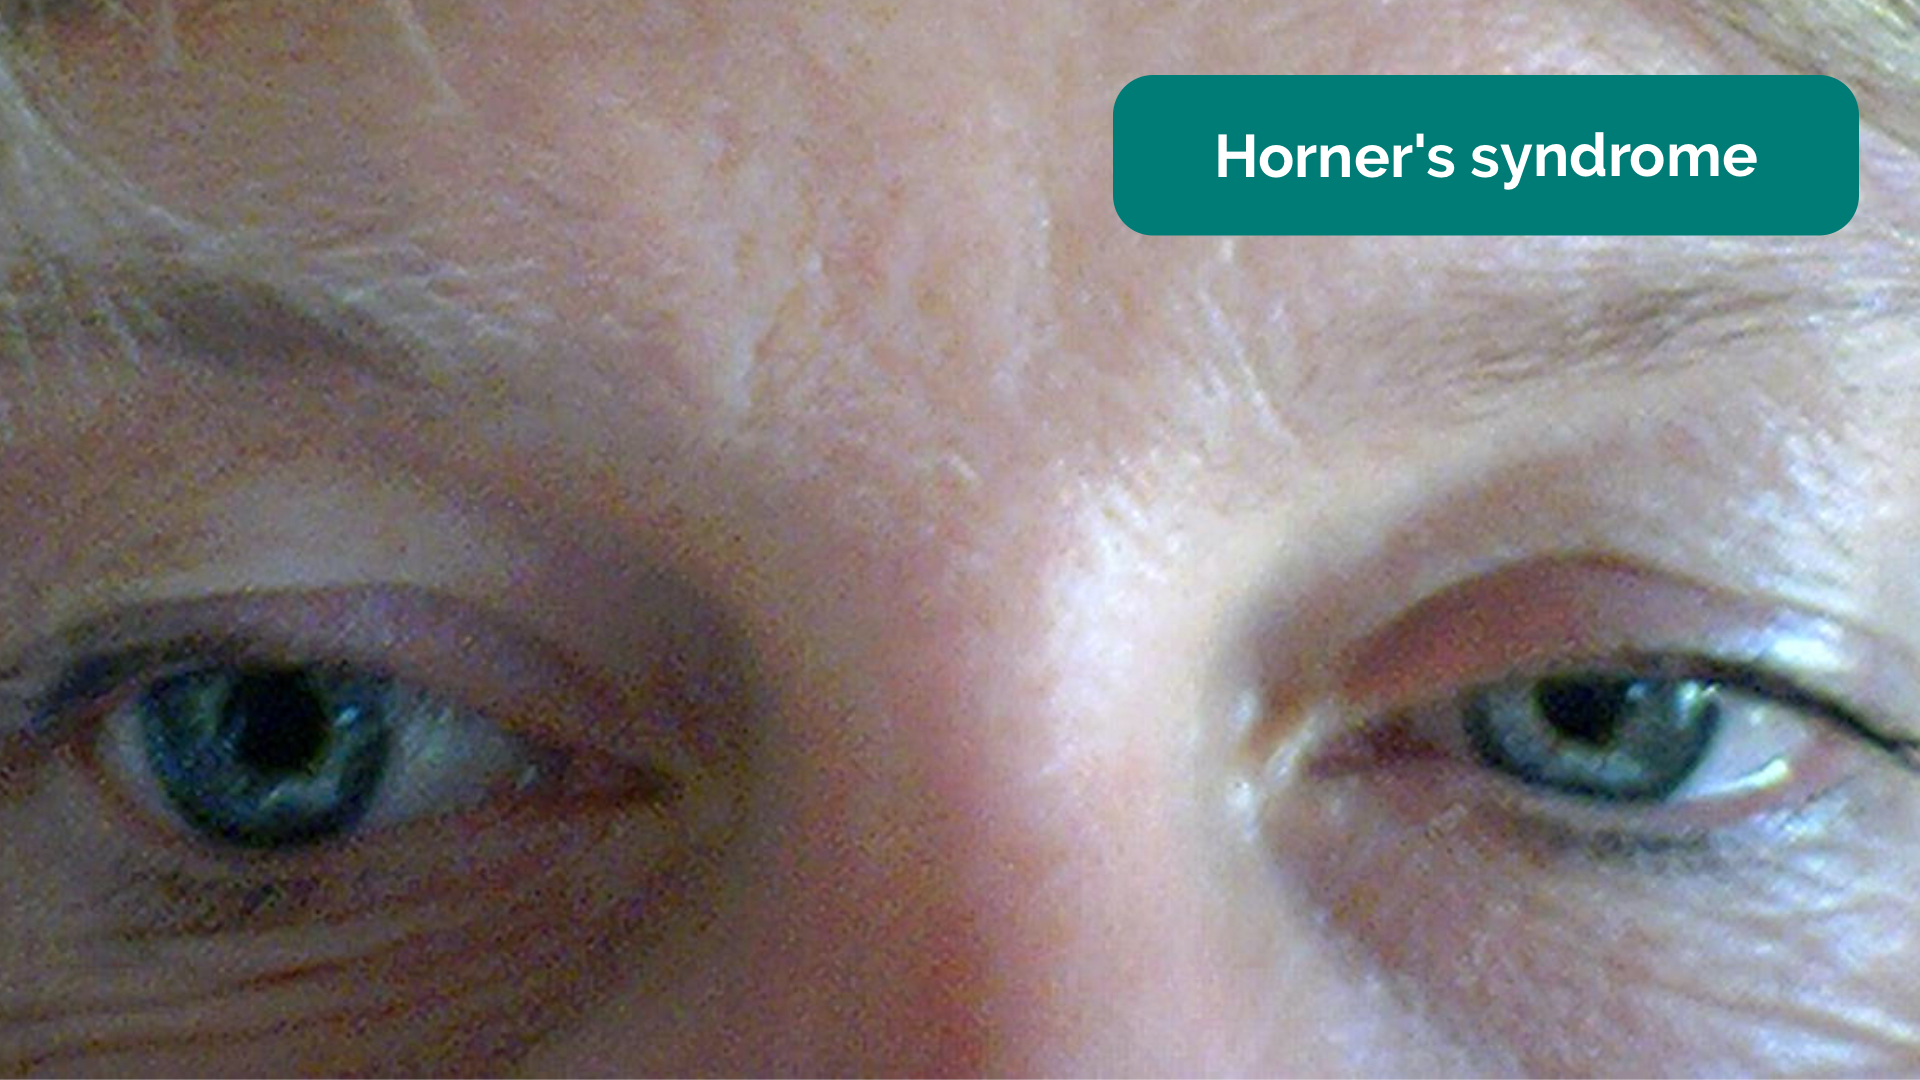
- Ptosis, miosis and enophthalmos: all features of Horner’s syndrome (anhydrosis is another important sign associated with the syndrome). Horner’s syndrome occurs when the sympathetic trunk is damaged by pathology such as lung cancer affecting the apex of the lung (e.g. Pancoast tumour).
Mouth
Inspect the mouth for signs relevant to the respiratory system:
- Central cyanosis: bluish discolouration of the lips and/or the tongue associated with hypoxaemia.
- Oral candidiasis: a fungal infection commonly associated with steroid inhaler use (due to local immunosuppression). It is characterised by pseudomembranous white slough which can be easily wiped away to reveal underlying erythematous mucosa.
Inspect the face
Inspect for conjunctival pallor
Inspect the mouth
Conjunctival pallor
Horner’s syndrome (ptosis and miosis) 6
Central cyanosis 7
Oral candidiasis 8
Central cyanosis 13
Inspection of the chest
Scars
Closely inspect the chest wall for scars and other abnormalities:
- Median sternotomy scar: located in the midline of the thorax. This surgical approach is used for cardiac valve replacement and coronary artery bypass grafts (CABG).
- Axillary thoracotomy scar: located between the posterior border of the pectoralis major and anterior border of latissimus dorsi muscles, through the 4th or 5th intercostal space. This surgical approach is used for the insertion of chest drains.
- Posterolateral thoracotomy scar: located between the scapula and mid-spinal line, extending laterally to the anterior axillary line. This surgical approach is used for lobectomy, pneumonectomy and oesophageal surgery.
- Infraclavicular scar: located in the infraclavicular region (on either side). This surgical approach is used forpacemaker insertion.
- Radiotherapy-associated skin changes: may be present in patients who have been treated for lung cancer. Clinical features can include xerosis (dry skin), scale, hyperkeratosis (thickened skin), depigmentation and telangiectasia.
Chest wall deformities
Inspect for evidence of chest wall deformities:
- Asymmetry: typically associated with pneumonectomy (e.g. lung cancer) and thoracoplasty (e.g. tuberculosis).
- Pectus excavatum: a caved-in or sunken appearance of the chest.
- Pectus carinatum: protrusion of the sternum and ribs.
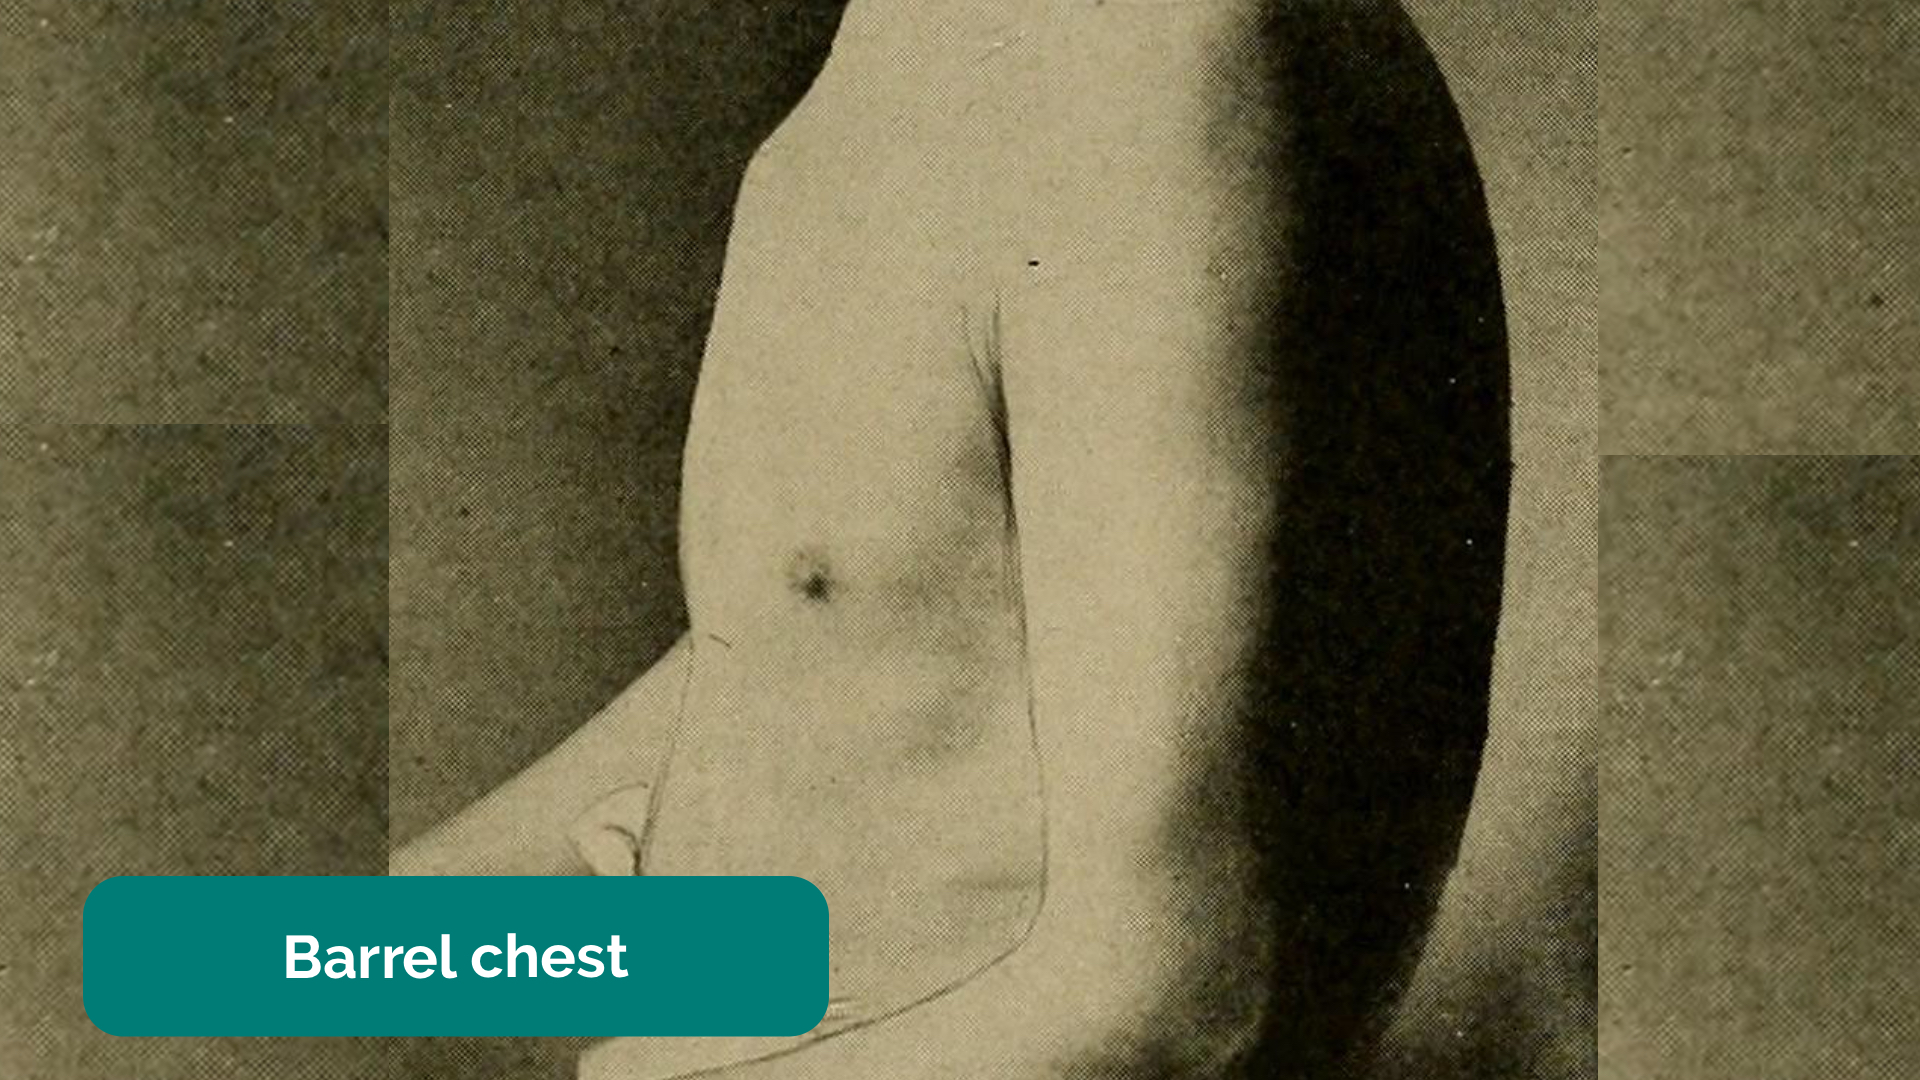
- Hyperexpansion (a.k.a. ‘barrel chest’): chest wall appears wider and taller than normal. Associated with chronic lung diseases such as asthma and COPD.
Inspect the chest wall
Inspect for thoracic scars
Types of thoracic scars
Inspect for lateral thoracotomy scars
Pectus excavatum 9
Pectus carinatum 10
Barrel chest
Trachea and cricosternal distance
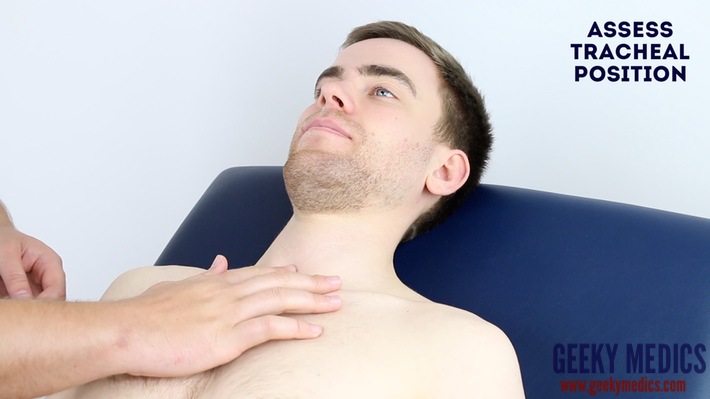
Assess tracheal position
Gently assess the position of the trachea, which should be central in healthy individuals (this can be uncomfortable, so warn the patient in advance):
1. Ensure patient’s neck musculature is relaxed by asking them to position their chin slightly downwards.
2. Dip your index finger into the thorax beside the trachea.
3. Gently apply side pressure to locate the border of the trachea.
4. Compare this space to the other side of the trachea using the same process.
5. A difference in the amount of space between the sides suggests the presence of tracheal deviation.
Causes of tracheal deviation
- The trachea deviates away from tension pneumothorax and large pleural effusions.
- The trachea deviates towards lobar collapse and pneumonectomy.
- Palpation of the trachea can be uncomfortable, so warn the patient and apply a gentle technique
Assess cricosternal distance
Cricosternal distance is the distance between the inferior border of the cricoid cartilage and the suprasternal notch:
1. Measure the distance between the suprasternal notch and cricoid cartilage using your fingers.
2. In healthy individuals, the distance should be 3-4 fingers.
Cricosternal distance is actually based on the size of the patient’s fingers so if their fingers are significantly different in size from your own, it may be worth using their fingers for the assessment.
Causes of abnormal cricosternal distance
A distance of fewer than 3 fingers suggests underlying lung hyperinflation (e.g. asthma, COPD).
Assess tracheal position
Assess cricosternal distance
Palpation of the chest
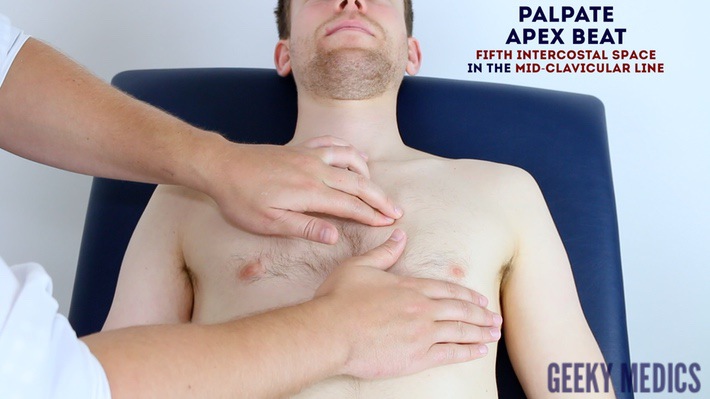
Palpate the apex beat
1. Palpate the apex beat with your fingers placed horizontally across the chest.
2. In healthy individuals, it is typically located in the 5th intercostal space in the midclavicular line.
Causes of a displaced apex beat
Respiratory causes of a displaced apex beat:
- Right ventricular hypertrophy (e.g. pulmonary hypertension, COPD, interstitial lung disease)
- Large pleural effusion
- Tension pneumothorax
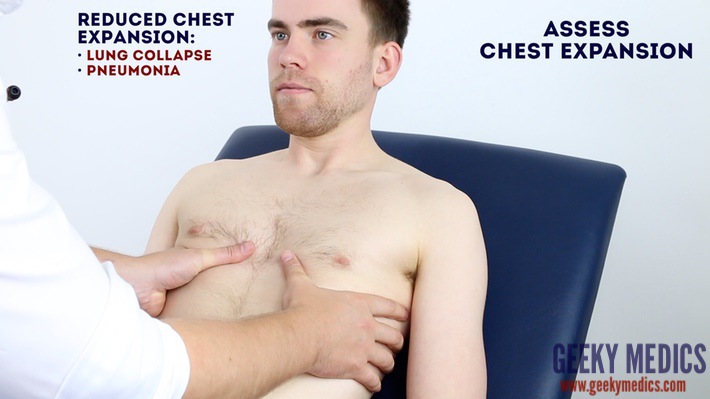
Assess chest expansion
1. Place your hands on the patient’s chest, inferior to the nipples.
2. Wrap your fingers around either side of the chest.
3. Bring your thumbs together in the midline, so that they touch.
4. Ask the patient to take a deep breath in.
5. Observe the movement of your thumbs (in healthy individuals they should move symmetrically upwards/outwards during inspiration and symmetrically downwards/inwards during expiration ).
6. Reduced movement of one of your thumbs indicates reduced chest expansion on that side.
Respiratory causes of reduced chest expansion
- Symmetrical: pulmonary fibrosis reduces lung elasticity, restricting overall chest expansion.
- Asymmetrical: pneumothorax, pneumonia and pleural effusion would all cause ipsilateral reduced chest expansion.
Palpate the apex beat
Assess chest expansion
Percussion of the chest
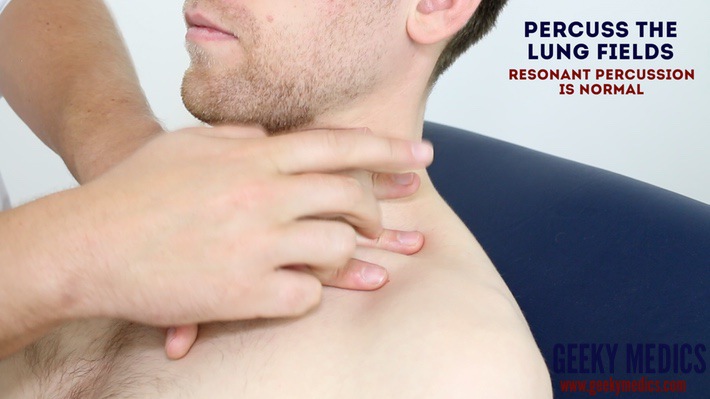
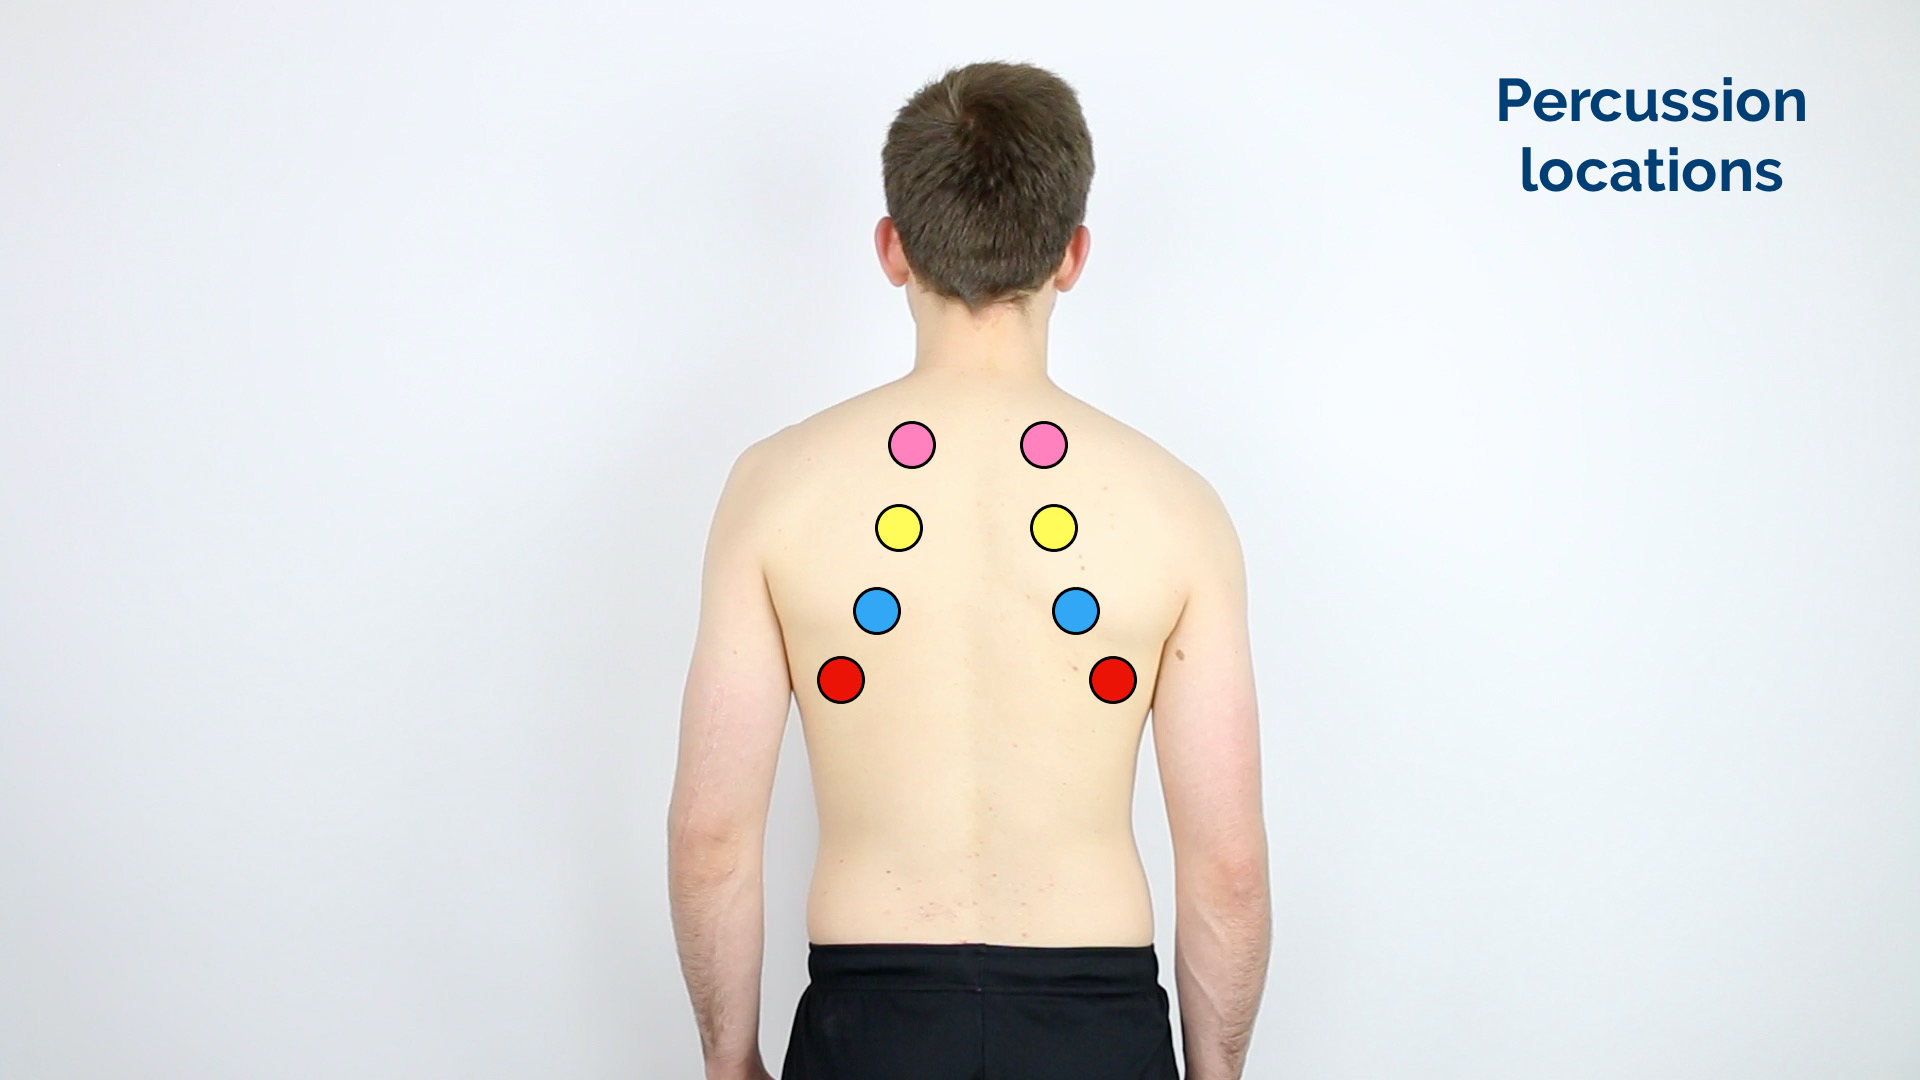
Percussion of the chest involves listening to the volume and pitch of percussion notes across the chest to identify underlying pathology. Correct technique is essential to generating effective percussion notes.
Percussion technique
1. Place your non-dominant hand on the patient’s chest wall.
2. Position your middle finger over the area you want to percuss, firmly pressed against the chest wall.
3. With your dominant hand’s middle finger, strike the middle phalanx of your non-dominant hand’s middle finger using a swinging movement of the wrist.
4. The striking finger should be removed quickly, otherwise, you may muffle the resulting percussion note.
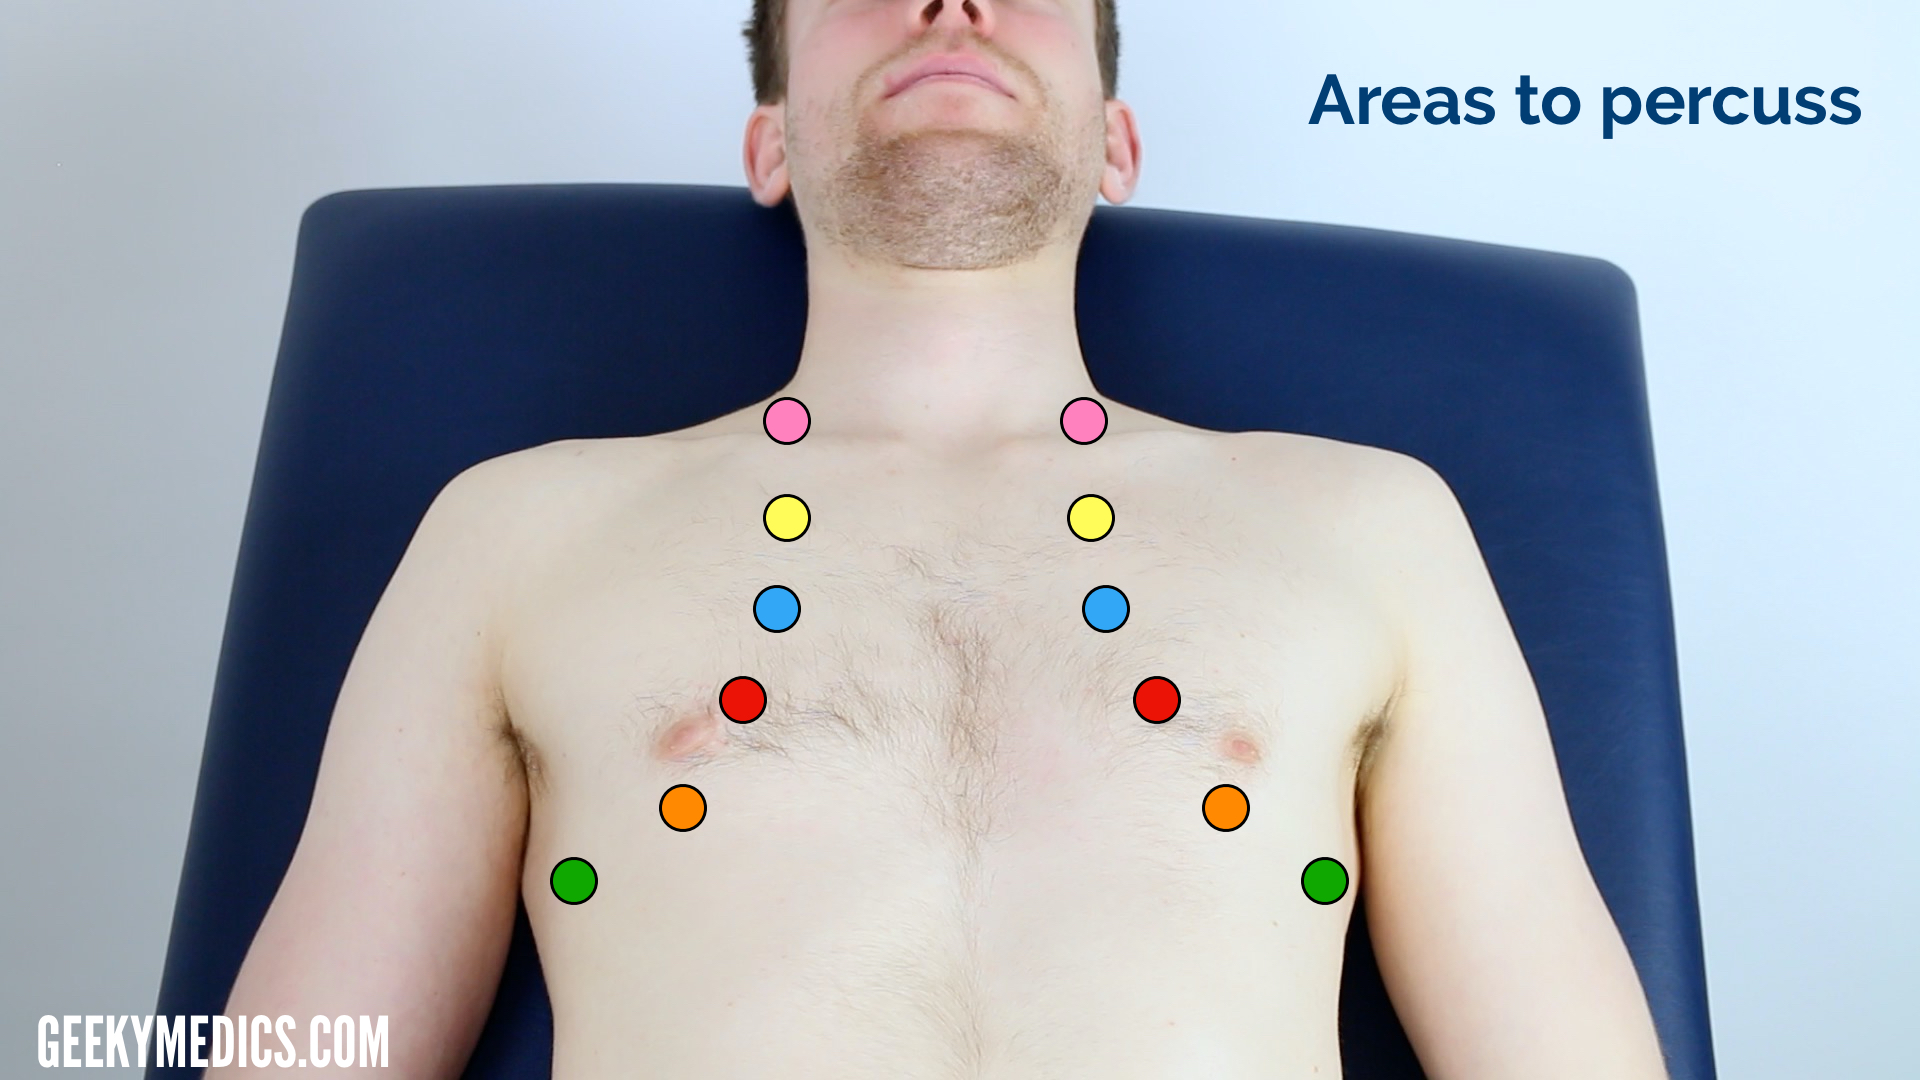
Areas to percuss
Percuss the following areas of the chest, comparing side to side as you progress (see image example below):
- Supraclavicular region: lung apices
- Infraclavicular region
- Chest wall: percuss over 3-4 locations bilaterally
- Axilla
Types of percussion note
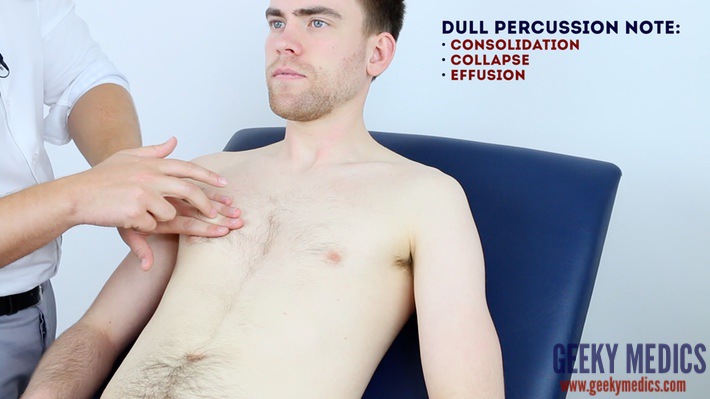
- Resonant: a normal finding (listen to the example in the video demonstration).
- Dullness: suggests increased tissue density (e.g. cardiac dullness, consolidation, tumour, lobar collapse).
- Stony dullness: typically caused by an underlying pleural effusion.
- Hyper-resonance: the opposite of dullness, suggestive of decreased tissue density (e.g. pneumothorax).
Tactile vocal fremitus
Assessing tactile vocal fremitus involves palpating over different areas of the chest wall whilst the patient repeats a word or number consistently (e.g. “ninety-nine”). The presence of increased tissue density or fluid affects the strength at which the patient’s speech is transmitted as vibrations through the chest wall to the examiner’s hands.
Technique
1. Ask the patient to say “99” repeatedly at the same volume and in the same tone.
2. Palpate the chest wall on both sides, using the ulnar border of your hand.
3. Cover all major regions of the chest wall, comparing each side at each location.
Abnormal tactile vocal fremitus
- Increased vibration over an area suggests increased tissue density (e.g. consolidation, tumour, lobar collapse).
- Decreased vibration over an area suggests the presence of fluid or air outside of the lung (e.g. pleural effusion, pneumothorax).
An alternative method of assessment
Vocal resonance (see below) is an alternative method of assessing the conduction of sound through lung tissue and involves auscultating over different areas of the chest wall whilst the patient repeats a word or number consistently. The presence of increased tissue density or fluid affects the volume at which the patient’s speech is transmitted to the diaphragm of the stethoscope. Given both tests assess the same thing, there is no reason to perform both vocal resonance and tactile vocal fremitus in the same examination.
Percuss the lung fields
Percuss the anterior chest wall
Chest percussion locations
Auscultation of the chest
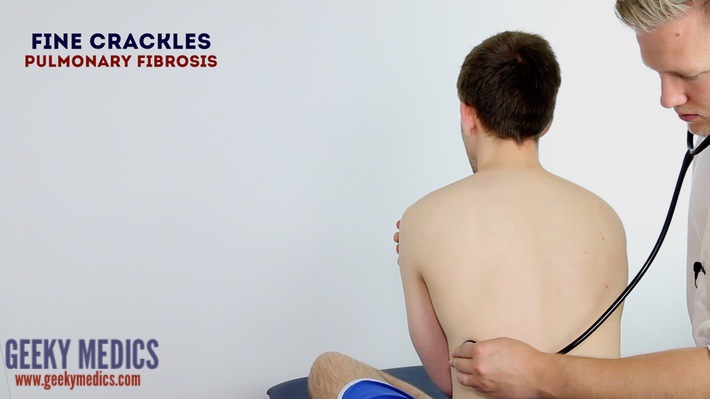
When auscultating the chest, it is important that you have a systematic approach that allows you to compare each area on both the left and the right as you progress.
Auscultate the chest
Technique
1. Ask the patient to relax and breathe deeply in and out through their mouth (prolonged deep breathing should, however, be avoided).
2. Position the diaphragm of the stethoscope over each of the relevant locations on the chest wall to ensure all lung regions have been assessed and listen to the breathing sounds during inspiration and expiration. Assess the quality and volume of breath sounds and note any added sounds.
3. Auscultate each side of the chest at each location to allow for direct comparison and increased sensitivity at detecting local abnormalities.
Quality of breath sounds
- Vesicular: the normal quality of breath sounds in healthy individuals.
- Bronchial: harsh-sounding (similar to auscultating over the trachea), inspiration and expiration are equal and there is a pause between. This type of breath sound is associated with consolidation.
Volume of breath sounds
- Quiet breath sounds: suggest reduced air entry into that region of the lung (e.g pleural effusion, pneumothorax).
- When presenting your findings, state ‘reduced breath sounds’, rather than ‘reduced air entry’.
Added sounds
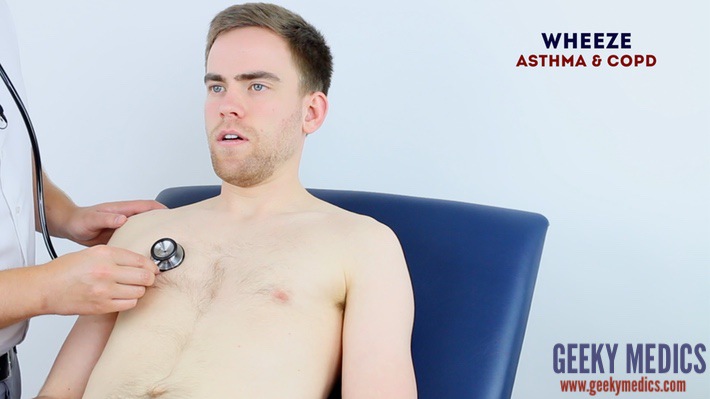
- Wheeze: a continuous, coarse, whistling sound produced in the respiratory airways during breathing. Wheeze is often associated with asthma, COPD and bronchiectasis.
- Stridor: a high-pitched extra-thoracic breath sound resulting from turbulent airflow through narrowed upper airways. Stridor has a wide range of causes, including foreign body inhalation (acute) and subglottic stenosis (chronic).
- Coarse crackles: discontinuous, brief, popping lung sounds typically associated with pneumonia, bronchiectasis and pulmonary oedema.
- Fine end-inspiratory crackles: often described as sounding similar to the noise generated when separating velcro. Fine end-inspiratory crackles are associated with pulmonary fibrosis.
Assess vocal resonance
Assessing vocal resonance involves auscultating over different areas of the chest wall whilst the patient repeats a word or number consistently. The presence of increased tissue density or fluid affects the volume at which the patient’s speech is transmitted to the diaphragm of the stethoscope.
Technique
1. Ask the patient to say “99” repeatedly at the same volume and in the same tone.
2. Auscultate all major regions of the anterior chest wall, comparing each side at each location.
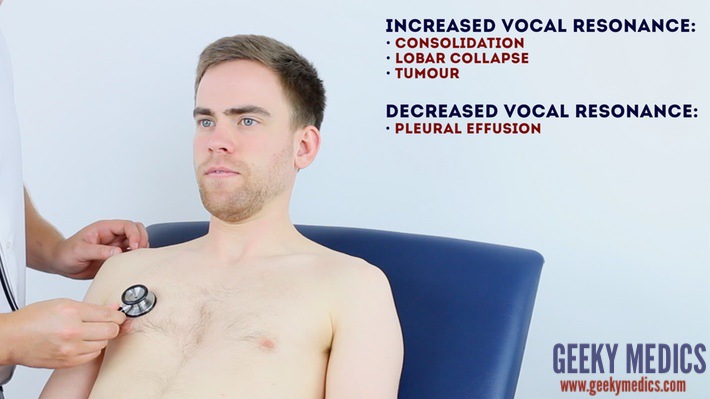
Abnormal vocal resonance
- Increased volume over an area suggests increased tissue density (e.g. consolidation, tumour, lobar collapse).
- Decreased volume over an area suggests the presence of fluid or air outside of the lung (e.g. pleural effusion, pneumothorax).
An alternative method of assessment
Tactile vocal fremitus is an alternative method of assessing the conduction of sound through lung tissue and involves feeling for sound vibrations on the chest wall with your hands as the patient speaks. Given both tests assess the same thing, there is no reason to perform both vocal resonance and tactile vocal fremitus in the same examination.
Auscultate the chest
Assess vocal resonance
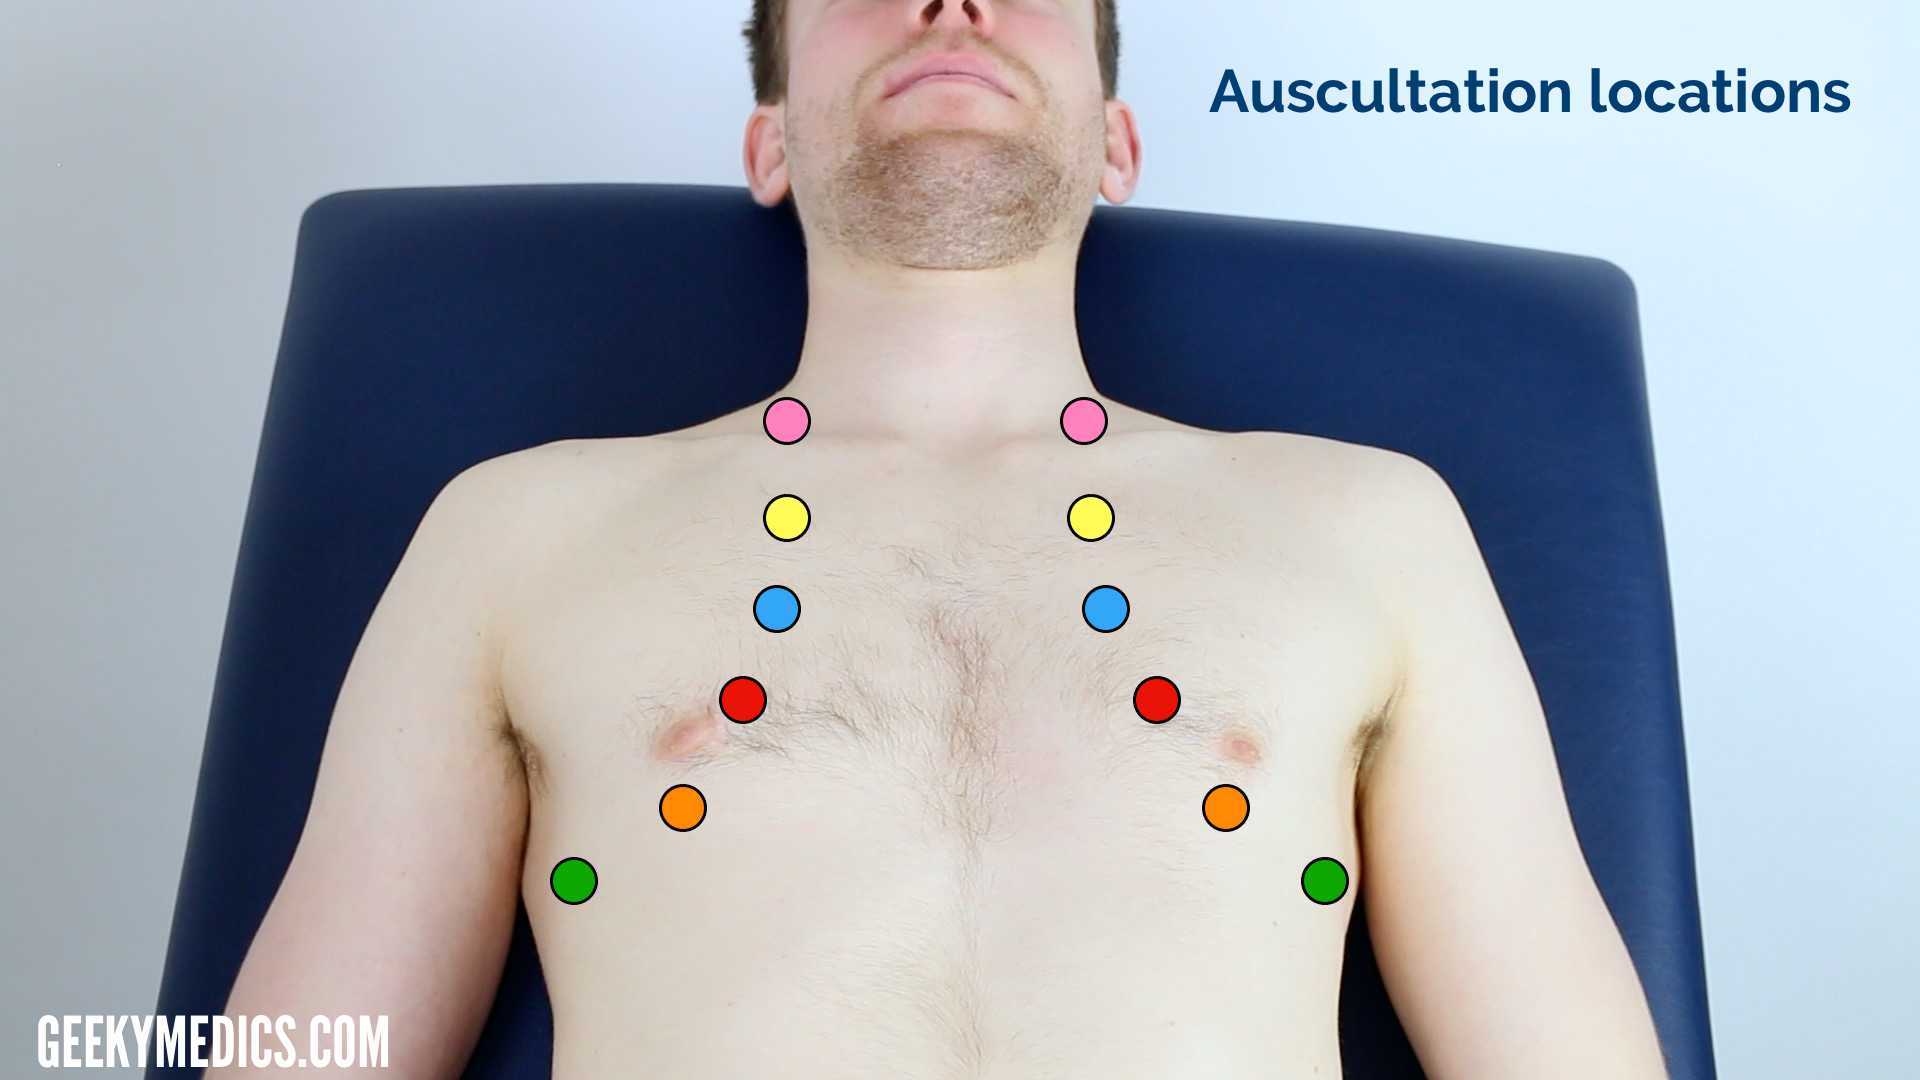
Auscultation locations on the anterior chest
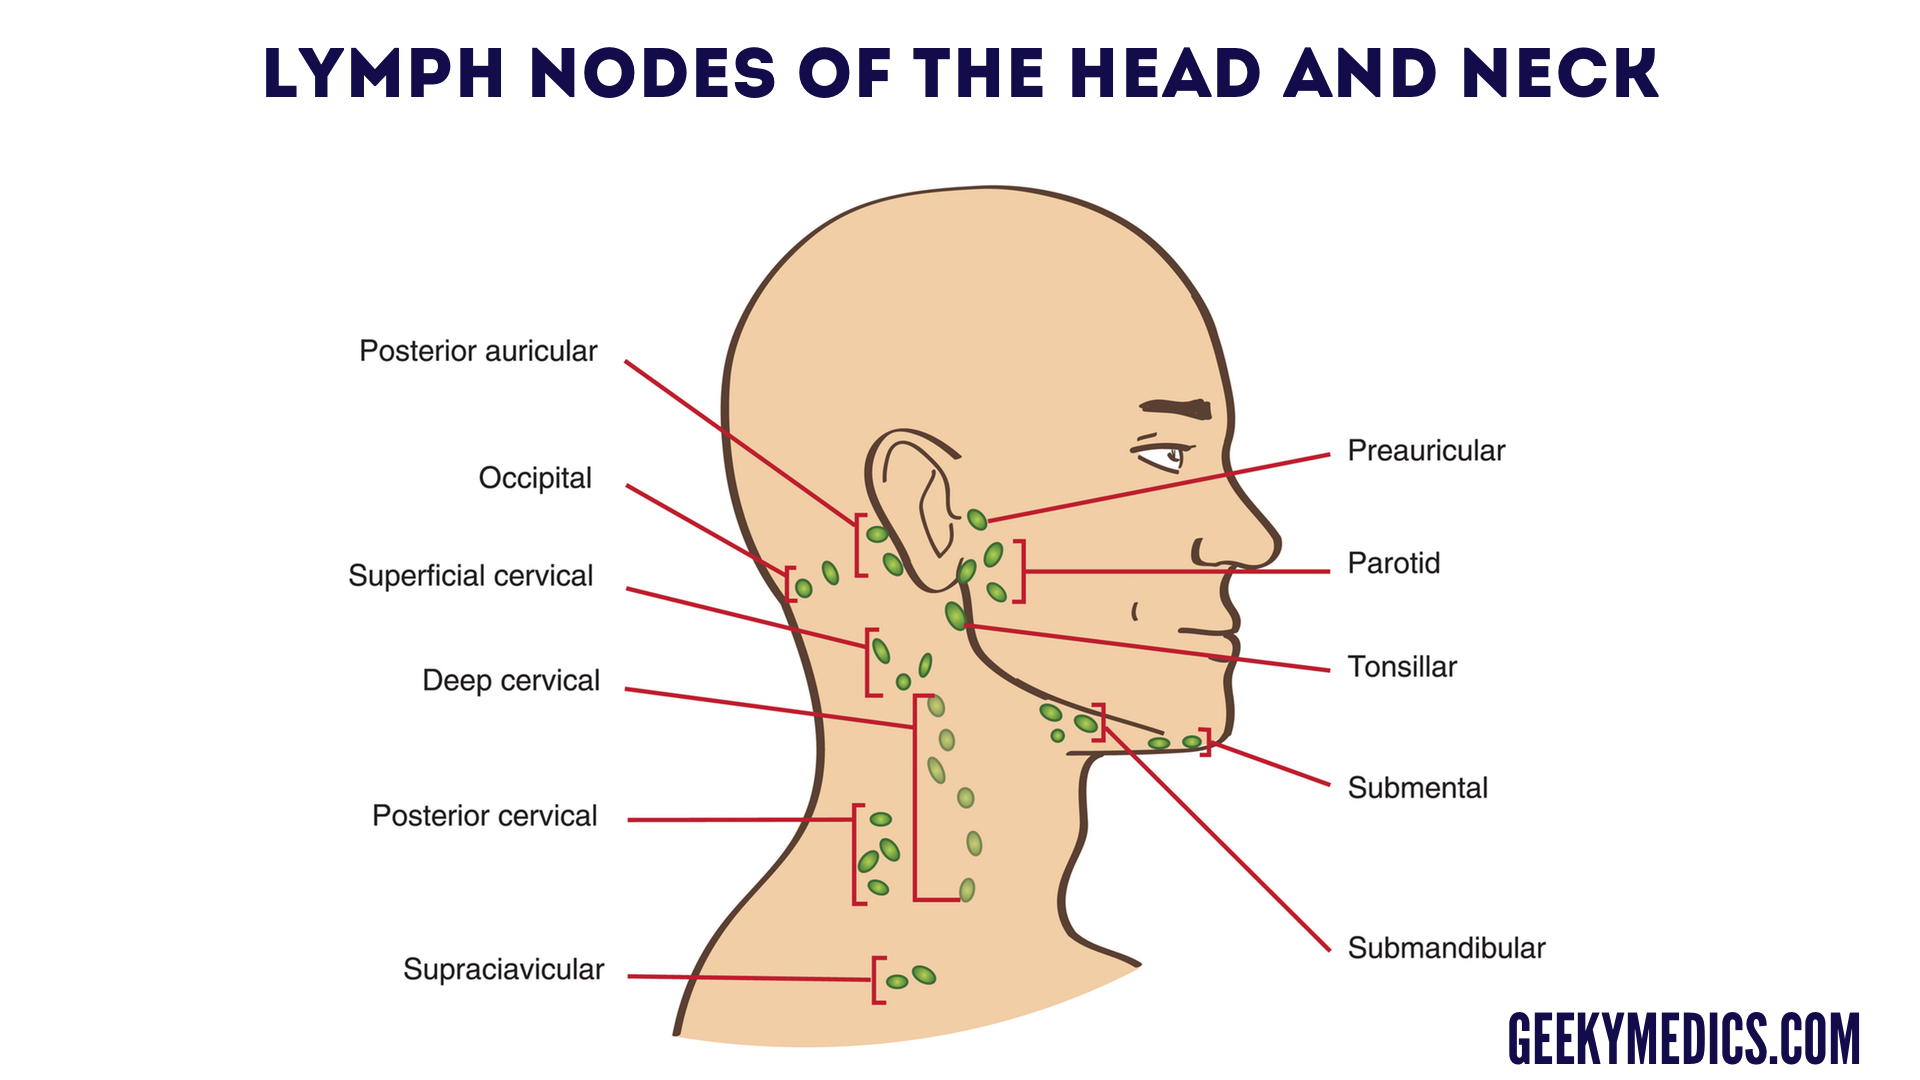
Lymph nodes
Palpate the patient’s lymph nodes
1. Position the patient sitting upright and examine from behind if possible. Ask the patient to tilt their chin slightly downwards to relax the muscles of the neck and aid palpation of lymph nodes. You should also ask them to relax their hands in their lap.
2. Inspect for any evidence of lymphadenopathy or irregularity of the neck.
3. Stand behind the patient and use both hands to start palpating the neck.
4. Use the pads of the second, third and fourth fingers to press and roll the lymph nodes over the surrounding tissue to assess the various characteristics of the lymph nodes. By using both hands (one for each side) you can note any asymmetry in size, consistency and mobility of lymph nodes.
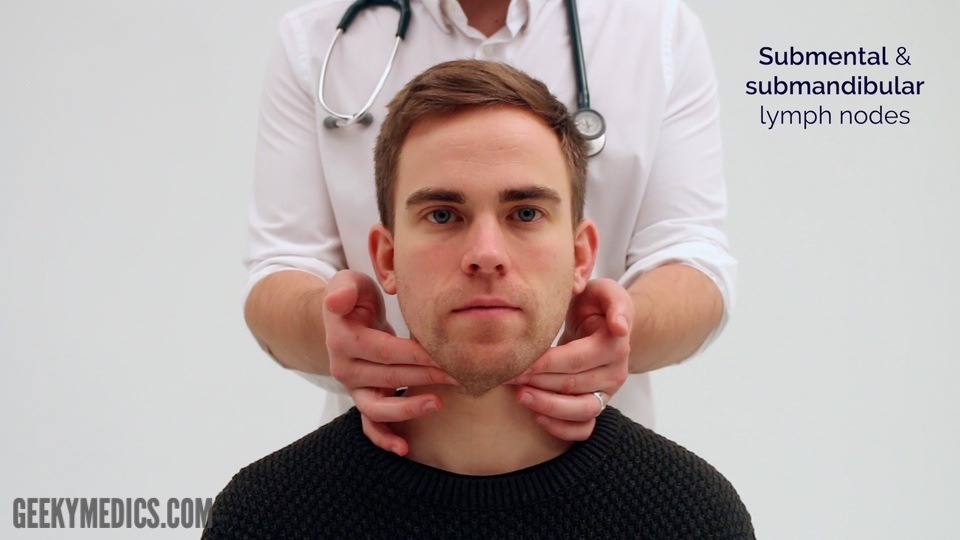
5. Start in the submental area and progress through the various lymph node chains. Any order of examination can be used, but a systematic approach will ensure no areas are missed:
- Submental
- Submandibular
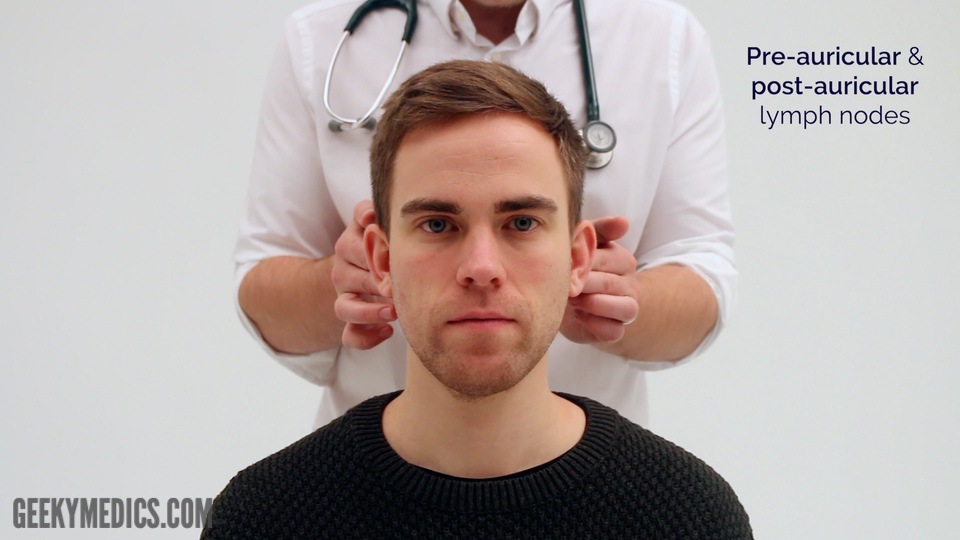
- Pre-auricular
- Post-auricular
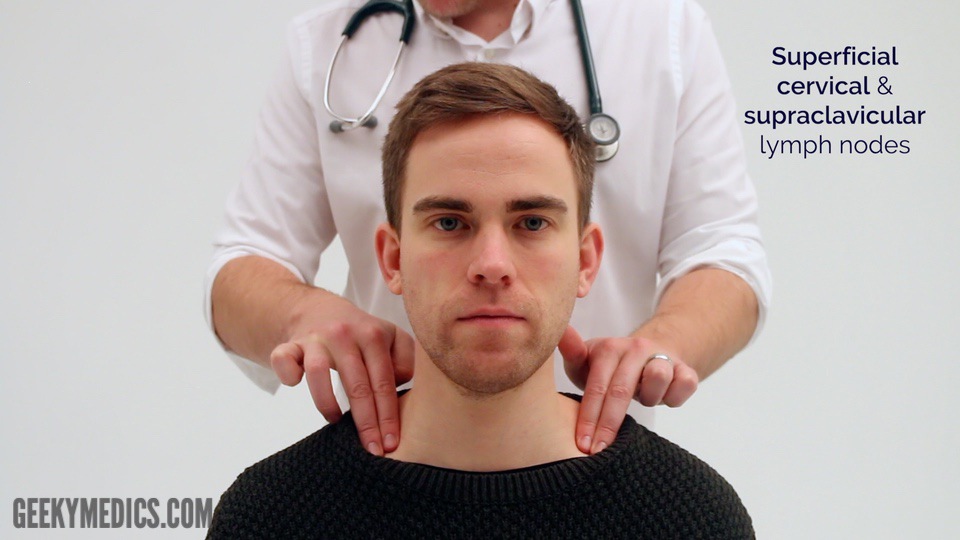
- Superficial cervical
- Deep cervical
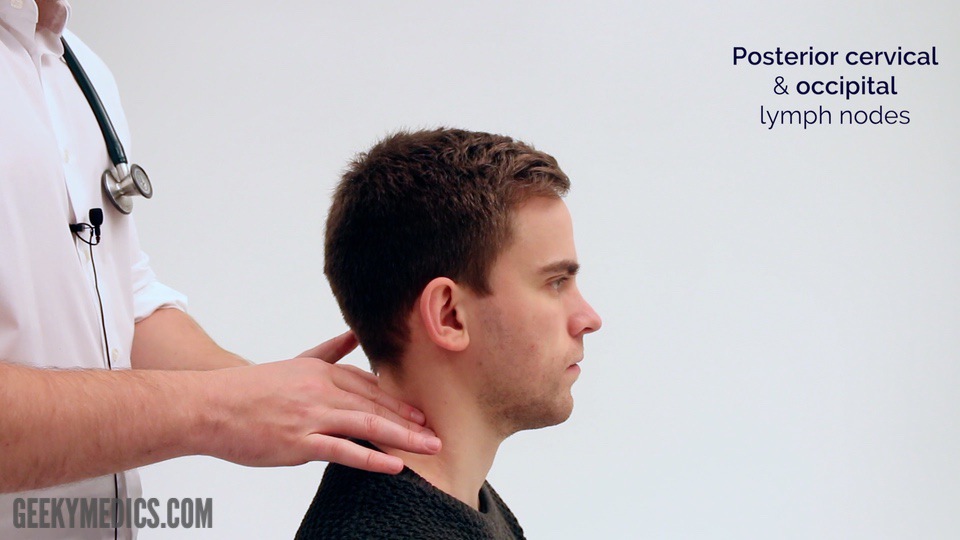
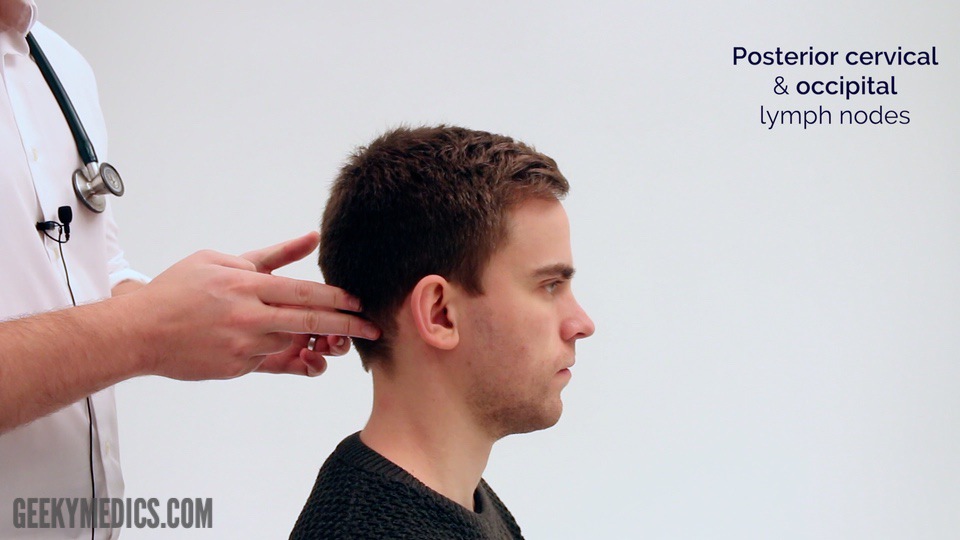
- Posterior cervical
- Supraclavicular – left supraclavicular region is where Virchow’s node may be noted (associated with upper gastrointestinal malignancy)
Take caution when examining the anterior cervical chain that you do not compromise cerebral blood flow (due to carotid artery compression). It may be best to examine one side at a time here.
A common mistake is a “piano-playing” or “spider’s legs” technique with the fingertips over the skin rather than correctly using the pads of the second, third and fourth fingers to press and roll the lymph nodes over the surrounding tissue.
Example of logical systematic examination of the lymph nodes
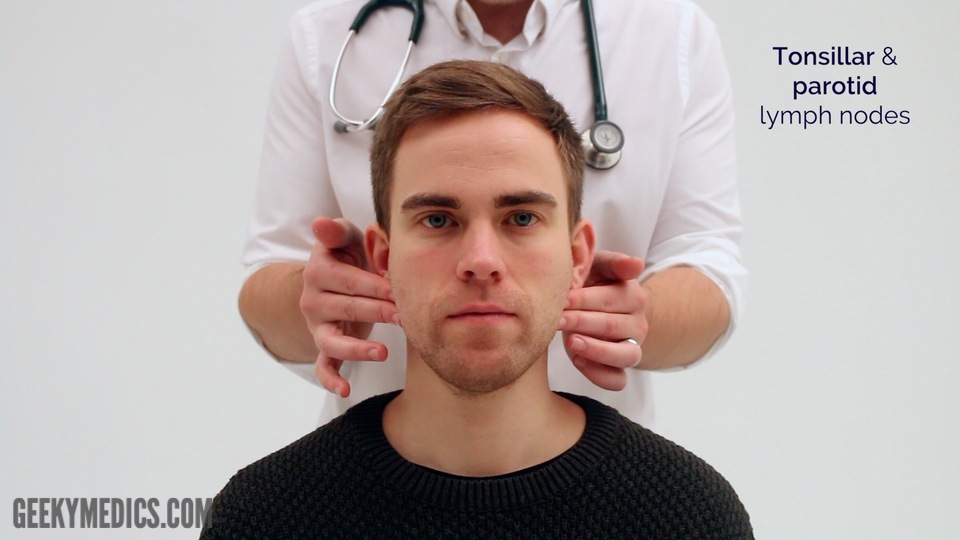
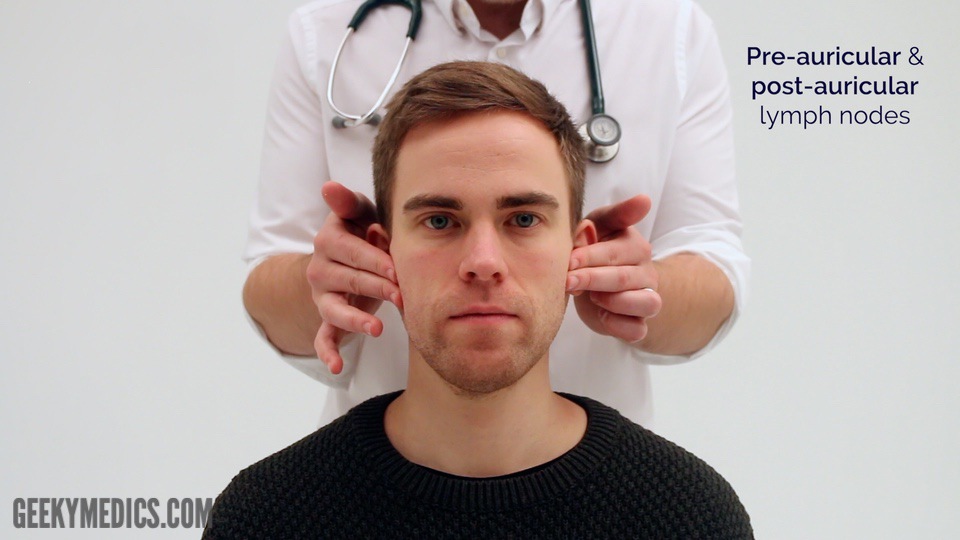
1. Start under the chin (submental lymph nodes), then move posteriorly palpating beneath the mandible (submandibular), turn upwards at the angle of the mandible and feel anterior (preauricular lymph nodes) and posterior to the ears (posterior auricular lymph nodes).
2. Follow the anterior border of the sternocleidomastoid muscle (anterior cervical chain) down to the clavicle, then palpate up behind the posterior border of the sternocleidomastoid (posterior cervical chain) to the mastoid process.
3. Ask the patient to tilt their head (bring their ear towards their shoulder) each side in turn, and palpate behind the posterior border of the clavicle in the supraclavicular fossa (supraclavicular and infraclavicular lymph nodes).
Respiratory causes of lymphadenopathy
Palpate the submental and submandibular lymph nodes
Palpate the tonsillar and parotid lymph nodes
Palpate the pre-auricular lymph nodes
Palpate the post-auricular lymph nodes
Palpate the superficial cervical lymph nodes
Palpate the supraclavicular lymph nodes
Palpate the posterior cervical lymph nodes
Palpate the occipital lymph nodes
Lymph nodes of the head and neck
Cervical lymphadenopathy 11
Posterior chest assessment
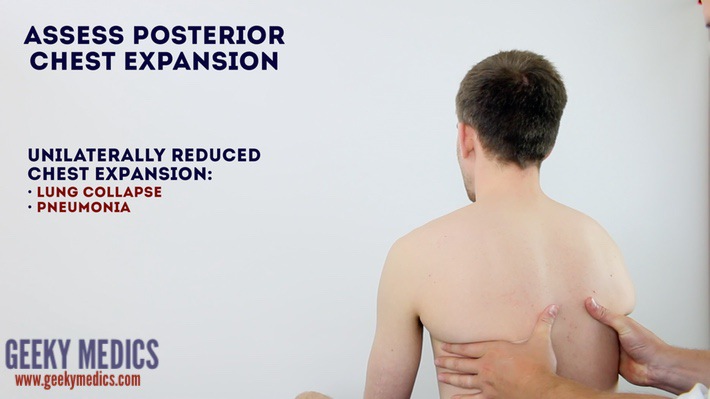
With the patient still sitting forwards, ask them to fold their arms across their chest so that their hands are touching the opposite shoulder. This results in rotation of the scapulae to better expose the underlying chest wall for assessment.
Assess the posterior chest including inspection, chest expansion, percussion, tactile vocal fremitus (or vocal resonance) and auscultation.
Allocate adequate time to assessing the posterior aspect of the chest as this is where you are most likely to identify clinical signs.
Posterolateral thoracotomy scar
Assess posterior chest expansion
Percuss the posterior chest wall
Percussion locations on the posterior chest wall
Auscultate the posterior chest
Auscultation locations on the posterior chest wall
Assess vocal resonance
Final steps
Assess for evidence of pitting sacral and pedal oedema (e.g. congestive heart failure).
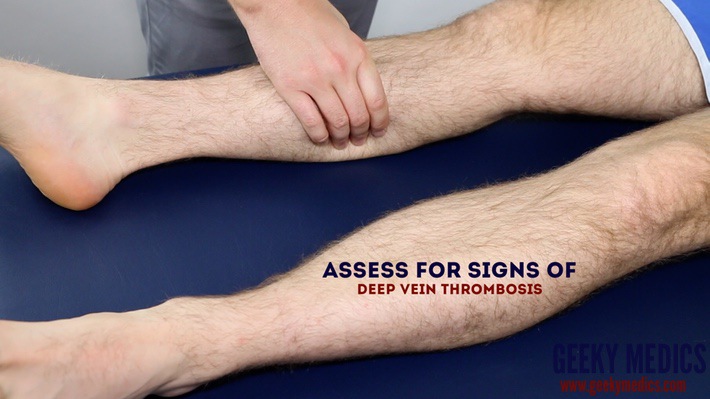
Assess the calves for signs of deep vein thrombosis (e.g. swelling, increased temperature, erythema, visible superficial veins) as the patient may have shortness of breath secondary to pulmonary embolism.
Inspect for evidence of erythema nodosum, which can be associated with sarcoidosis.
Assess sacral oedema
Assess for pedal oedema
Assess the legs for signs of deep vein thrombosis
Pitting pedal oedema 12
Gastrointestinal system
General inspection
Clinical signInspect the patient from the end of the bed whilst at rest, looking for clinical signs suggestive of underlying pathology:
- Age: the patient’s approximate age is helpful when considering the most likely underlying pathology, with younger patients more likely to have diagnoses such as inflammatory bowel disease (IBD) and older patients more likely to have chronic liver disease and malignancy.
- Confusion: often a feature of end-stage liver disease, known as hepatic encephalopathy.
- Pain: if the patient appears uncomfortable, ask where the pain is and whether they are still happy for you to examine them.
- Obvious scars: may provide clues regarding previous abdominal surgery.
- Abdominal distention: may suggest the presence of ascites or underlying bowel obstruction and/or organomegaly.
- Pallor: a pale colour of the skin that can suggest underlying anaemia (e.g. gastrointestinal bleeding or malnutrition). It should be noted that healthy individuals may have a pale complexion that mimics pallor.
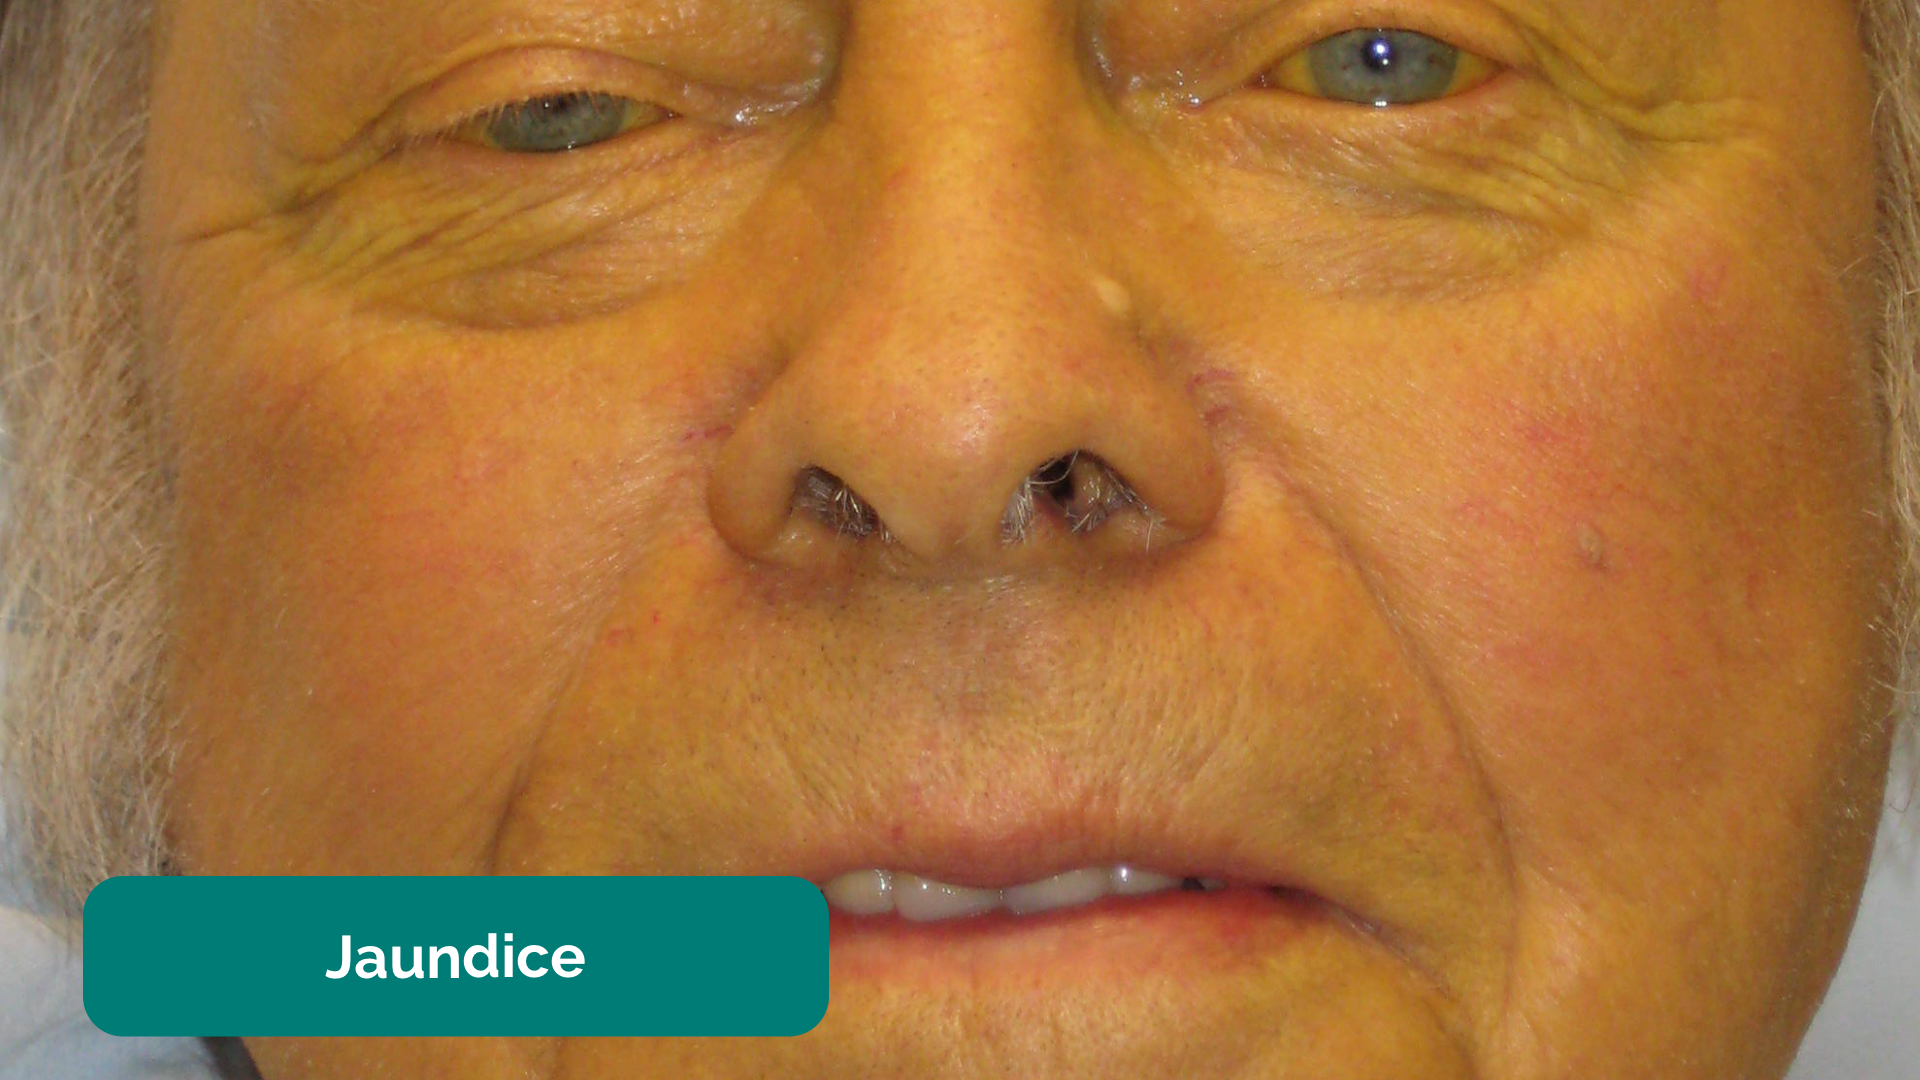
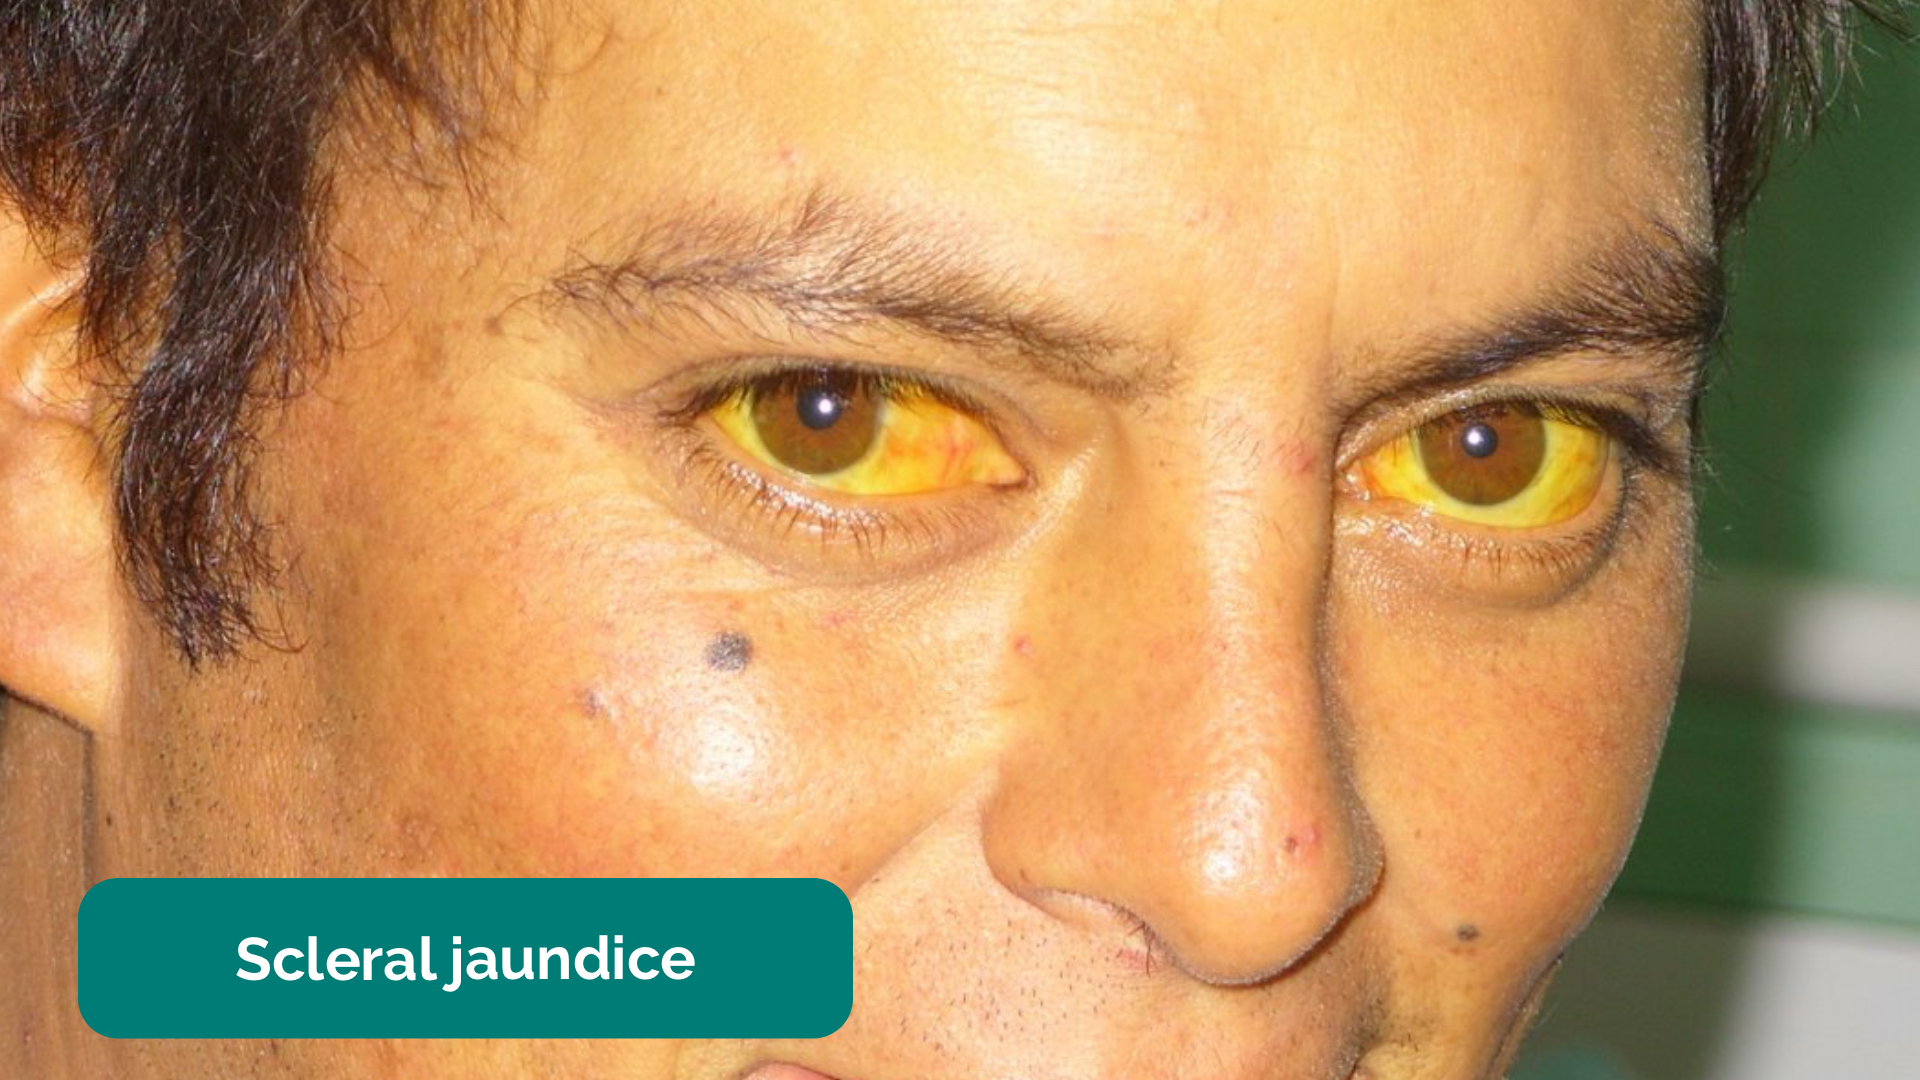
- Jaundice: a yellowish or greenish pigmentation of the skin and whites of the eyes due to high bilirubin levels (e.g. acute hepatitis, liver cirrhosis, cholangitis, pancreatic cancer).
- Hyperpigmentation: a bronzing of the skin associated with haemochromatosis.
- Oedema: typically presents as swelling of the limbs (e.g. pedal oedema) or abdomen (i.e. ascites) and is often associated with liver cirrhosis in the context of an abdominal examination OSCE station.
- Cachexia: ongoing muscle loss that is not entirely reversed with nutritional supplementation. Cachexia is commonly associated with underlying malignancy (e.g. pancreatic/bowel/stomach cancer) and advanced liver failure.
- Hernias: may be visible from the end of the bed (e.g. umbilical/incisional hernia). Asking the patient to cough will usually cause hernias to become more pronounced.
Objects and equipment
Look for objects or equipment on or around the patient that may provide useful insights into their medical history and current clinical status:
- Stoma bag(s): note the location of the stoma bag(s) as this can provide clues as to the type of stoma (e.g. colostomies are typically located in the left iliac fossa, whereas ileostomies are usually located in the right iliac fossa).
- Surgical drains: note the location of the drain and the type/volume of the contents within the drain (e.g. blood, chyle, pus).
- Feeding tubes: note the presence of feeding tubes (e.g. nasogastric/nasojejunal) and whether the patient is currently being fed.
- Other medical equipment: ECG leads, medications, total parenteral nutrition, catheters (note volume/colour of urine) and intravenous access.
- Mobility aids: items such as wheelchairs and walking aids give an indication of the patient’s current mobility status.
- Vital signs: charts on which vital signs are recorded will give an indication of the patient’s current clinical status and how their physiological parameters have changed over time.
- Fluid balance: fluid balance charts will give an indication of the patient’s current fluid status which may be relevant if a patient appears fluid overloaded or dehydrated.
- Prescriptions: prescribing charts or personal prescriptions can provide useful information about the patient’s recent medications.
General inspection
Jaundice 1
Ascites and caput medusae 2
Hands
The hands can provide lots of clinically relevant information and therefore a focused, structured assessment is essential.
Inspection
Palms
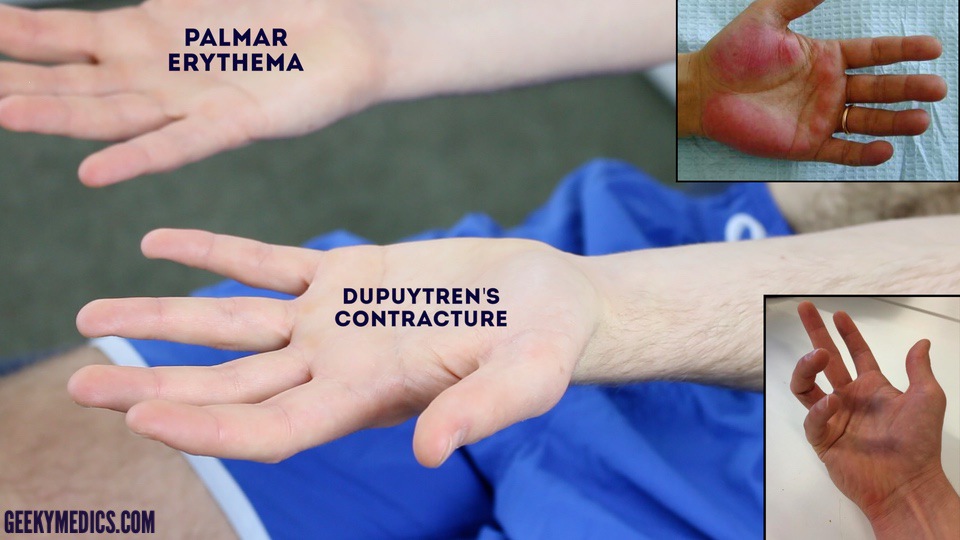
Inspect the palms for any of the following signs:
- Pallor: may suggest underlying anaemia (e.g. malignancy, gastrointestinal bleeding, malnutrition).
- Palmar erythema: a redness involving the heel of the palm that can be associated with chronic liver disease (it can also be a normal finding in pregnancy).
- Dupuytren’s contracture (see more details in the palpation section).
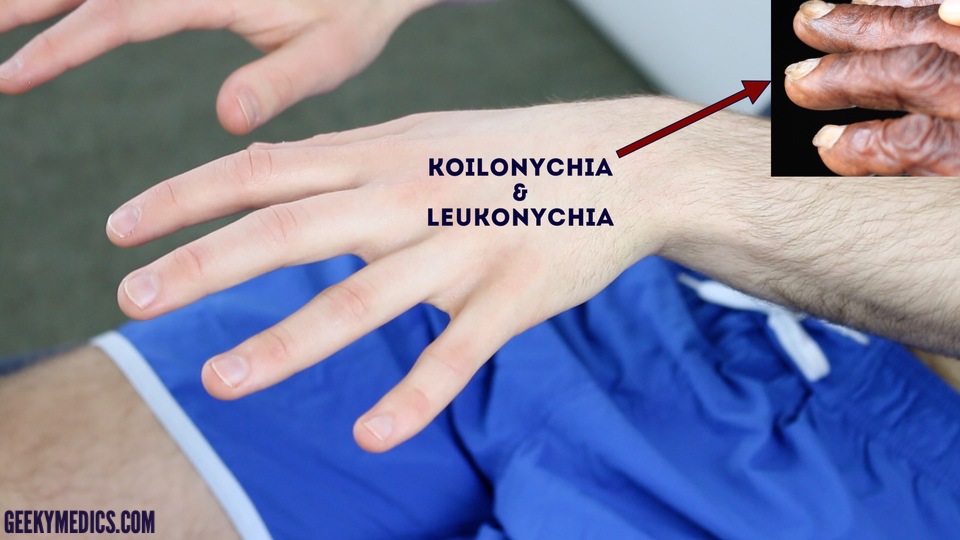
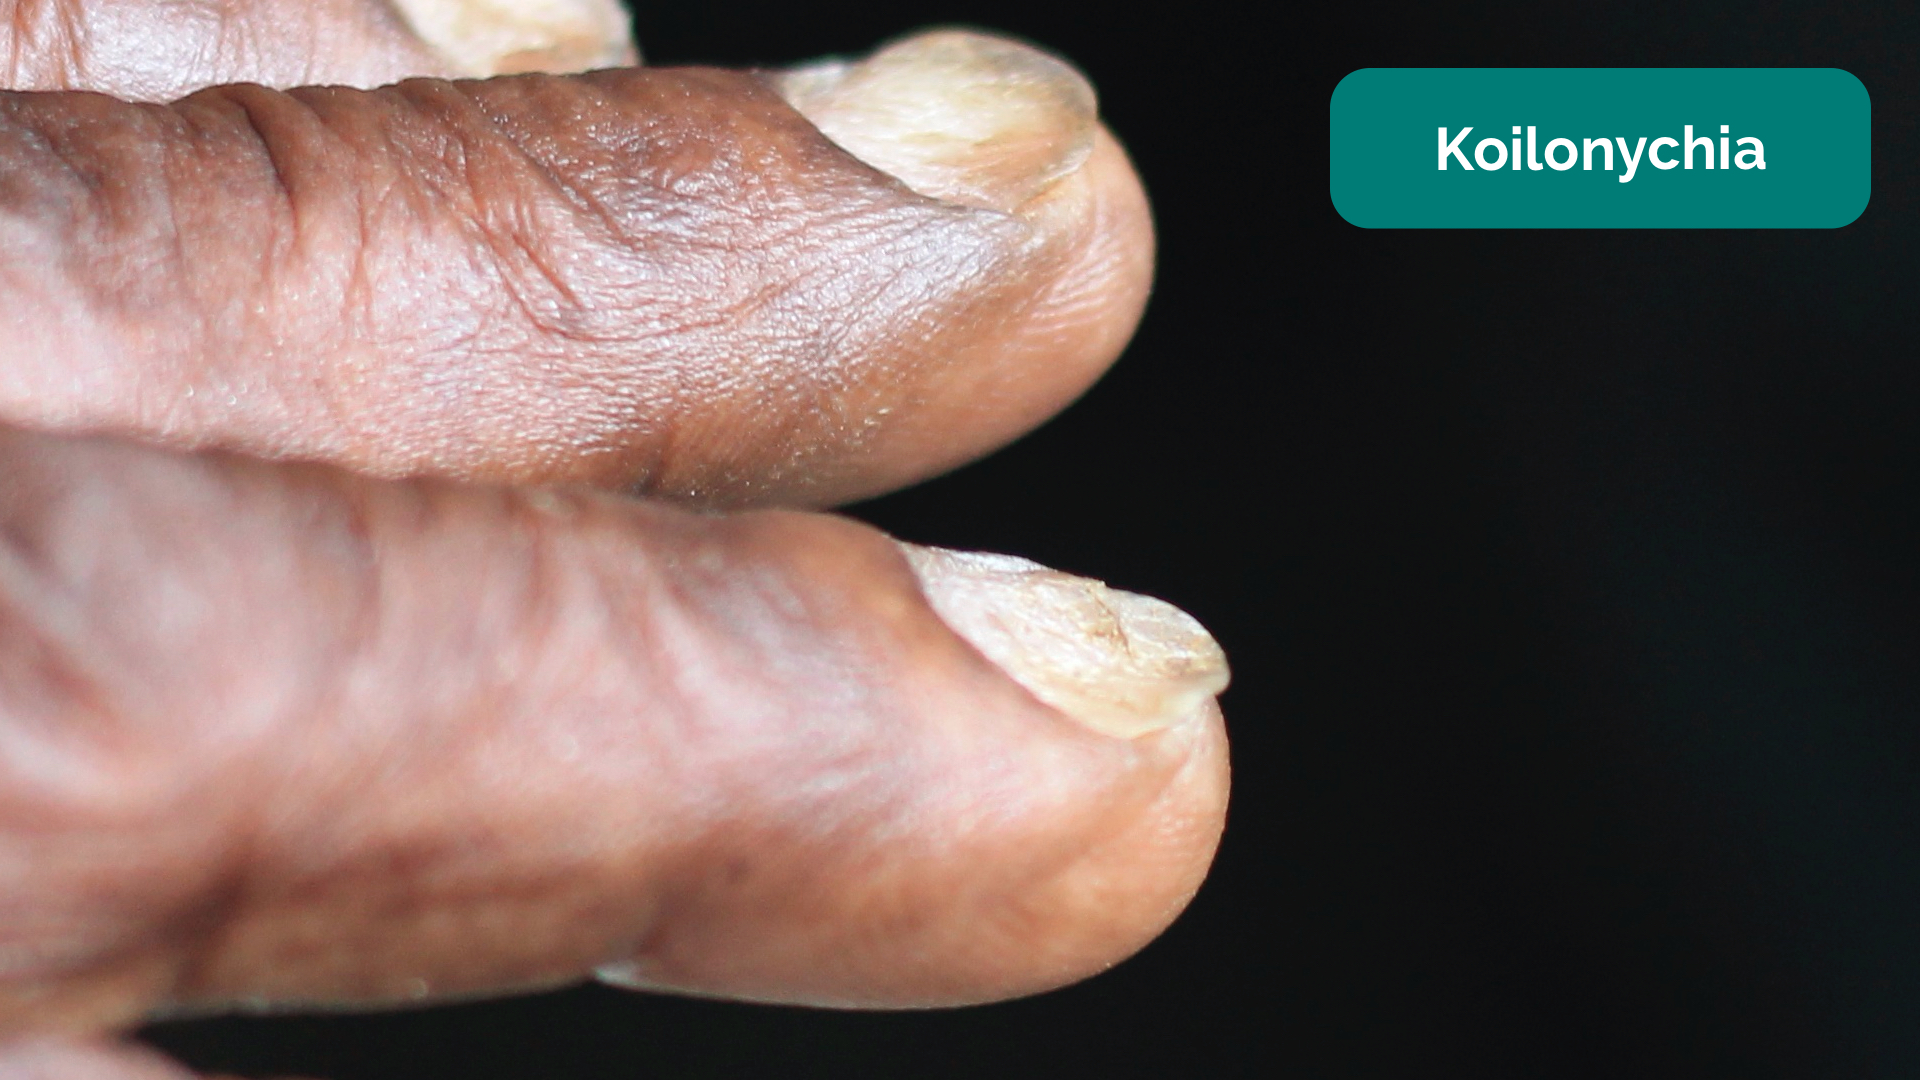
Nail signs
Inspect the nails for any of the following signs:
- Koilonychia: spoon-shaped nails, associated with iron deficiency anaemia (e.g. malabsorption in Crohn’s disease).
- Leukonychia: whitening of the nail bed, associated with hypoalbuminaemia (e.g. end-stage liver disease, protein-losing enteropathy).
Finger clubbing
Finger clubbing involves uniform soft tissue swelling of the terminal phalanx of a digit with subsequent loss of the normal angle between the nail and the nail bed. Finger clubbing is associated with several underlying disease processes, but those most likely to appear in an abdominal OSCE station include inflammatory bowel disease, coeliac disease, liver cirrhosis and lymphoma of the gastrointestinal tract.
To assess for finger clubbing:
- Ask the patient to place the nails of their index fingers back to back.
- In a healthy individual, you should be able to observe a small diamond-shaped window (known as Schamroth’s window).
- When finger clubbing develops, this window is lost.
Asterixis (flapping tremor)
Asterixis (also known as ‘flapping tremor’) is a type of negative myoclonus characterised by irregular lapses of posture causing a flapping motion of the hands. In the context of an abdominal examination, the most likely underlying cause is either hepatic encephalopathy (due to hyperammonaemia) or uraemia secondary to renal failure. CO2 retention secondary to type 2 respiratory failure is another possible cause of asterixis.
- Ask the patient to stretch their arms out in front of them.
- Then ask them to cock their hands backwards at the wrist joint and hold the position for 30 seconds.
- Observe for evidence of asterixis during this time period.
Palpation
Temperature
Place the dorsal aspect of your hand onto the patient’s to assess temperature:
- In healthy individuals, the hands should be symmetrically warm, suggesting adequate perfusion.
- Cool hands may suggest poor peripheral perfusion.
Radial pulse
Assess the patient’s radial pulse:
- Palpate the patient’s radial pulse, located at the radial side of the wrist, with the tips of your index and middle fingers aligned longitudinally over the course of the artery.
- Once you have located the radial pulse, assess the rate and rhythm.
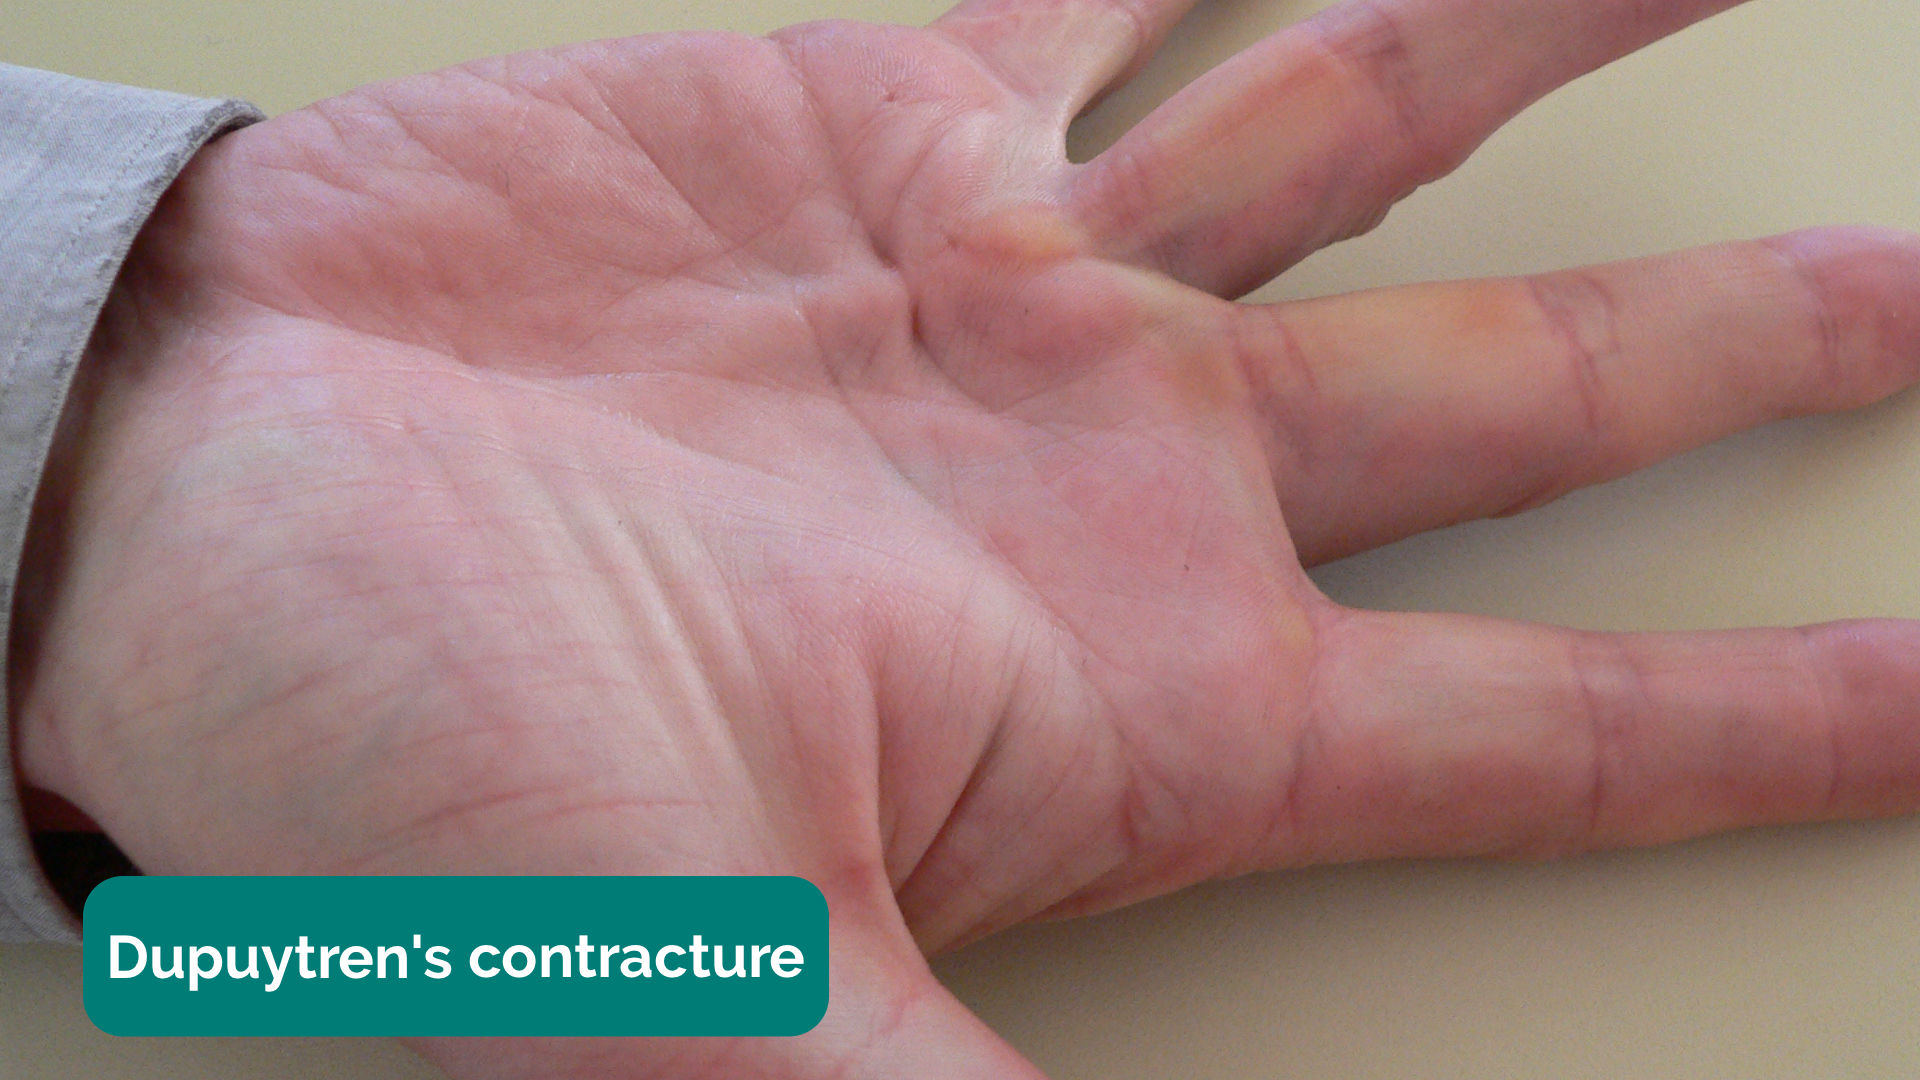
Dupuytren’s contracture
Dupuytren’s contracture involves thickening of the palmar fascia, resulting in the development of cords of palmar fascia which eventually cause contracture deformities of the fingers and thumb. There are a number of factors that have been associated with the development of Dupuytren’s contracture including genetics, excessive alcohol use, increasing age, male gender and diabetes.
To assess for Dupuytren’s contracture:
- Support the patient’s hand and palpate the palm to detect bands of thickened palmar fascia that feel cord-like.
Inspect the back of the hands
Inspect palms of the hands
Inspect for finger clubbing
Assess for hepatic flap (asterixis)
Palpate the radial pulse
Pallor 3
Koilonychia 4
Leukonychia 5
Finger clubbing 6
Dupuytren’s contracture 7
Arms and axillae
Arms
Inspect the patient’s arms for the following:
- Bruising: may suggest underlying clotting abnormalities secondary to liver disease (e.g. cirrhosis).
- Excoriations: scratch marks that may be caused by the patient trying to relieve pruritis. In the context of an abdominal examination, this may suggest underlying cholestasis.
- Needle track marks: important to note as intravenous drug use can be associated with an increased risk of viral hepatitis.
Axillae
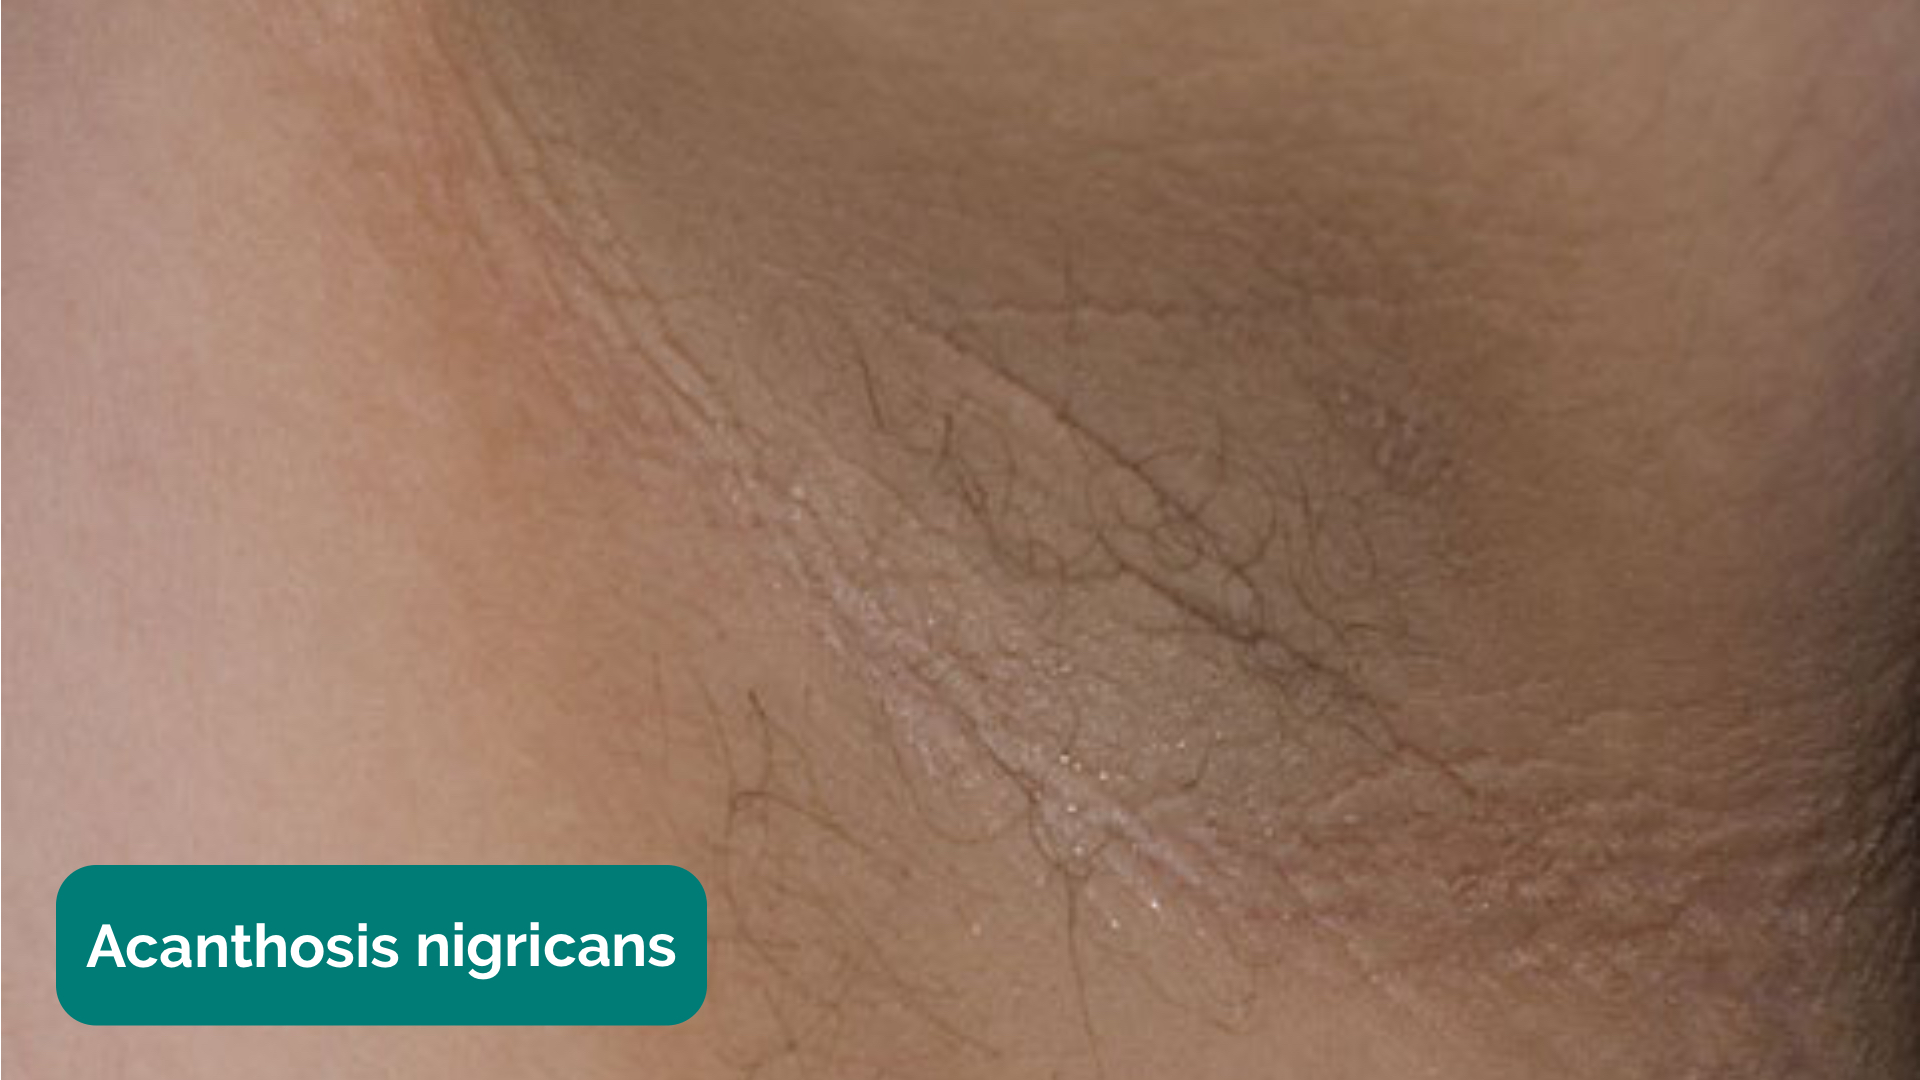
Whilst supporting the patient’s arm, inspect each axilla for the following:
- Acanthosis nigricans: darkening (hyperpigmentation) and thickening (hyperkeratosis) of the axillary skin which can be benign (most commonly in dark-skinned individuals) or associated with insulin resistance (e.g. type 2 diabetes mellitus) or gastrointestinal malignancy (most commonly stomach cancer).
- Hair loss: loss of axillary hair associated with iron-deficiency anaemia and malnutrition.
Inspect the axillae
Acanthosis nigricans 8
Face
Eyes
Ask the patient to gently pull down their lower eyelid and inspect for signs suggestive of gastrointestinal pathology:
- Conjunctival pallor: suggestive of underlying anaemia.
- Jaundice: most evident in the superior portion of the sclera (ask the patient to look downwards as you lift their upper eyelid).
- Corneal arcus: a hazy white, grey or blue opaque ring located in the peripheral cornea, typically occurring in patients over the age of 60. In older patients, the condition is considered benign, however, its presence in patients under the age of 50 suggests underlying hypercholesterolaemia.
- Xanthelasma: yellow, raised cholesterol-rich deposits around the eyes associated with hypercholesterolaemia.
- Kayser-Fleischer rings: dark rings that encircle the iris associated with Wilson’s disease. The disease involves abnormal copper processing by the liver, resulting in accumulation and deposition in various tissues (including the liver causing cirrhosis).
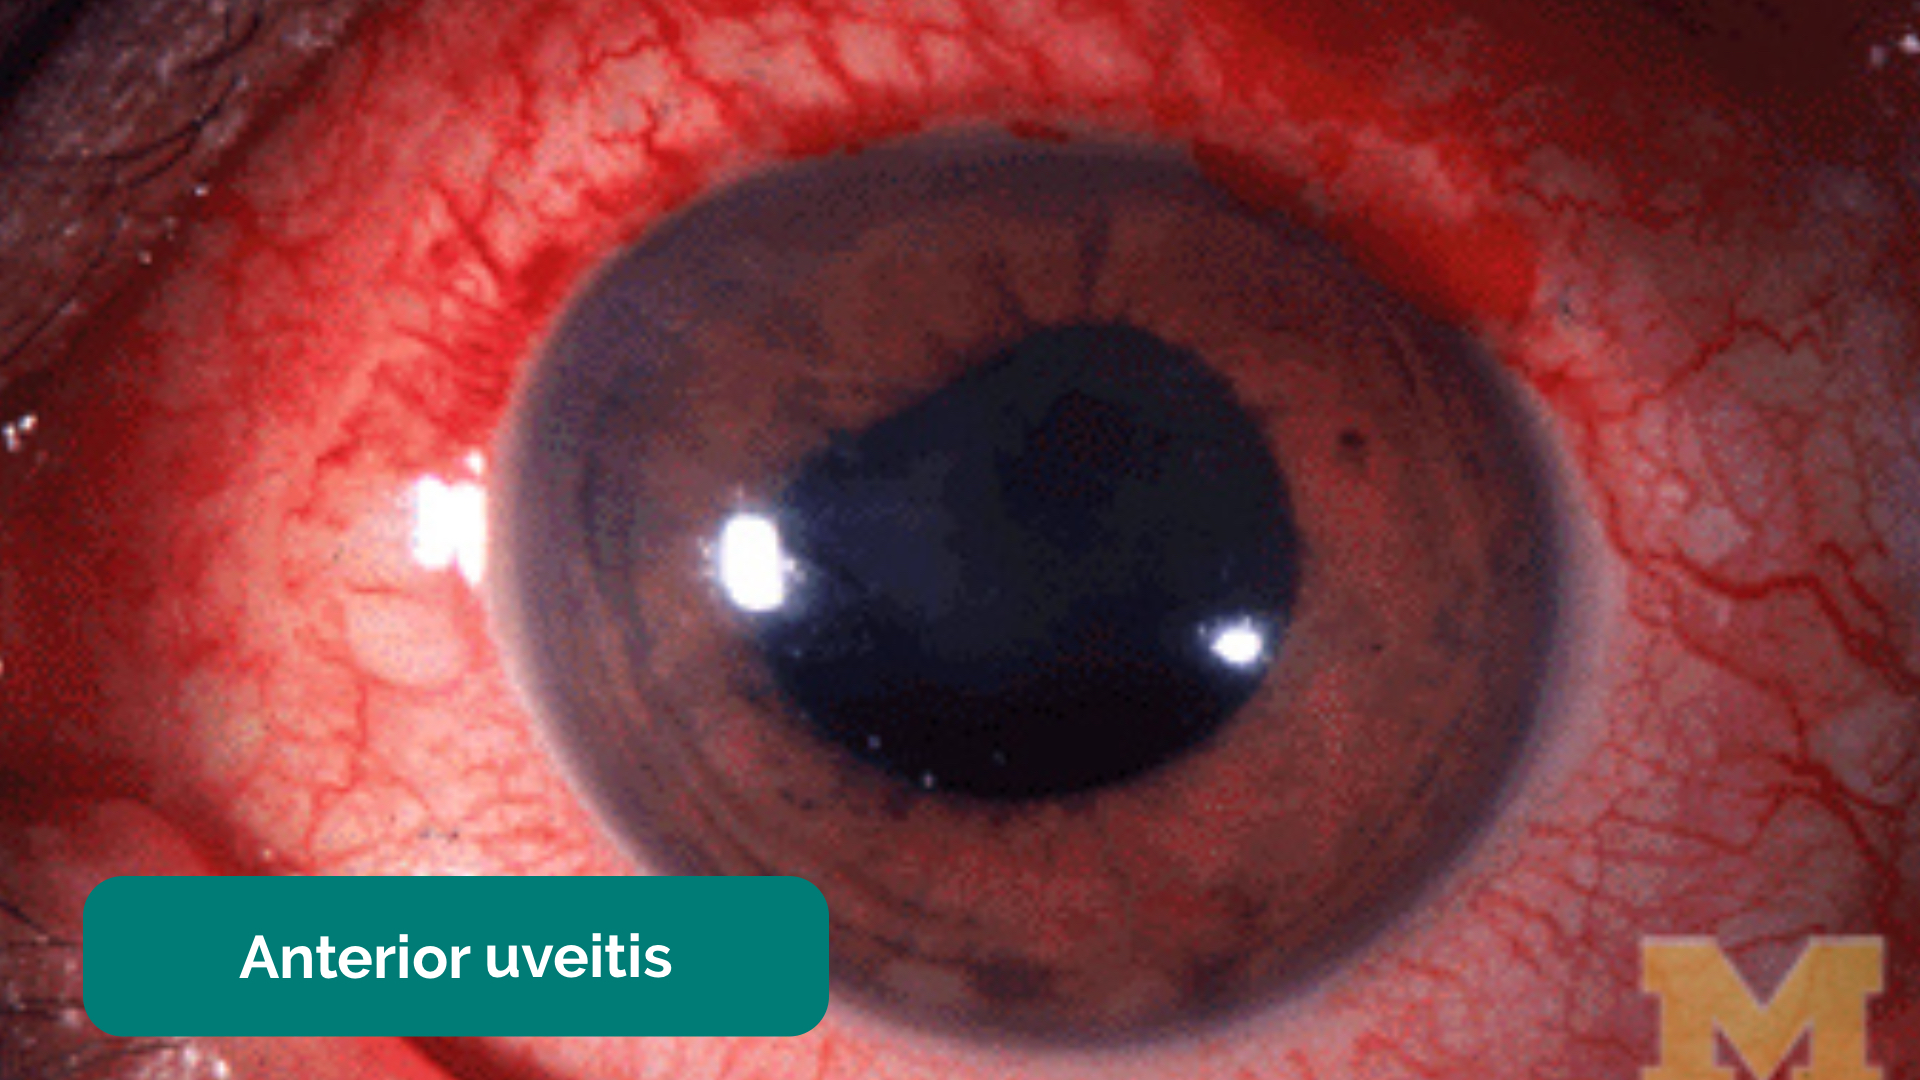
- Perilimbal injection: inflammation of the area of conjunctiva adjacent to the iris. Perilimbal injection is a sign of anterior uveitis, which can be associated with inflammatory bowel disease. Other clinical features of anterior uveitis include photophobia, ocular pain and reduced visual acuity.
Inspect the sclera for jaundice
Inspect for conjunctival pallor
Inspect for xanthelasma
Conjunctival pallor
Scleral jaundice 9
Corneal arcus
Xanthelasma 10
Kayser-Fleischer ring 11
Perilimbal injection (anterior uveitis) 12
Mouth
Ask the patient to open their mouth and inspect for signs suggestive of gastrointestinal pathology:
- Angular stomatitis: a common inflammatory condition affecting the corners of the mouth. It has a wide range of causes including iron deficiency (e.g. gastrointestinal malignancy, malabsorption).
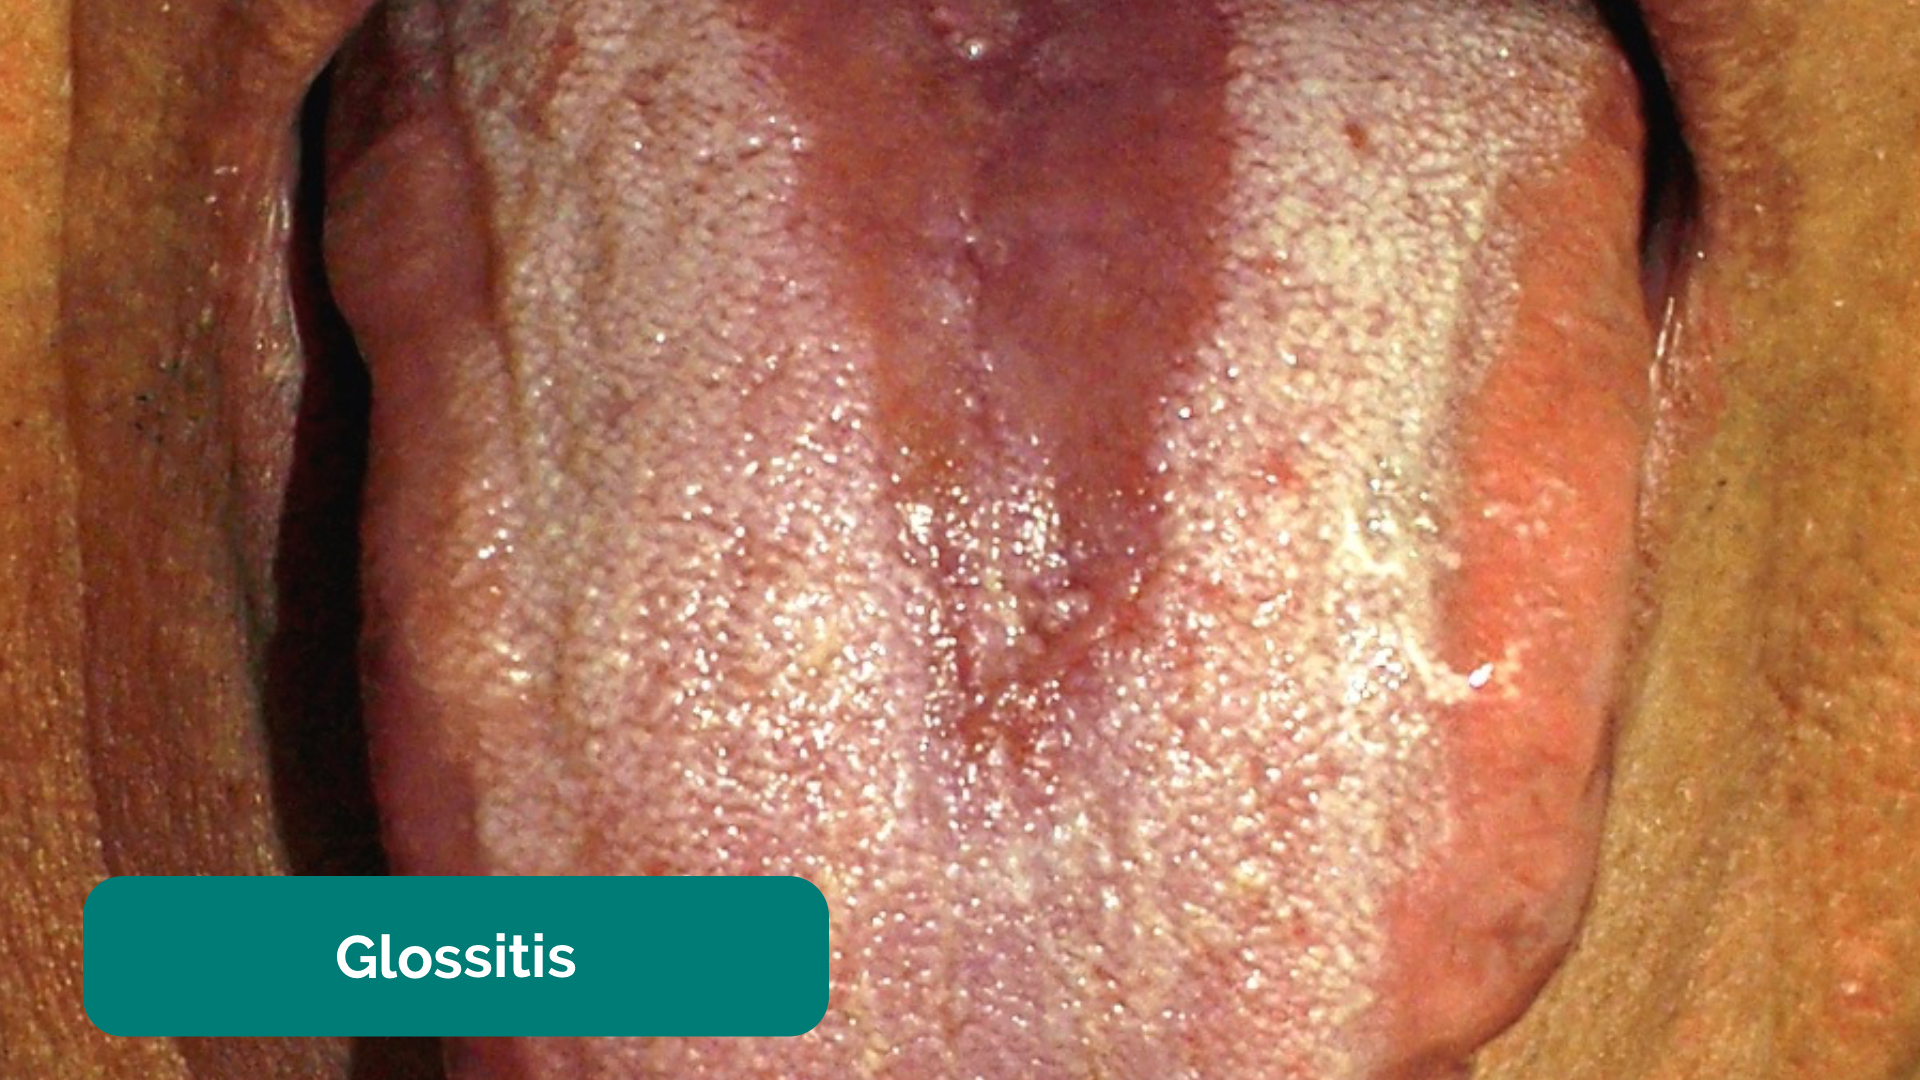
- Glossitis: smooth erythematous enlargement of the tongue associated with iron, B12 and folate deficiency (e.g. malabsorption secondary to inflammatory bowel disease).
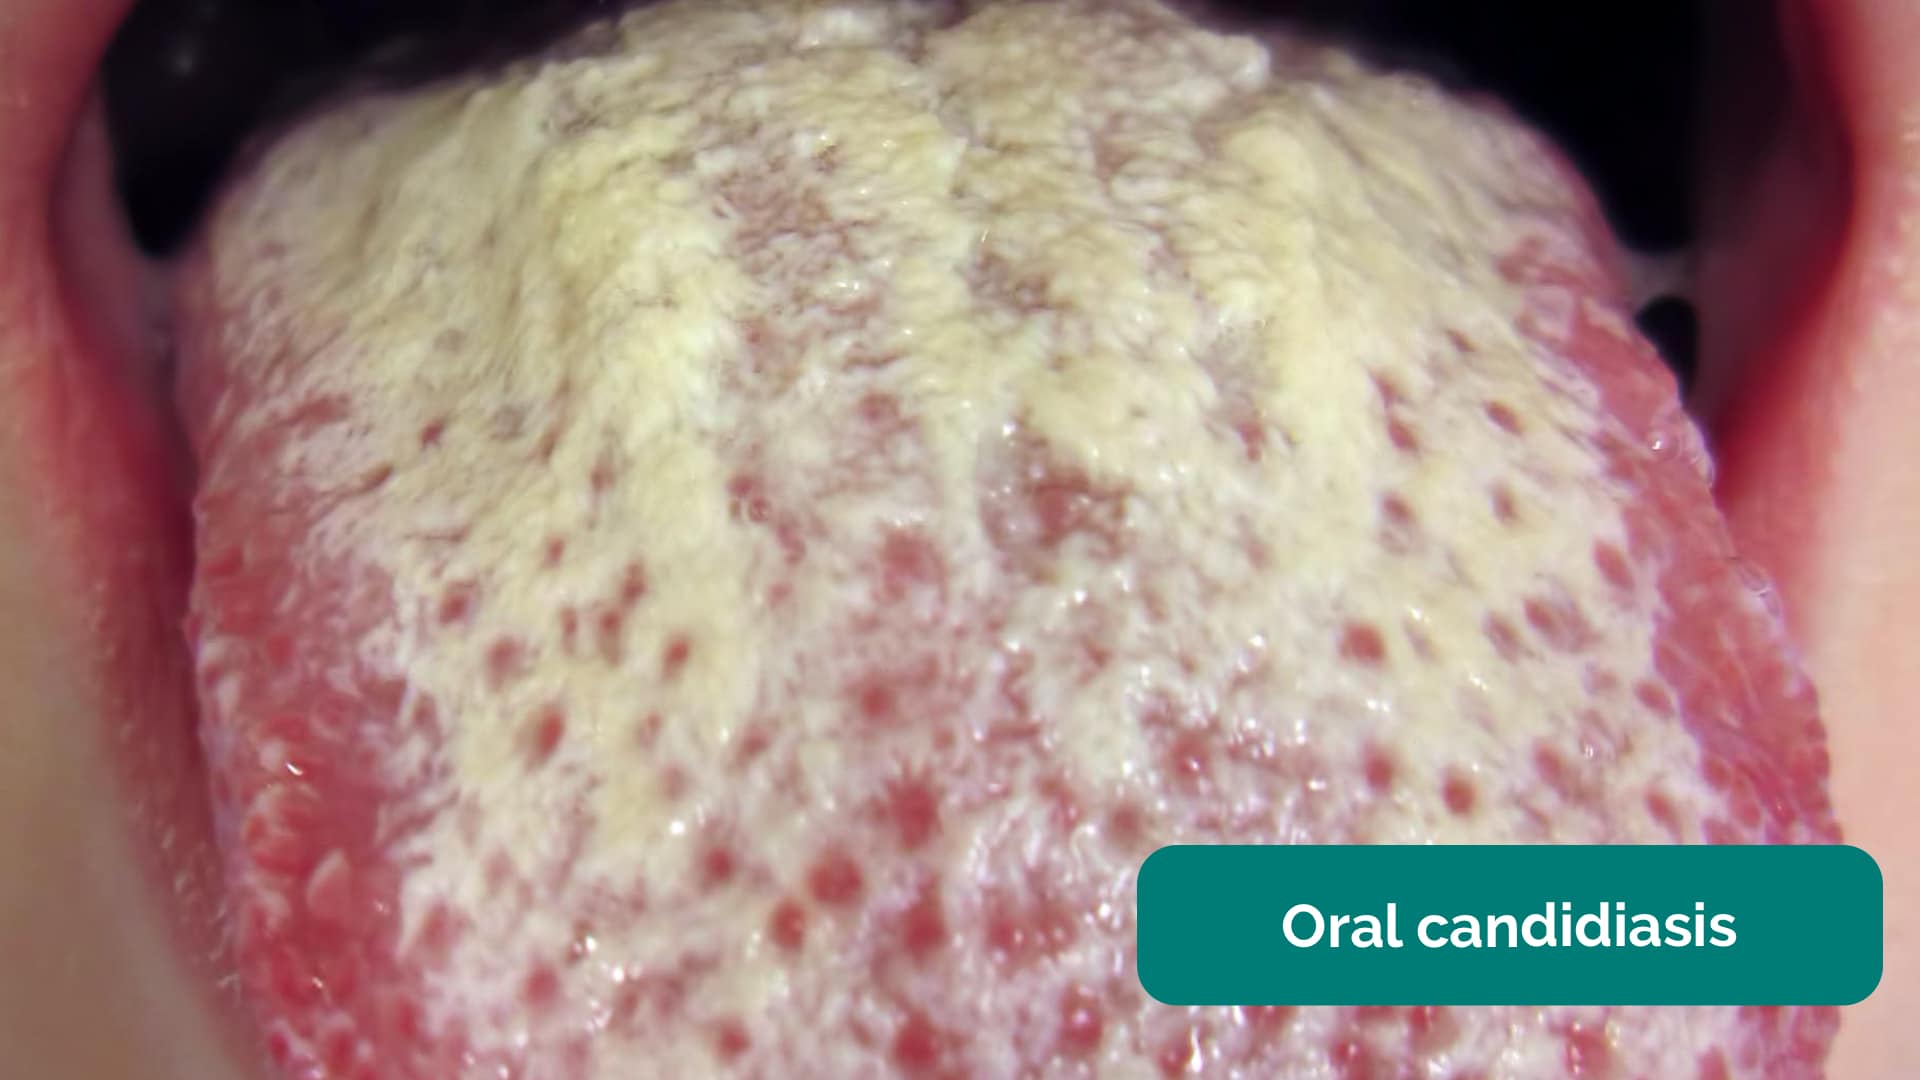
- Oral candidiasis: a fungal infection commonly associated with immunosuppression. It is characterised by pseudomembranous white slough which can be easily wiped away to reveal underlying erythematous mucosa.
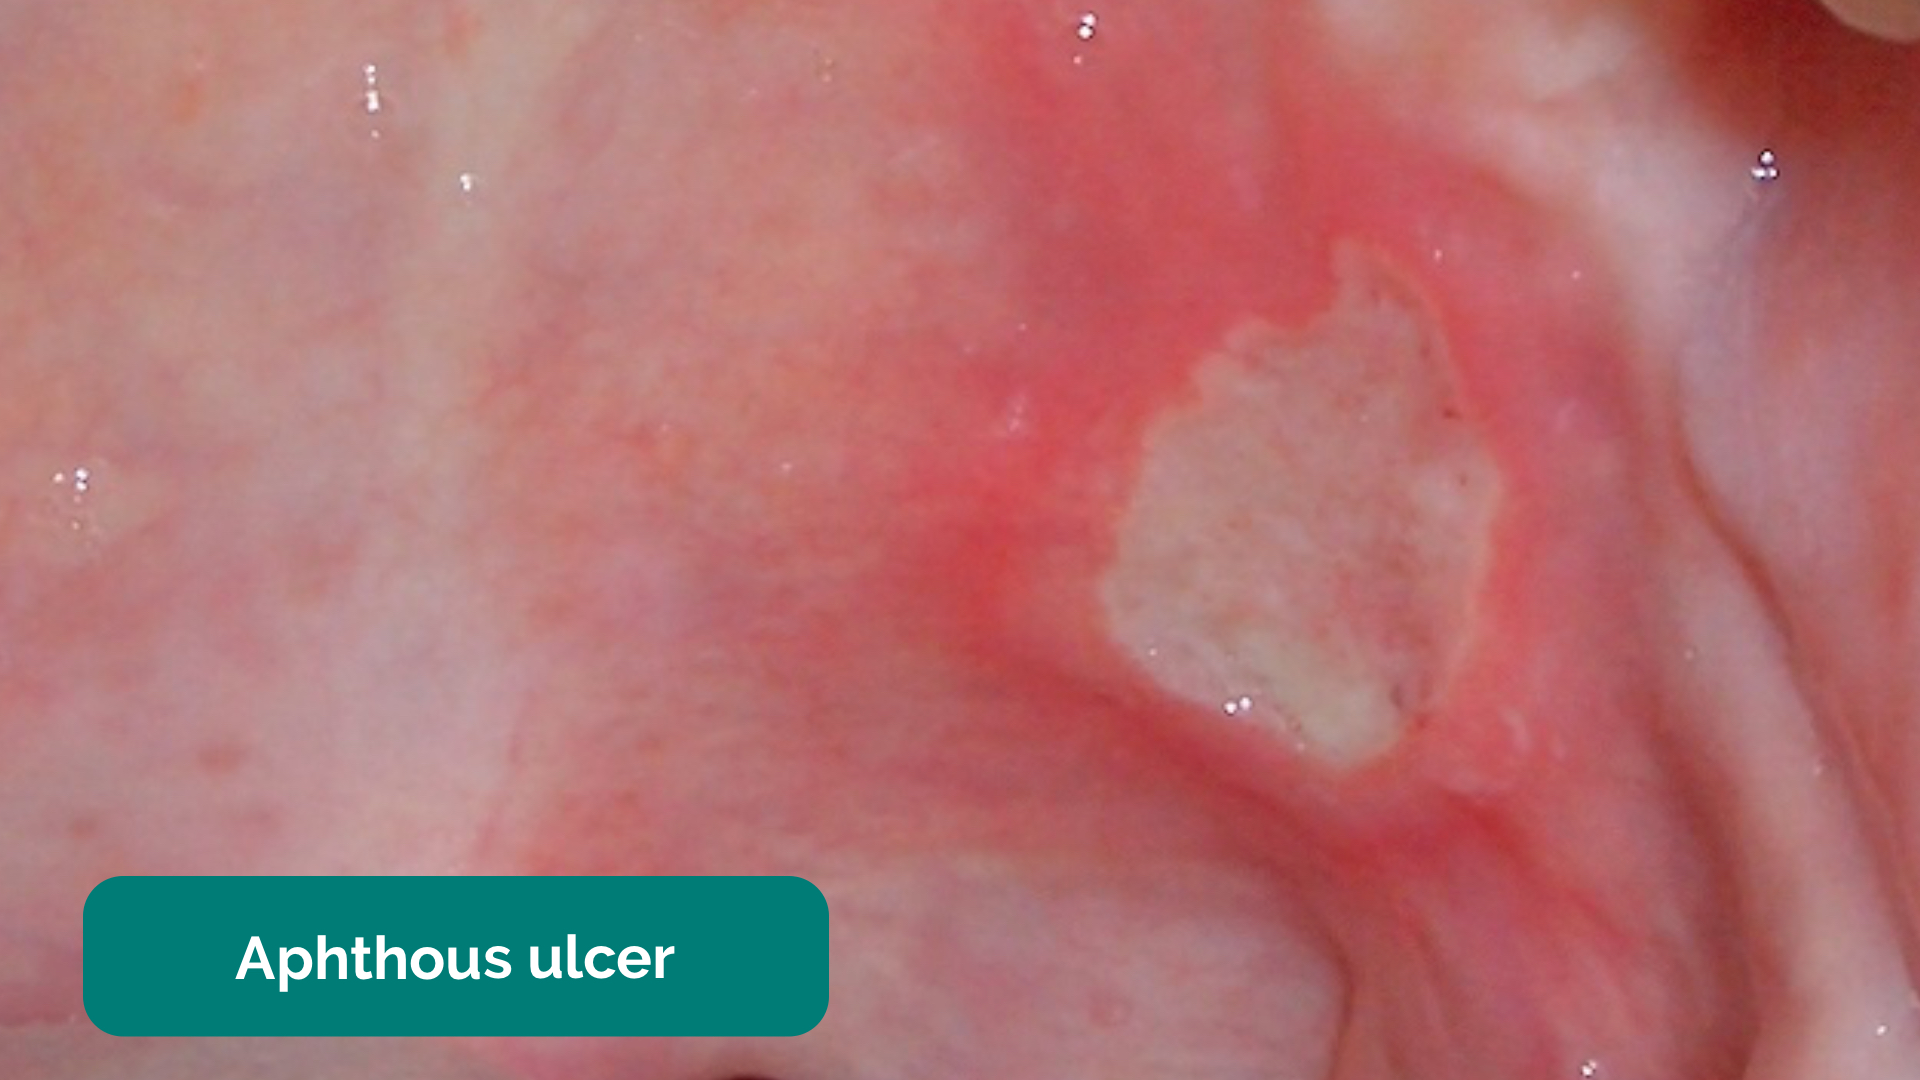
- Aphthous ulceration: round or oval ulcers occurring on the mucous membranes inside the mouth. Aphthous ulcers are typically benign (e.g. due to stress or mechanical trauma), however, they can be associated with iron, B12 and folate deficiency as well as Crohn’s disease.
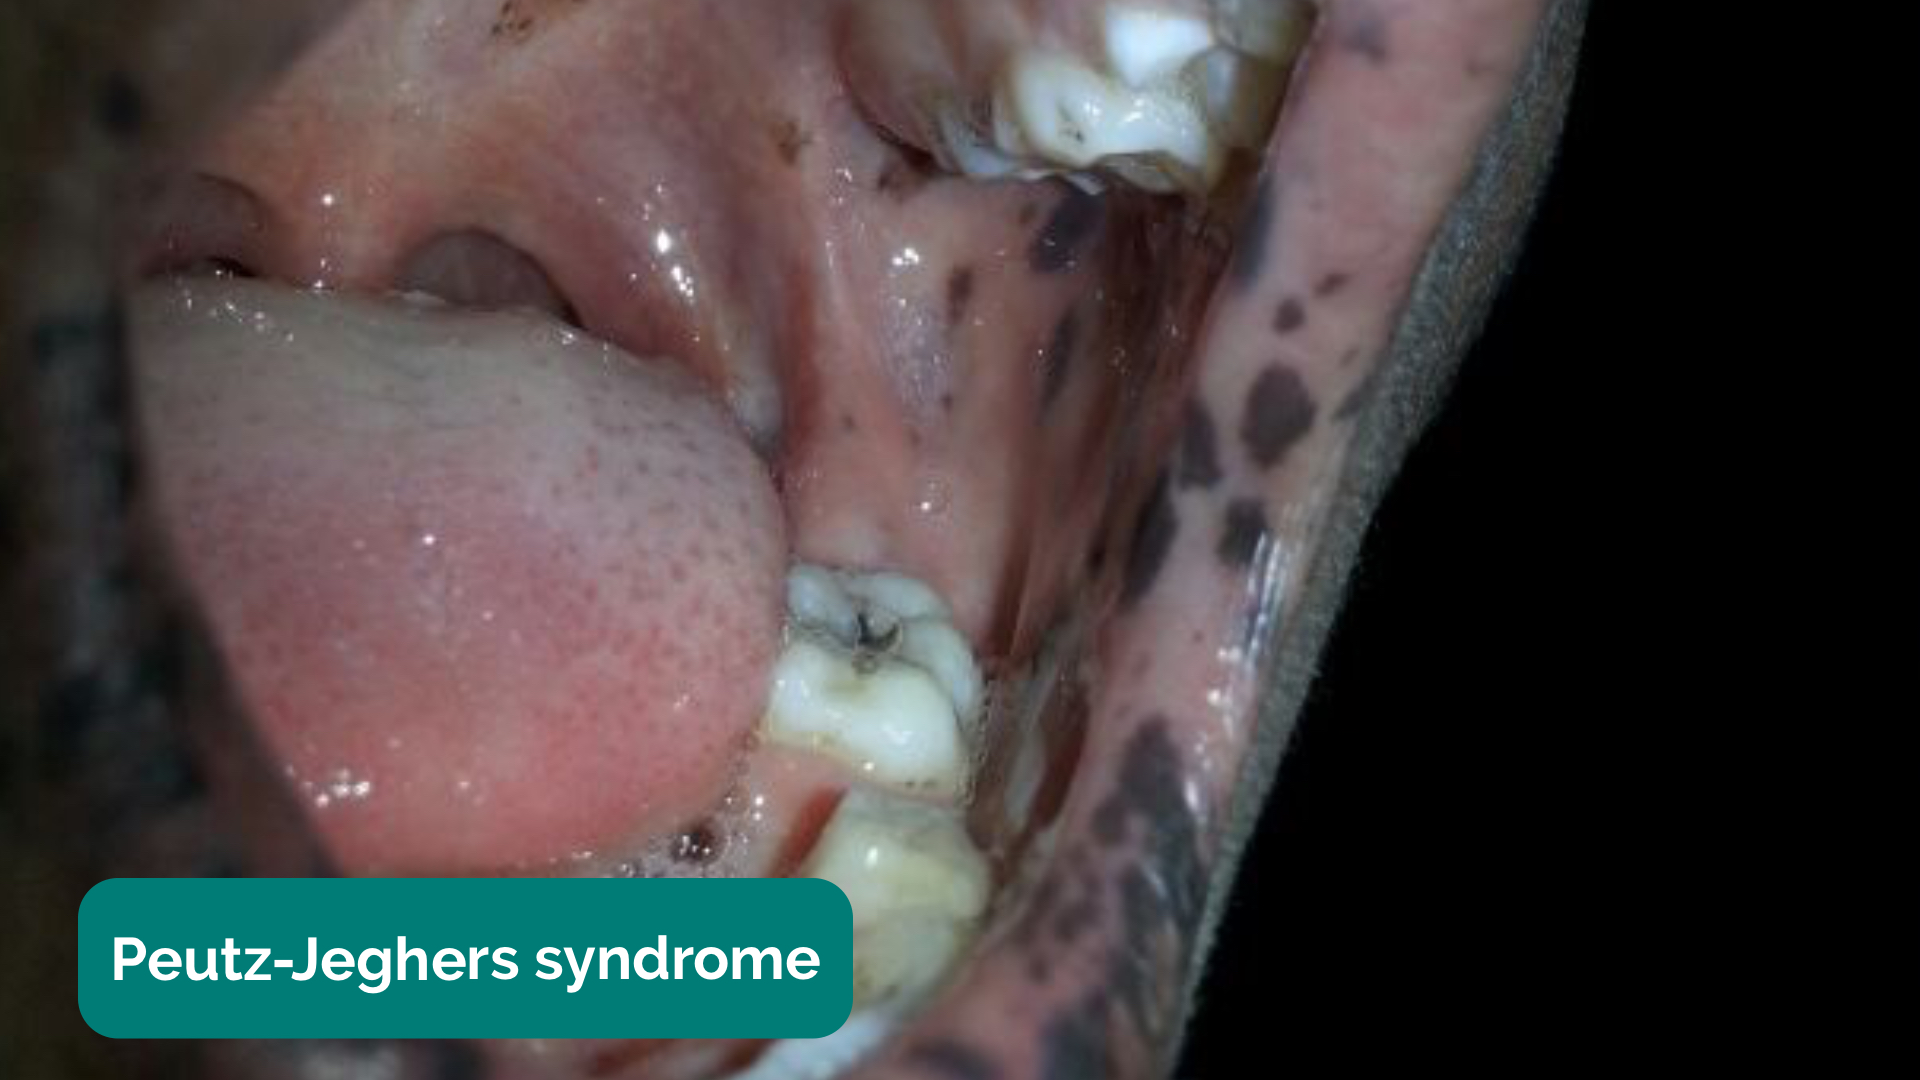
- Hyperpigmented macules: pathognomonic for Peutz-Jeghers syndrome, an autosomal dominant genetic disorder that results in the development of polyps in the gastrointestinal tract.
Inspect the mouth
Angular stomatitis 13
Glossitis 14
Oral candidiasis 15
Aphthous ulcer 16
Peutz-Jeghers syndrome 17
Neck
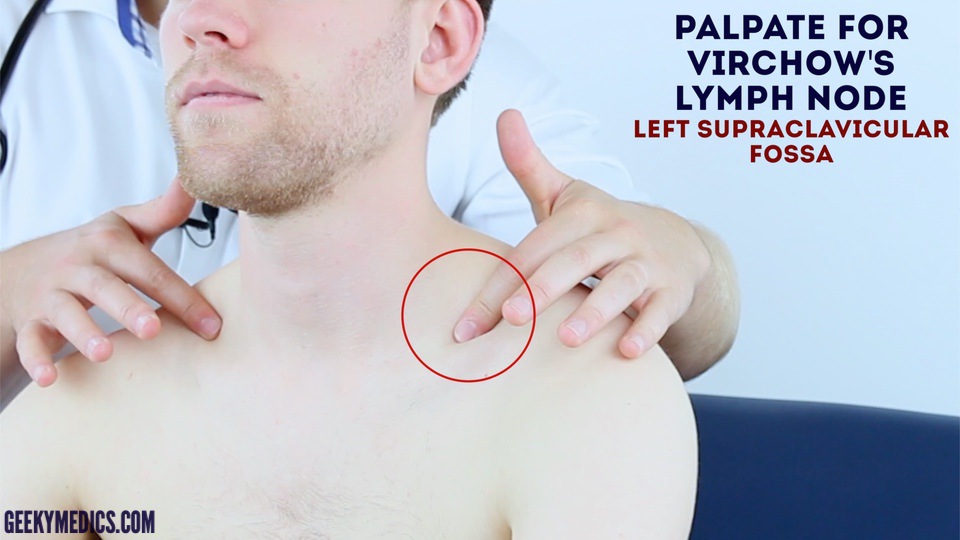
The left supraclavicular lymph node (known as Virchow’s node) receives lymphatic drainage from the abdominal cavity and therefore enlargement of Virchow’s node can be one of the first clinical signs of metastatic intrabdominal malignancy (most commonly gastric cancer). The right supraclavicular lymph node receives lymphatic drainage from the thorax and therefore lymphadenopathy in this region can be associated with metastatic oesophageal cancer (as well as malignancy from other thoracic viscera).
Palpate for lymphadenopathy
Palpate the supraclavicular fossa on each side, paying particular attention to Virchow’s node on the left for evidence of lymphadenopathy.
Palpate for Virchow’s node
Chest
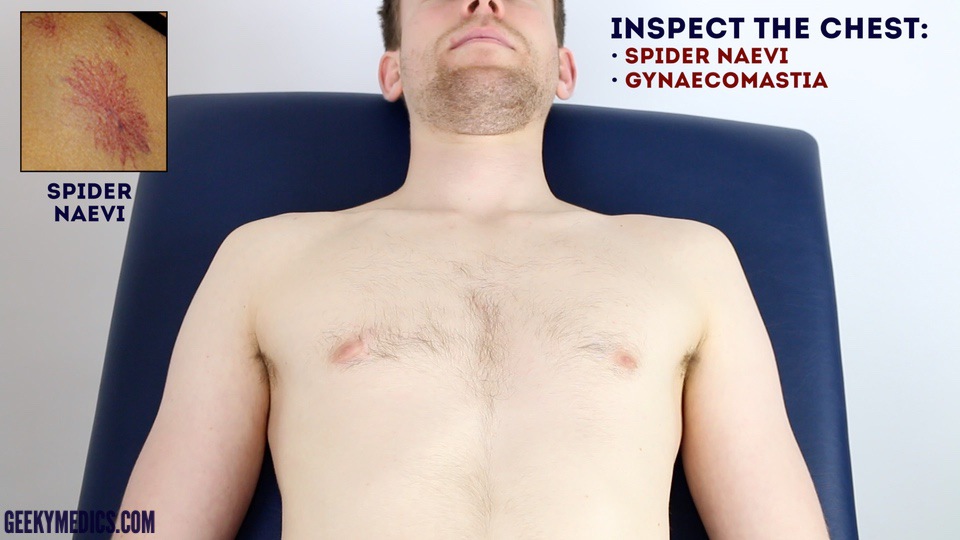
Inspect the patient’s chest for signs suggestive of gastrointestinal pathology:
- Spider naevi: skin lesions that have a central red papule with fine red lines extending radially caused by increased levels of circulating oestrogen. Spider naevi are commonly associated with liver cirrhosis, but can also be a normal finding in pregnancy or in women taking the combined oral contraceptive pill. If more than 5 are present it is more likely to be associated with pathology such as liver cirrhosis.
- Gynaecomastia: enlargement of male breast tissue caused by increased levels of circulating oestrogen (e.g. liver cirrhosis). Other causes include medications such as digoxin and spironolactone.
- Hair loss: also caused by increased levels of circulating oestrogen. General malnourishment can also result in hair loss.
Inspect the chest
Spider naevi 18

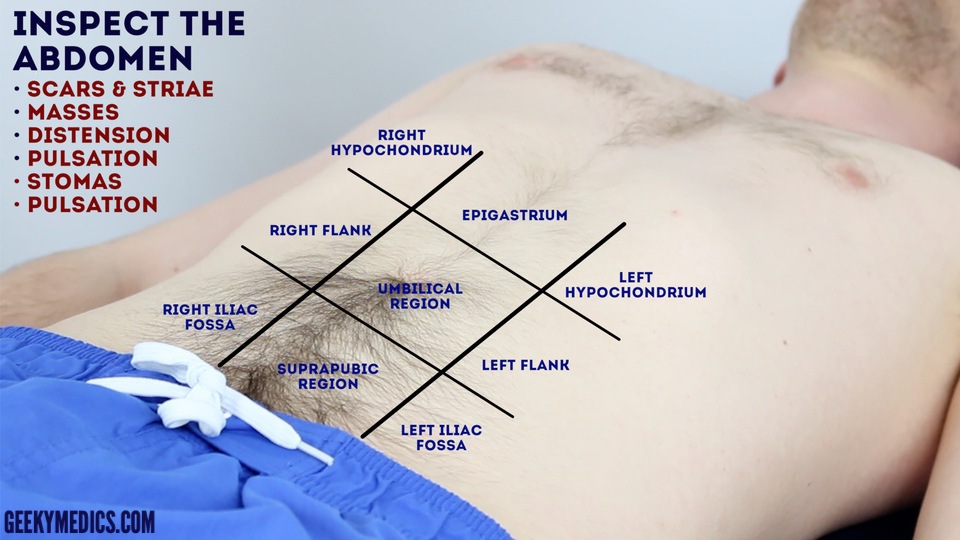
- Abdominal inspection
- Position the patient lying flat on the bed, with their arms by their sides and legs uncrossed for abdominal inspection and subsequent palpation.
Inspect the patient’s abdomen for signs suggestive of gastrointestinal pathology:
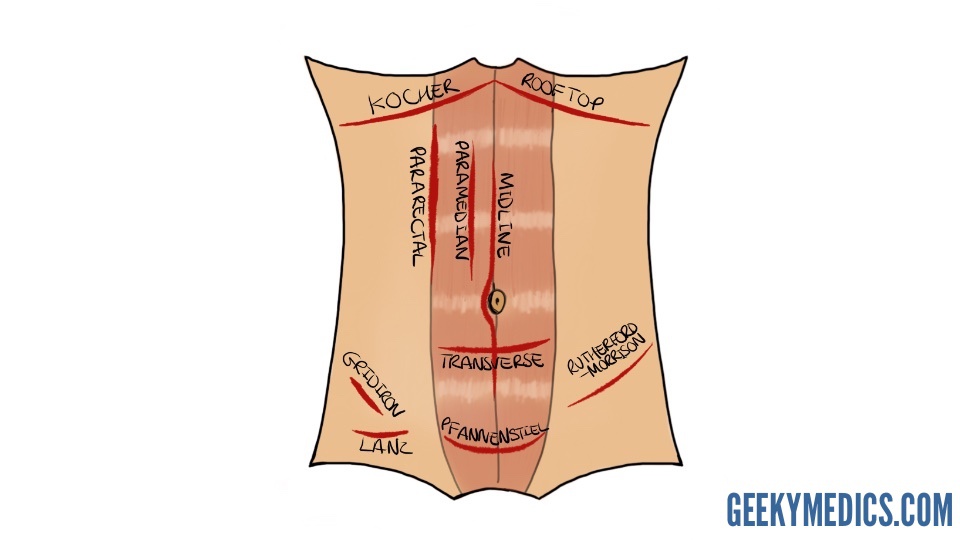
- Scars: there are many different types of abdominal scars that can provide clues as to the patient’s past surgical history (see image below for examples).
- Abdominal distension: can be caused by a wide range of pathology including the six f’s (fat, fluid, flatus, faeces, fetus or fulminant mass).
- Caput medusae: engorged paraumbilical veins associated with portal hypertension (e.g. liver cirrhosis).
- Striae (stretch marks): caused by tearing during the rapid growth or overstretching of skin (e.g. ascites, intrabdominal malignancy, Cushing’s syndrome, obesity, pregnancy).
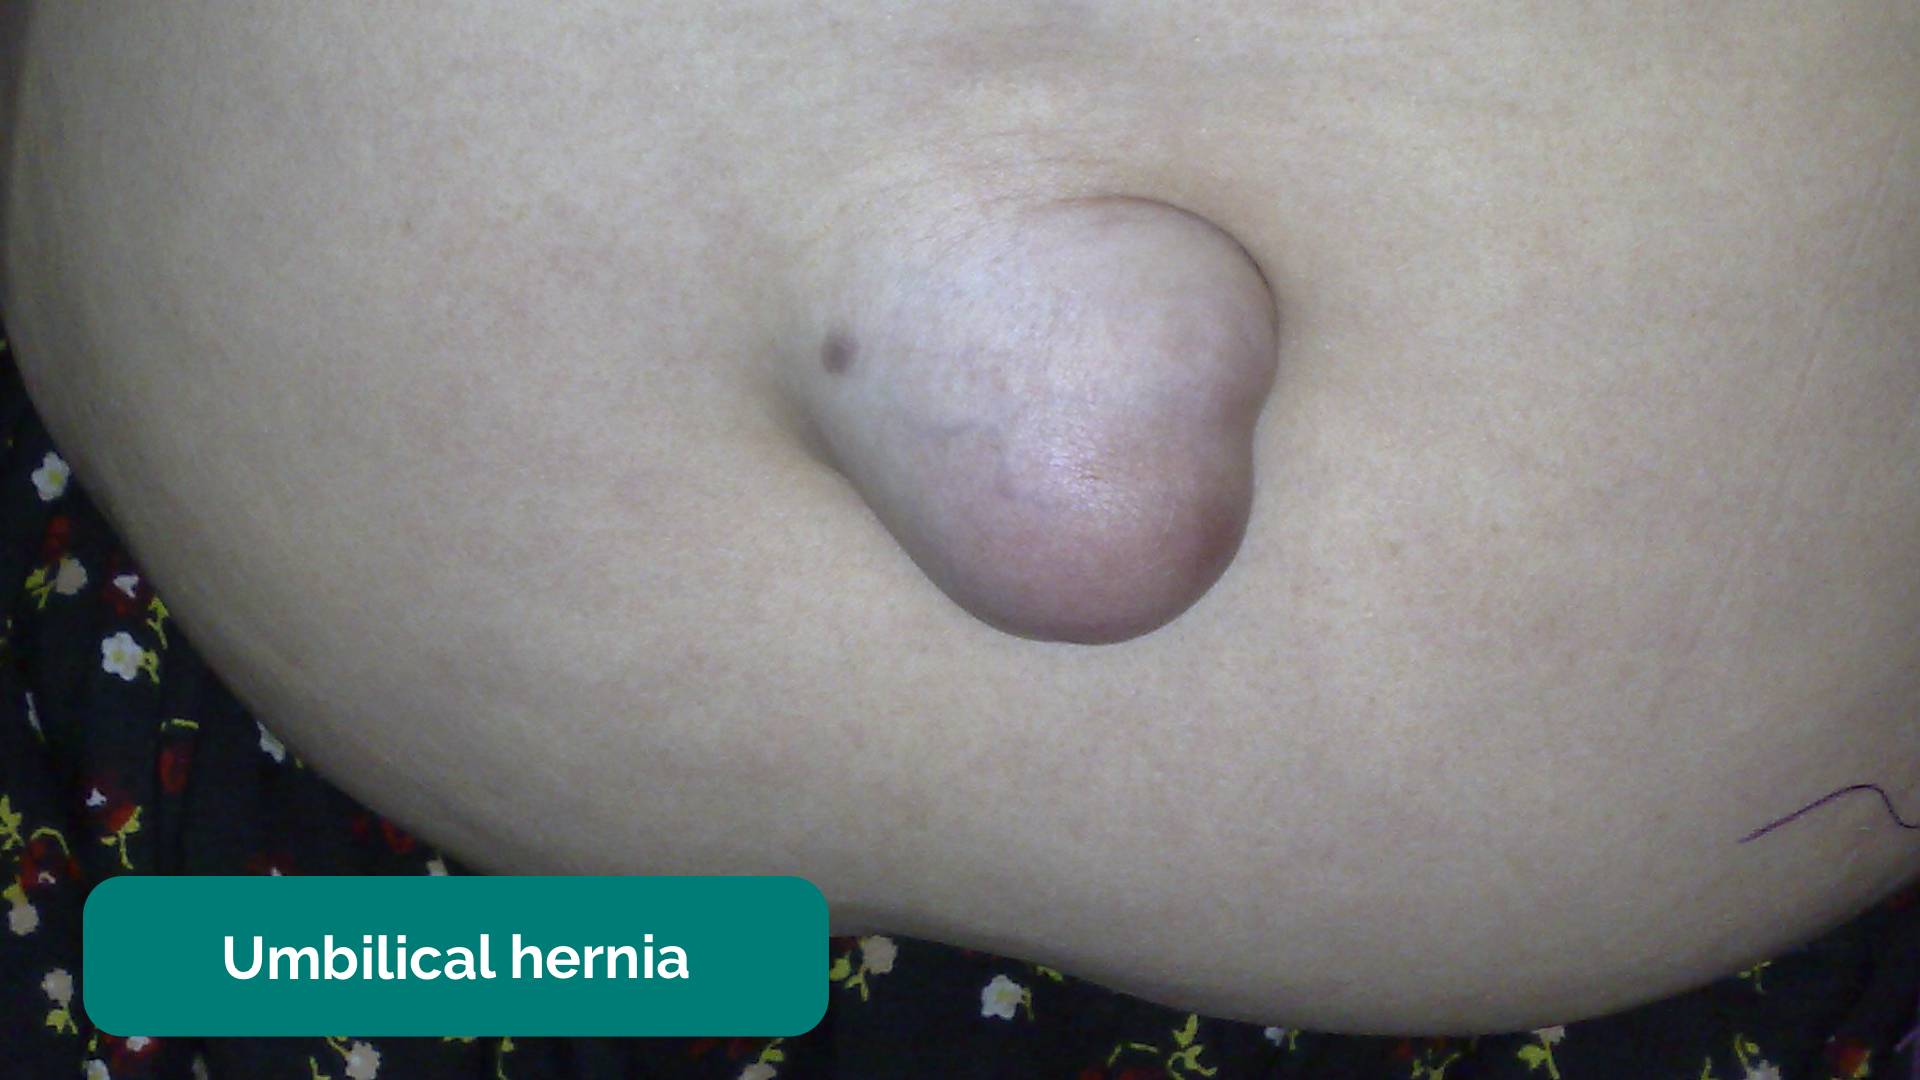
- Hernias: ask the patient to cough and observe for any protrusions through the abdominal wall (e.g. umbilical hernia, incisional hernia).
- Cullen’s sign: bruising of the tissue surrounding the umbilicus associated with haemorrhagic pancreatitis (a late sign).
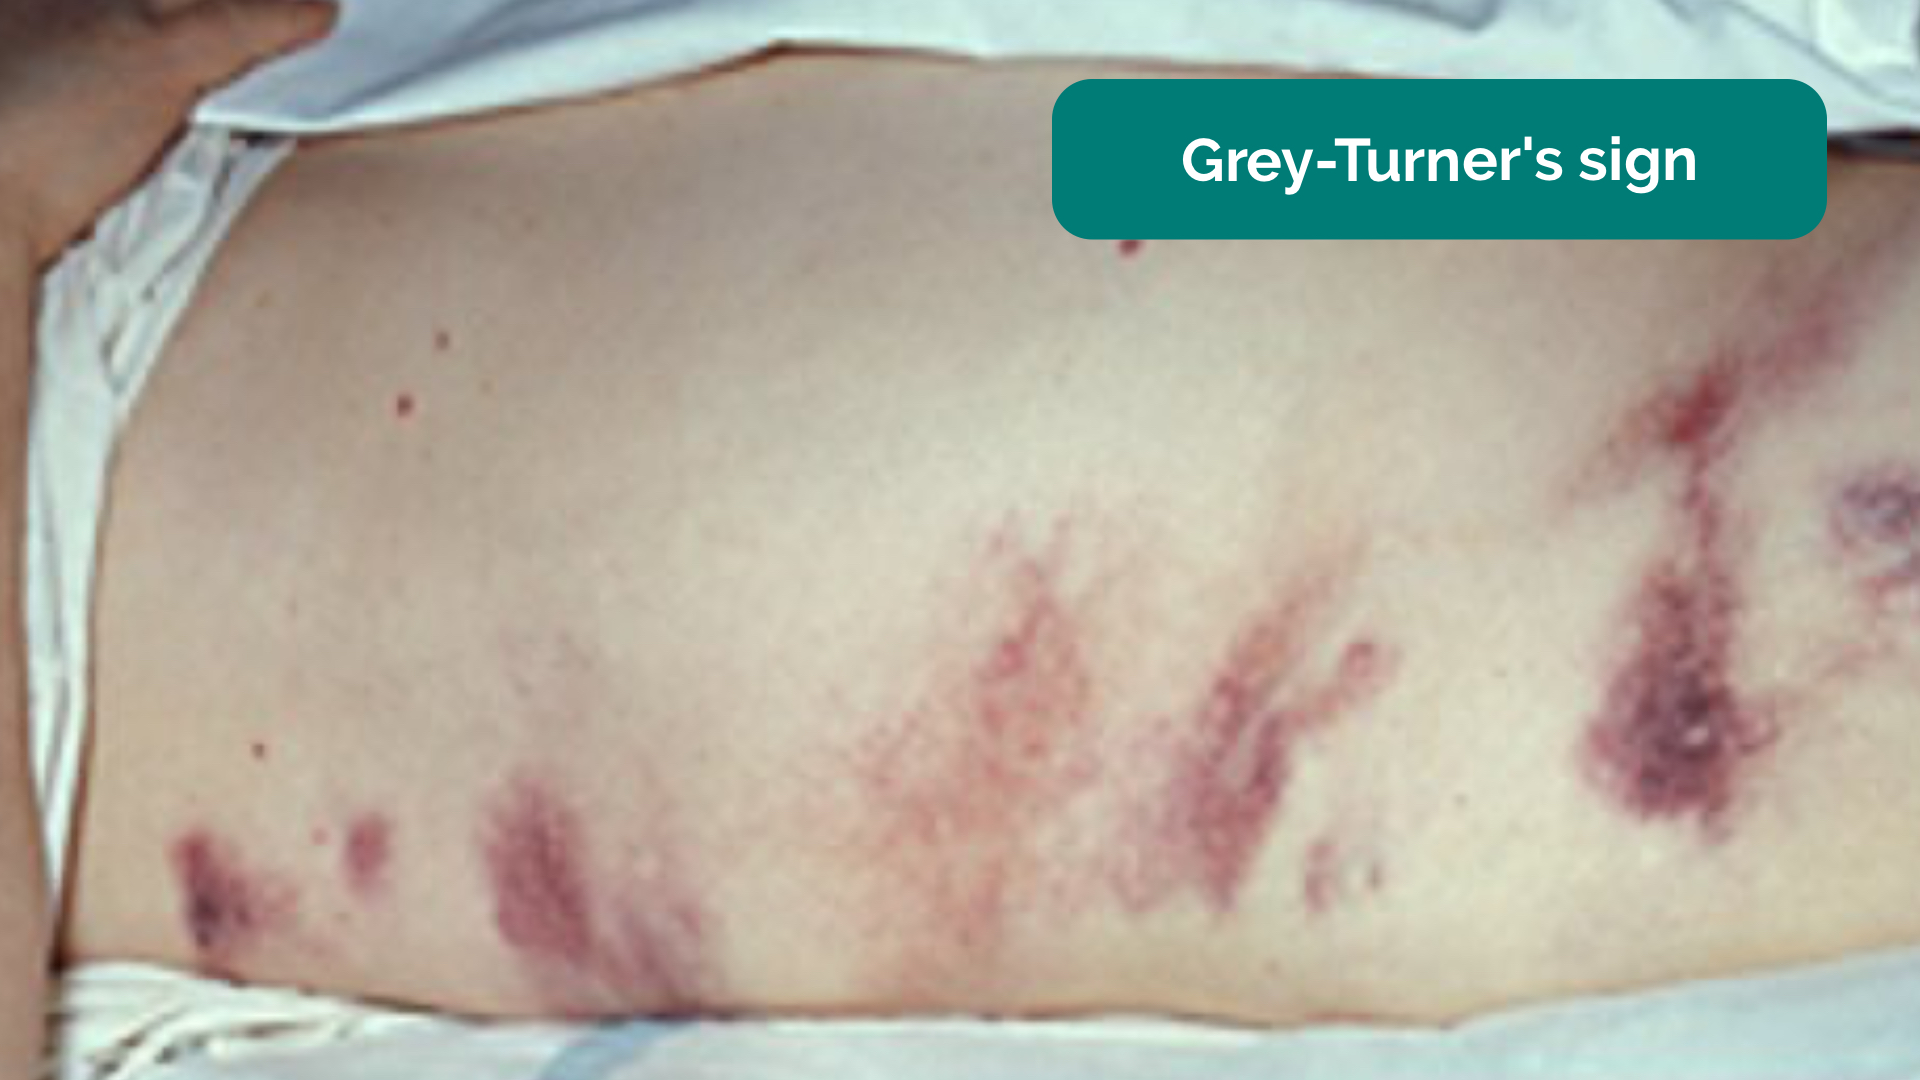
- Grey-Turner’s sign: bruising in the flanks associated with haemorrhagic pancreatitis (a late sign).
Inspect the abdomen
Abdominal surgical incision sites
Ascites and caput medusae 2
Striae 19
Umbilical hernia 20
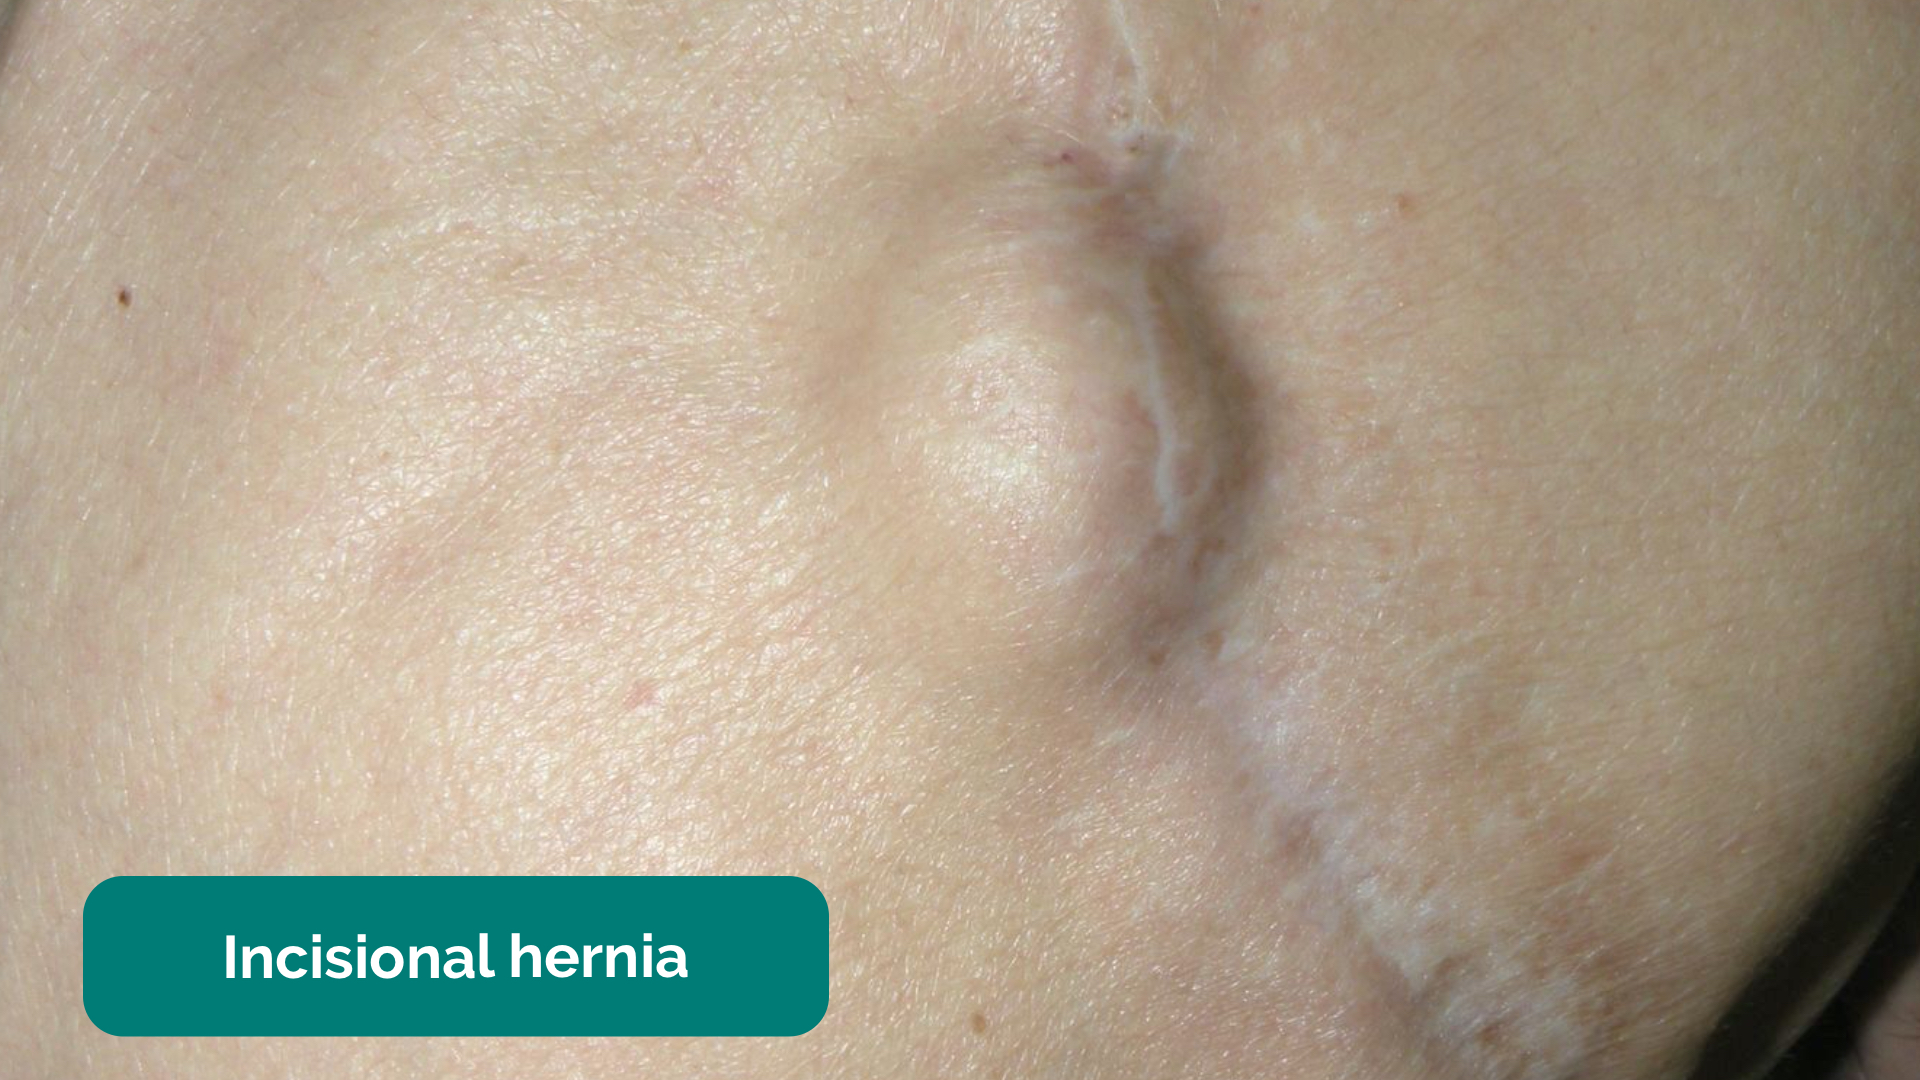
Incisional hernia 21
Cullen’s sign 22
Grey-Turner’s sign 23
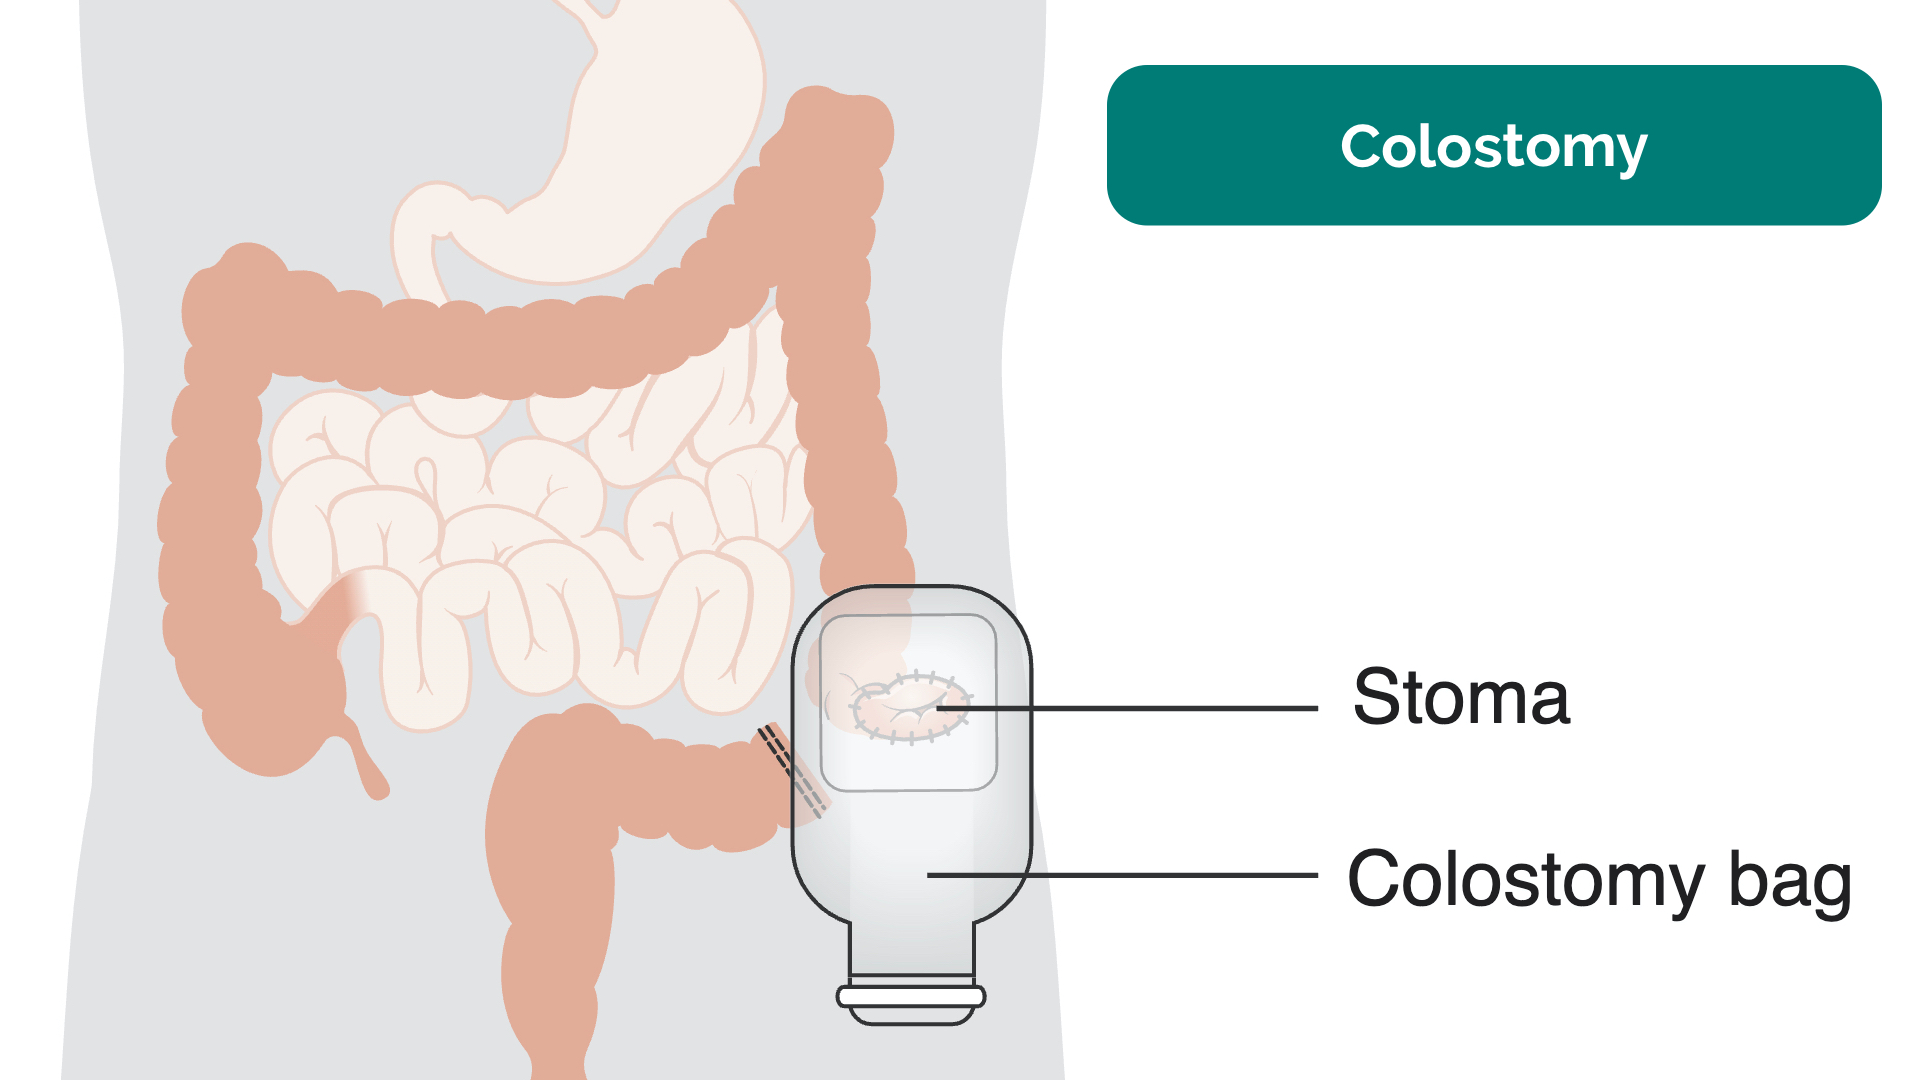
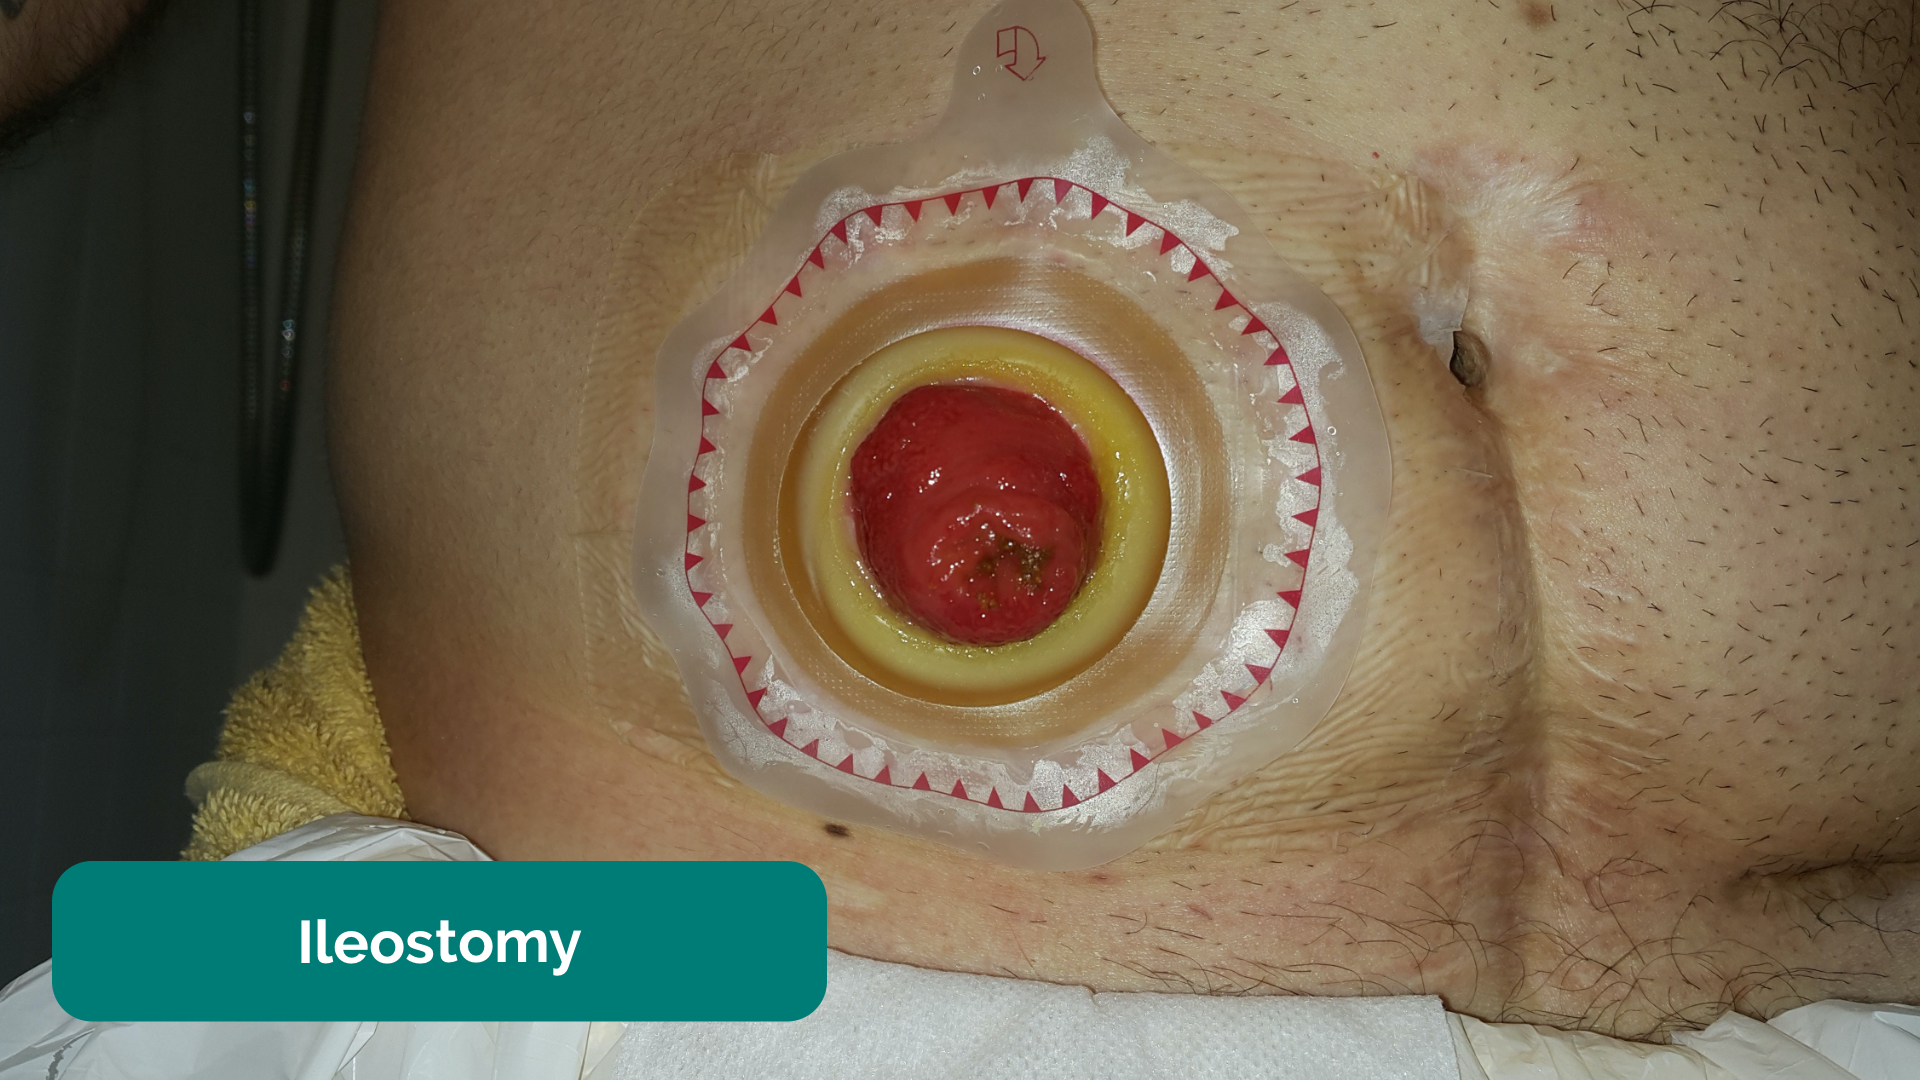
Stomas
If a stoma is present, assess the following characteristics:
- Location: this can provide clues as to the type of stoma (e.g. colostomies are typically located in the left iliac fossa, ileostomies and urostomies are typically located in the right iliac fossa).
- Contents: can be stool (e.g. colostomy or ileostomy) or urine (e.g. urostomy).
- Consistency of stool: note if it is liquid (ileostomy) or solid (colostomy).
- Spout: colostomies are flush to the skin with no spout whereas ileostomies and urostomies have a spout.
Colostomy 24
Ileostomy 25
Abdominal palpation
Preparation
Before beginning abdominal palpation:
- The patient should already be positioned lying flat on the bed.
- Ask the patient if they are aware of any areas of abdominal pain (if present, examine these areas last).
- Kneel beside the patient to carry out palpation and observe their face throughout the examination for signs of discomfort.
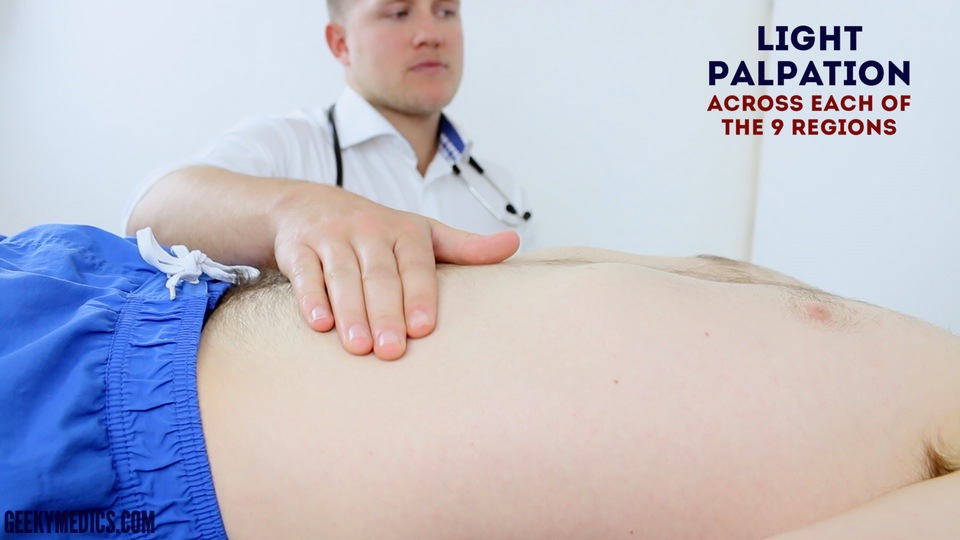
Light palpation of the abdomen
Lightly palpate each of the nine abdominal regions, assessing for clinical signs suggestive of gastrointestinal pathology:
- Tenderness:note the abdominal region(s) involved and the severity of the pain.
- Rebound tenderness: said to be present when the abdominal wall, having been compressed slowly, is released rapidly and results in sudden sharp abdominal pain. This is a non-specific, unreliable clinical sign that can, in some cases, be associated with peritonitis (e.g. appendicitis).
- Voluntary guarding: contraction of the abdominal muscles in response to pain
- Involuntary guarding/rigidity: involuntary tension in the abdominal muscles that occurs on palpation associated with peritonitis (e.g. appendicitis, diverticulitis).
- Rovsing’s sign: palpation of the left iliac fossa causes pain to be experienced in the right iliac fossa. This sign was historically said to be indicative of appendicitis, but it is not reliable and at best indicates peritoneal inflammation of any cause affecting the left and/or right iliac fossa.
- Masses: large or superficial masses (e.g. hernias) may be noted on light palpation.
Deep palpation of the abdomen
Palpate each of the nine abdominal regions again, this time applying greater pressure to identify any deeper masses. Warn the patient this may feel uncomfortable and ask them to let you know if they want you to stop. You should also carefully monitor the patient’s face for evidence of discomfort (as they may not vocalise this).
If any masses are identified during deep palpation, assess the following characteristics:
- Location: note which of the nine abdominal regions the mass located within.
- Size and shape: assess the approximate size and shape of the mass.
- Consistency: assess the consistency of the mass (e.g. smooth, soft, hard, irregular).
- Mobility: assess if the mass appears to be attached to superficial or underlying structures.
- Pulsatility: note if the mass feels pulsatile, suggestive of vascular aetiology (e.g. abdominal aortic aneurysm).
Perform light abdominal palpation
Perform deep abdominal palpation
Palpate the liver
1. Begin palpation in the right iliac fossa, starting at the edge of the superior iliac spine, using the flat edge of your hand (the radial side of your right index finger).
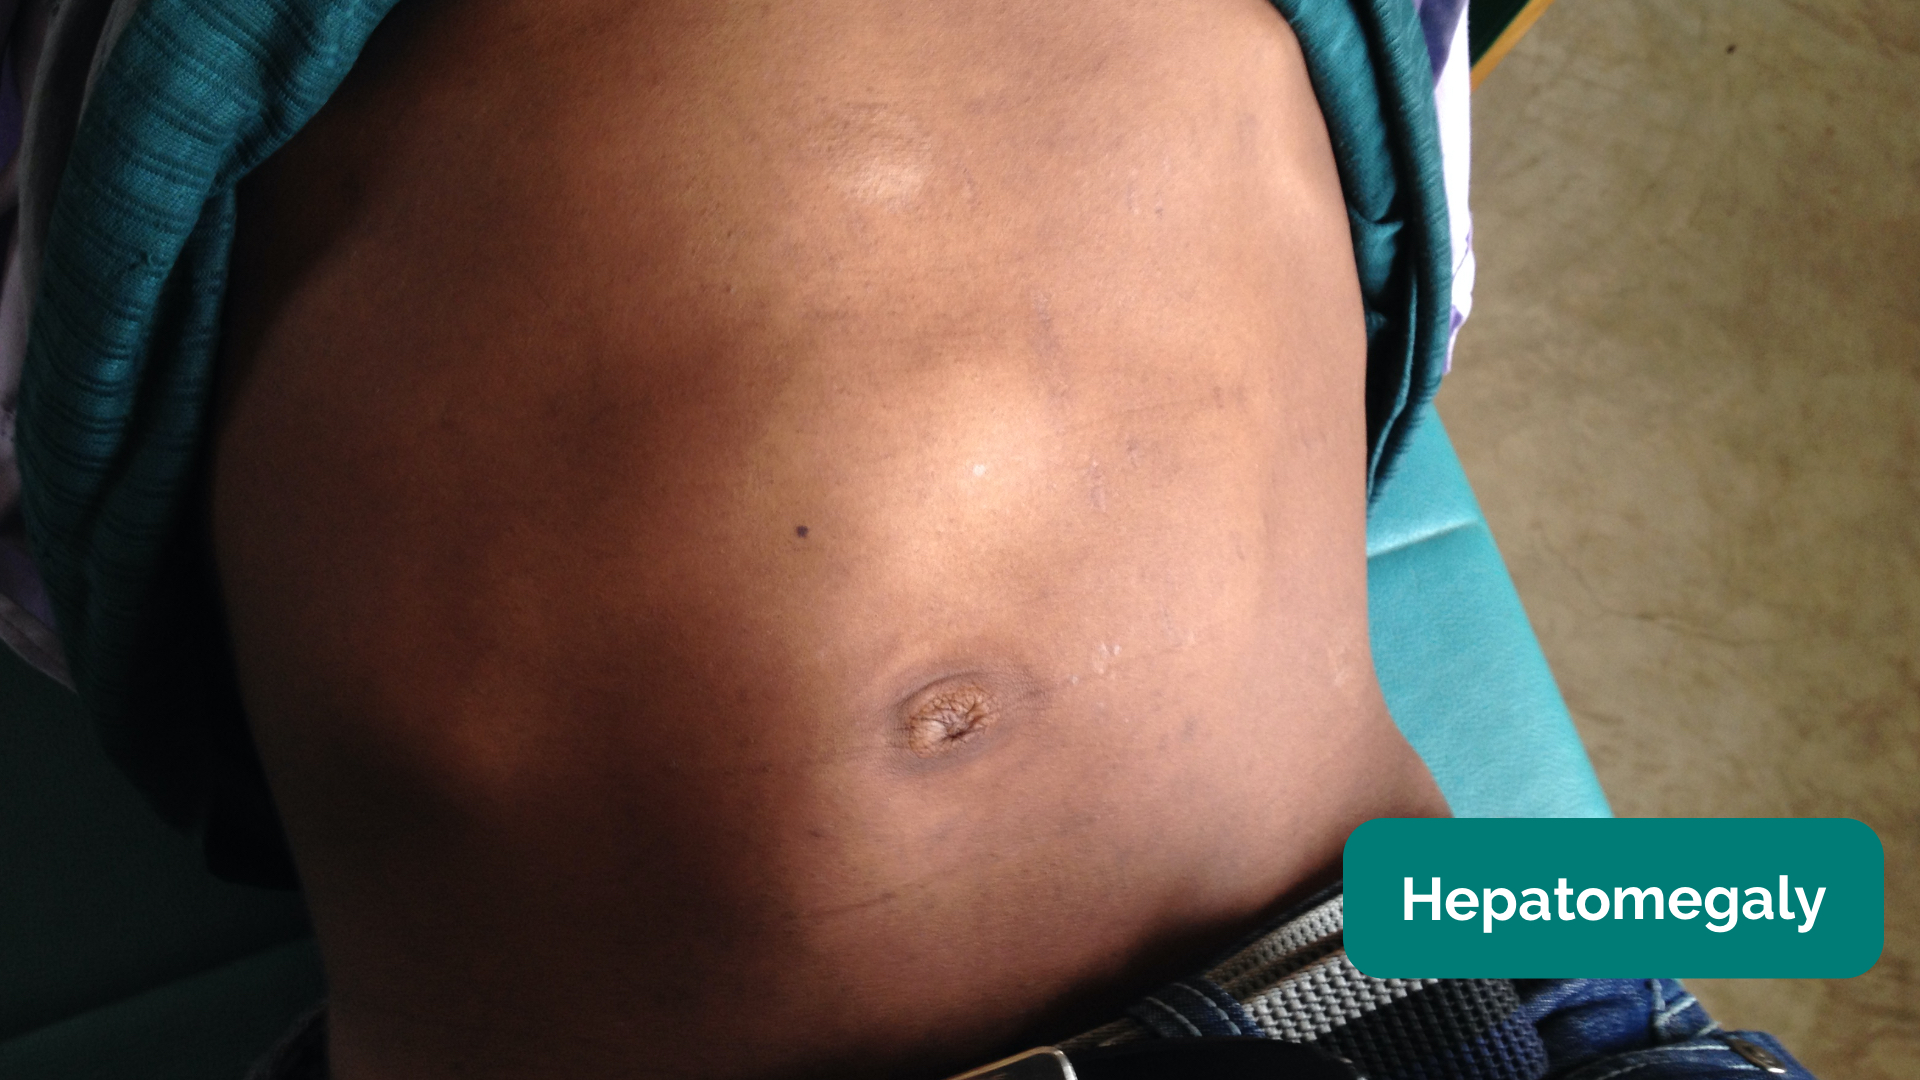
2. Ask the patient to take a deep breath and as they begin to do this palpate the abdomen. Feel for a step as the liver edge passes below your hand during inspiration (a palpable liver edge this low in the abdomen suggests gross hepatomegaly).
3. Repeat this process of palpation moving 1-2 cm superiorly from the right iliac fossa each time towards the right costal margin.
4. As you get close to the costal margin (typically 1-2 cm below it) the liver edge may become palpable in healthy individuals.
If you are able to identify the liver edge, assess the following characteristics:
- Degree of extension below the costal margin: if greater than 2 cm this suggests hepatomegaly.
- Consistency of the liver edge: a nodular consistency is suggestive of cirrhosis.
- Tenderness: hepatic tenderness may suggest hepatitis or cholecystitis (as you may be palpating the gallbladder)
- Pulsatility: pulsatile hepatomegaly is associated with tricuspid regurgitation.
Causes of hepatomegaly
There is a wide range of possible causes of hepatomegaly including but not limited to:
- Hepatitis (infective and non-infective)
- Hepatocellular carcinoma
- Hepatic metastases
- Wilson’s disease
- Haemochromatosis
- Leukaemia
- Myeloma
- Glandular fever
- Primary biliary cirrhosis
- Tricuspid regurgitation
- Haemolytic anaemia
Palpate the liver
Hepatomegaly 26
Palpate the gallbladder
In healthy individuals, the gallbladder is not usually palpable. If the gallbladder is palpable it suggests enlargement secondary to biliary flow obstruction (e.g. pancreatic malignancy, gallstones) and/or infection (e.g. cholecystitis).
Palpation of the gallbladder can be attempted at the right costal margin, in the mid-clavicular line (the tip of the 9th rib). If the gallbladder is enlarged, a well-defined round mass that moves with respiration may be noted. Tenderness suggests a diagnosis of cholecystitis whereas a distended painless gallbladder may indicate underlying pancreatic cancer (particularly if also associated with jaundice).
Murphy’s sign
1. Position your fingers at the right costal margin in the mid-clavicular line at the liver’s edge.
2. Ask the patient to take a deep breath.
If the patient suddenly stops mid-breath due to pain, this suggests the presence of cholecystitis (known as “Murphy’s sign positive”).
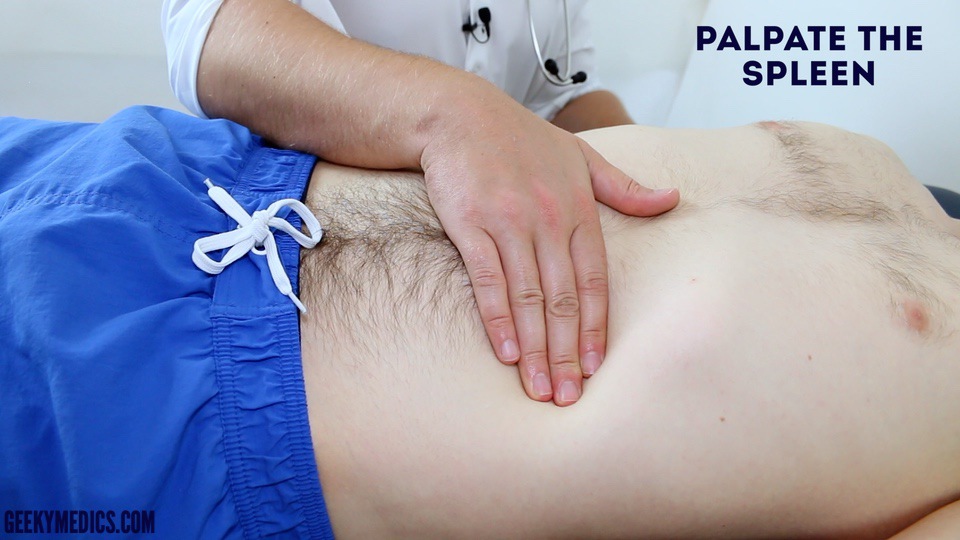
Palpate the spleen
1. Begin palpation in the right iliac fossa, starting at the edge of the superior iliac spine, using the flat edge of your hand (the radial side of your right index finger).
2. Ask the patient to take a deep breath and as they begin to do this palpate the abdomen with your fingers aligned with the left costal margin. Feel for a step as the splenic edge passes below your hand during inspiration (the splenic notch may be noted).
3. Repeat this process of palpation moving 1-2 cm superiorly from the right iliac fossa each time towards the left costal margin.
In healthy individuals, you should not be able to palpate the spleen. A palpable spleen at the edge of the left costal margin would suggest splenomegaly (for the spleen to be palpable at this location it would need to be approximately three times its normal size).
Causes of splenomegaly
There is a wide range of possible causes of splenomegaly including but not limited to:
- Portal hypertension secondary to liver cirrhosis
- Haemolytic anaemia
- Congestive heart failure
- Splenic metastases
- Glandular fever
Palpate the spleen
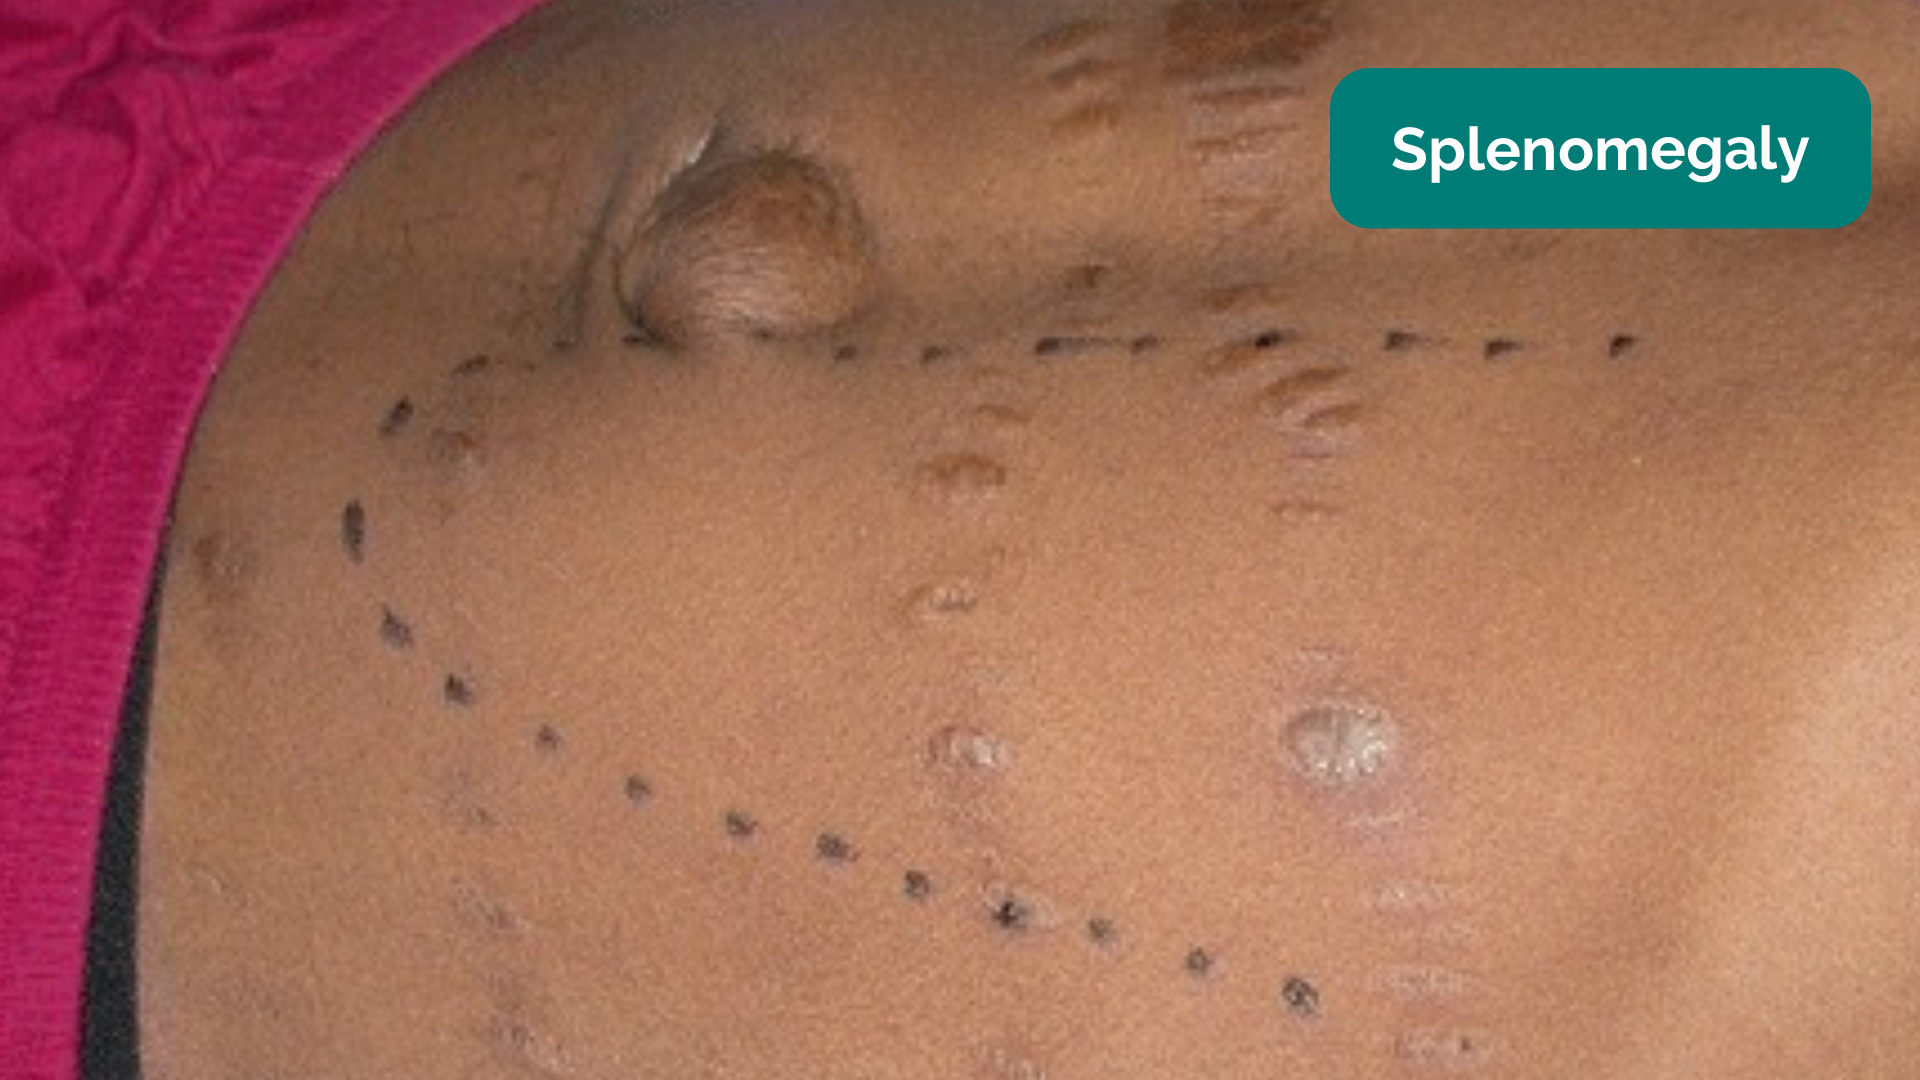
Splenomegaly 27
Ballot the kidneys
1. Place your left hand behind the patient’s back, below the ribs and underneath the right flank.
2. Then place your right hand on the anterior abdominal wall just below the right costal margin in the right flank.
3. Push your fingers together, pressing upwards with your left hand and downwards with your right hand.
4. Ask the patient to take a deep breath and as they do this feel for the lower pole of the kidney moving down between your fingers. This bimanual method of kidney palpation is known as balloting.
5. If a kidney is ballotable, describe its size and consistency.
6. Repeat this process on the opposite side to ballot the left kidney.
In healthy individuals, the kidneys are not usually ballotable, however, in patients with a low body mass index, the inferior pole can sometimes be palpated during inspiration.
Causes of enlarged kidneys
- Bilaterally enlarged, ballotable kidneys can occur in polycystic kidney disease or amyloidosis.
- A unilaterally enlarged, ballotable kidney can be caused by a renal tumour.
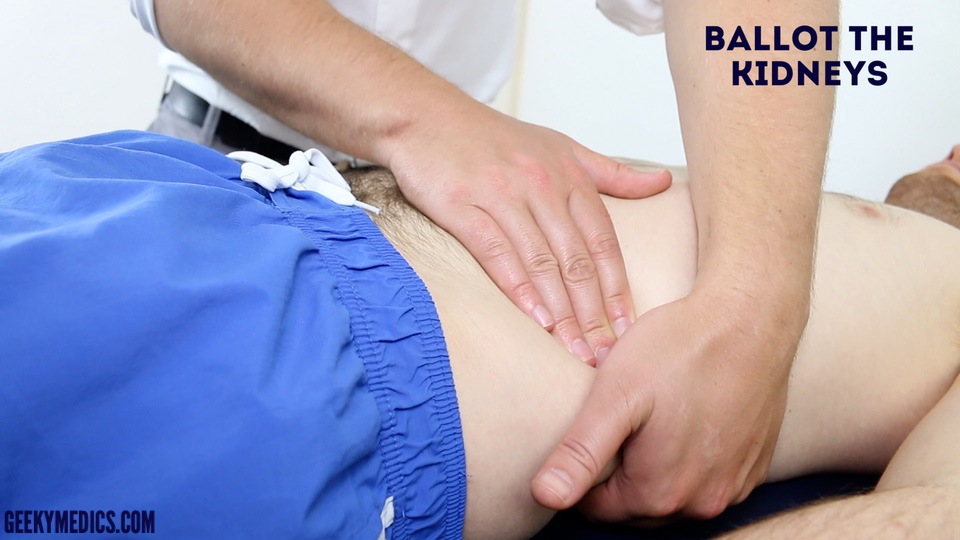
Ballot the kidneys
Palpate the aorta
1. Using both hands perform deep palpation just superior to the umbilicus in the midline.
2. Note the movement of your fingers:
- In healthy individuals, your hands should begin to move superiorly with each pulsation of the aorta.
- If your hands move outwards, it suggests the presence of an expansile mass (e.g. abdominal aortic aneurysm).This is a crude clinical test and further investigations would be required before a diagnosis of an abdominal aortic aneurysm was made.
Palpate the aorta
Palpate the bladder
Before performing bladder palpation, allow the patient the opportunity to go to the toilet. Warn the patient that palpation may be uncomfortable and bring about the sudden urge to pass urine.
A distended bladder can be palpated in the suprapubic area arising from behind the pubic symphysis (e.g. urinary obstruction/retention). In most healthy patients who are passing urine regularly, the bladder will not be palpable.
Abdominal percussion
Percuss the liver
1. Percuss upwards 1-2 cm at a time from the right iliac fossa (the same position used to begin palpation) towards the right costal margin until the percussion note changes from resonant to dull indicating the location of the lower liver border.
2. Continue to percuss upwards 1-2 cm at a time until the percussion note changes from dull to resonant indicating the location of the upper liver border.
3. Use the knowledge of the upper and lower border of the liver to determine its approximate size.
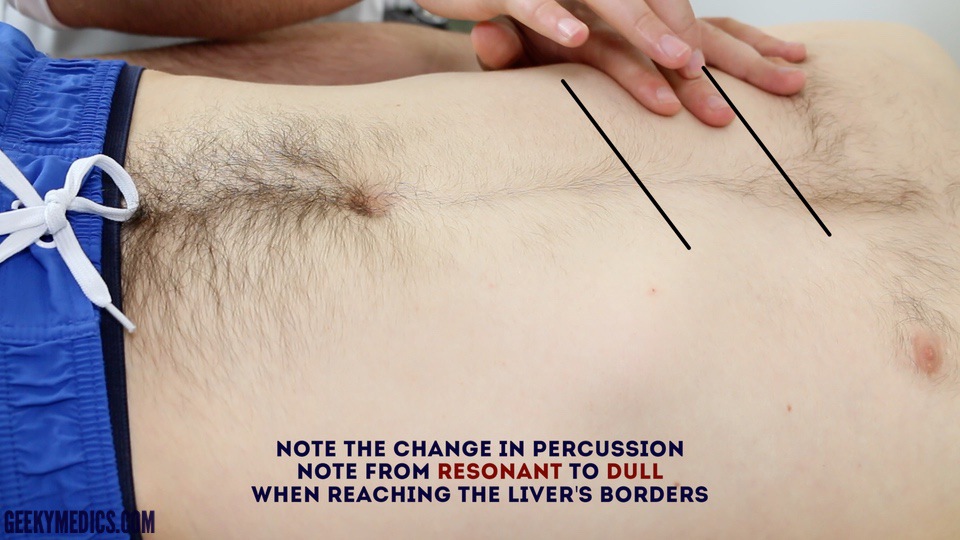
Percuss to determine the liver’s borders
Percuss upwards 1-2 cm at a time from the right iliac fossa (the same position used to begin palpation) towards the left costal margin until the percussion note changes from resonant to dull indicating the location of the spleen (in the absence of splenomegaly the spleen should not be identifiable using percussion).
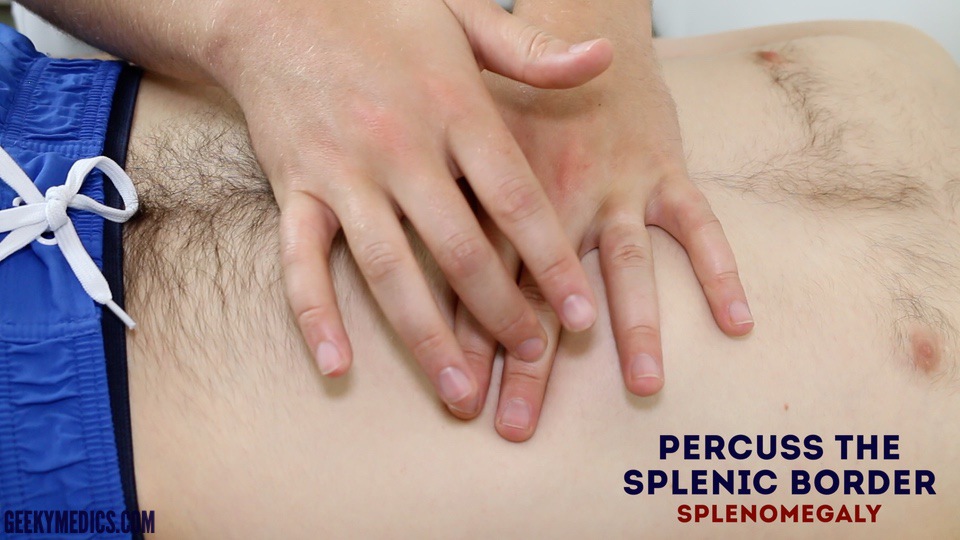
Percuss the spleen
Percuss the bladder
Percuss downwards in the midline from the umbilical region towards the pubic symphysis. A distended bladder will be dull to percussion allowing you to approximate the bladder’s upper border.
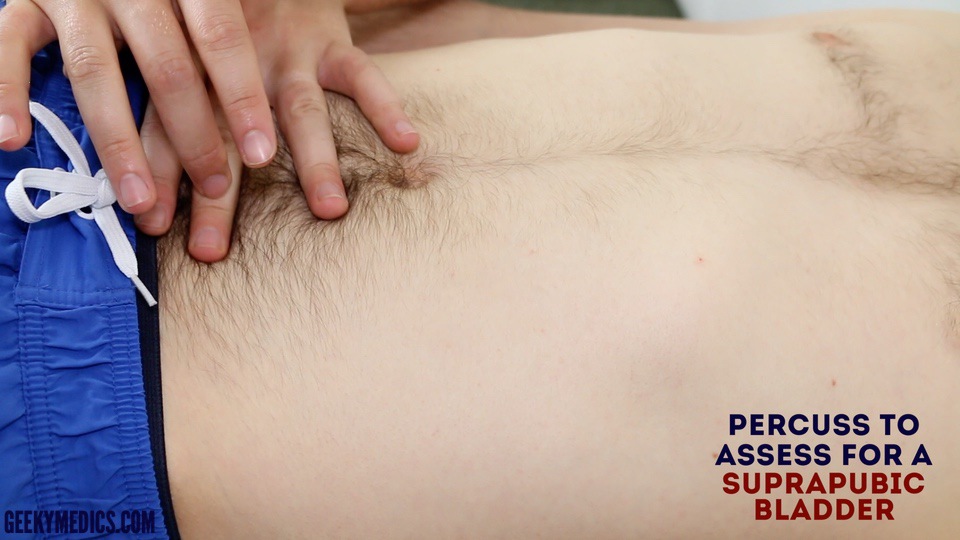
Percuss to detect a suprapubic bladder (urinary retention)
Assess shifting dullness
Percussion can also be used to assess for the presence of ascites by identifying shifting dullness:
1. Percuss from the umbilical region to the patient’s left flank. If dullness is noted, this may suggest the presence of ascitic fluid in the flank.
2. Whilst keeping your fingers over the area at which the percussion note became dull, ask the patient to roll onto their right side (towards you for stability).
3. Keep the patient on their right side for 30 seconds and then repeat percussion over the same area.
4. If ascites is present, the area that was previously dull should now be resonant (i.e. the dullness has shifted).
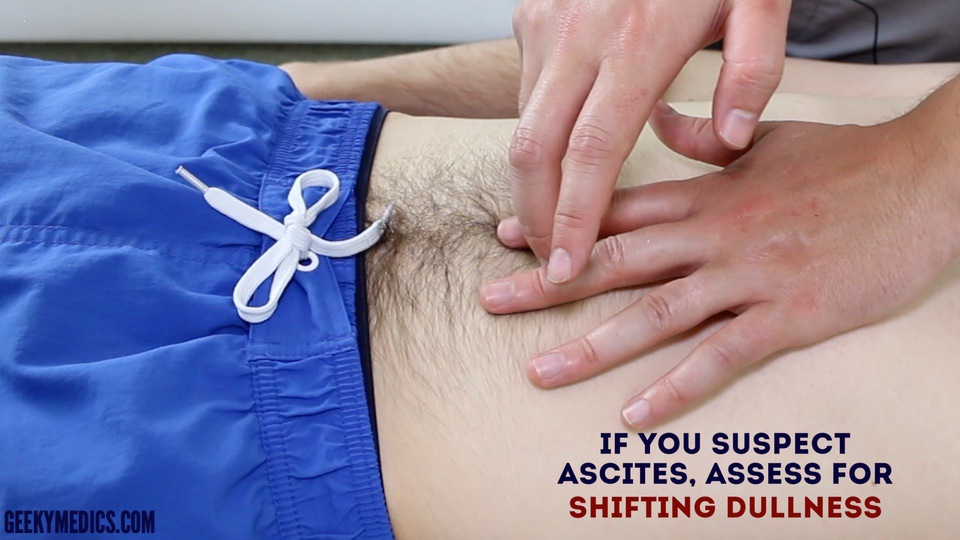
Assess for shifting dullness
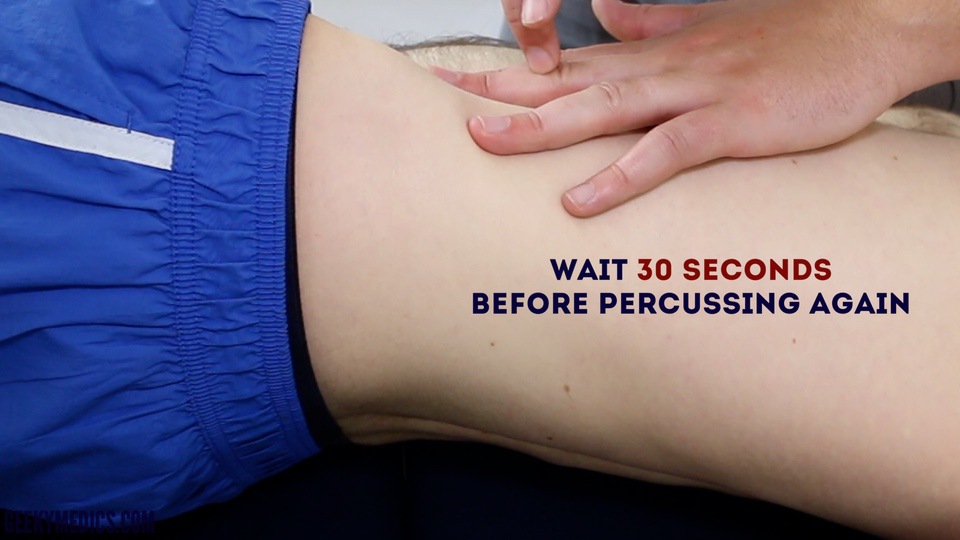
Assess for shifting dullness
Abdominal auscultation
Assess bowel sounds
Auscultate over at least two positions on the abdomen to assess bowel sounds:
- Normal bowel sounds: typically described as gurgling (listen to an example in our video demonstration)
- Tinkling bowel sounds: typically associated with bowel obstruction.
- Absent bowel sounds: suggests ileus which is a disruption of the normal propulsive ability of the intestine due to a malfunction of peristalsis. Causes of ileus include electrolyte abnormalities and recent abdominal surgery. To be able to confidently state that a patient has ‘absent bowel sounds’ you need to auscultate for at least 3 minutes (this is unlikely to be the case in an OSCE given the time restraints).
Listen for bruits
Auscultate over the aorta and renal arteries to identify vascular bruits suggestive of turbulent blood flow:
- Aortic bruits: auscultate 1-2 cm superior to the umbilicus, a bruit here may be associated with an abdominal aortic aneurysm.
- Renal bruits: auscultate 1-2 cm superior to the umbilicus and slightly lateral to the midline on each side. A bruit in this location may be associated with renal artery stenosis.
Auscultate bowel sounds
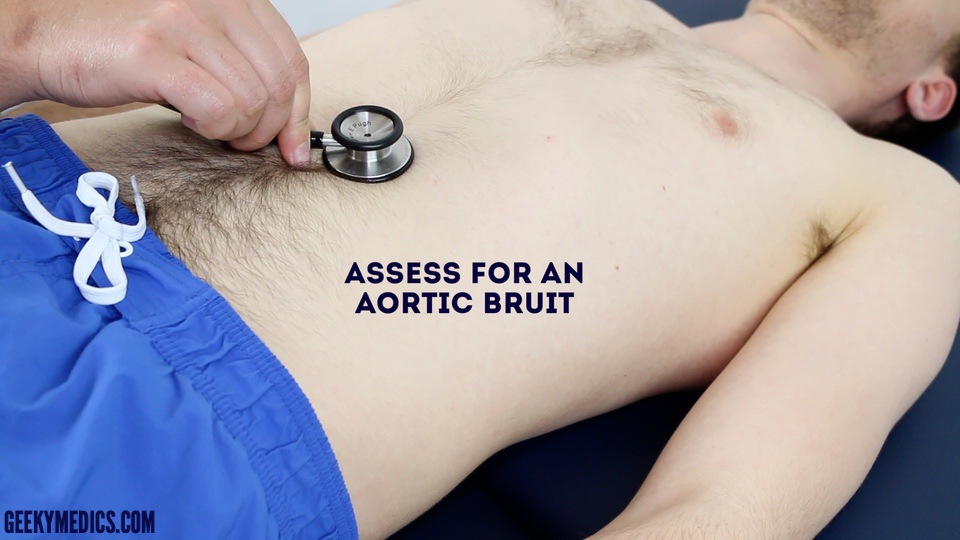
Auscultate for aortic bruits
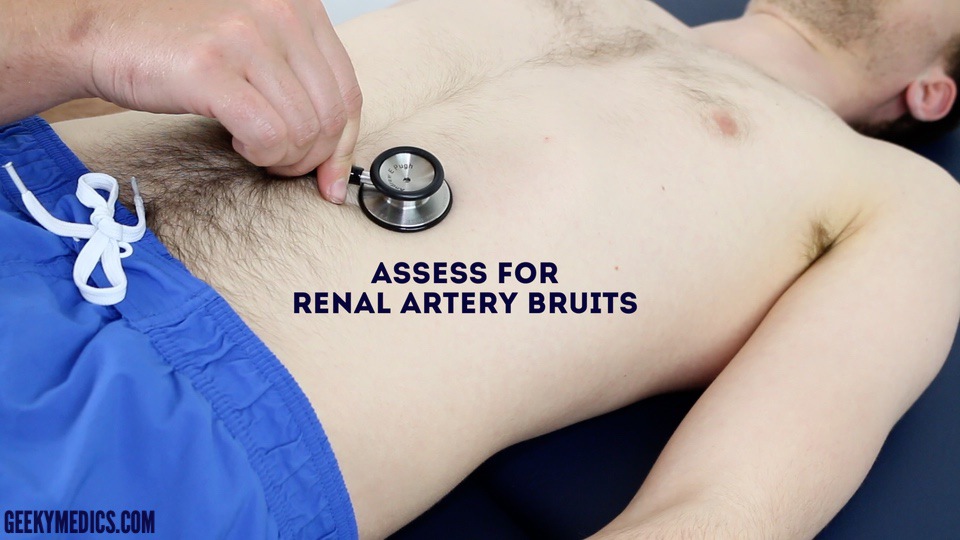
Auscultate for renal artery bruits
Legs
Assess the patient’s lower legs for evidence of pitting oedema which may suggest hypoalbuminaemia (e.g. liver cirrhosis, protein-losing enteropathy).
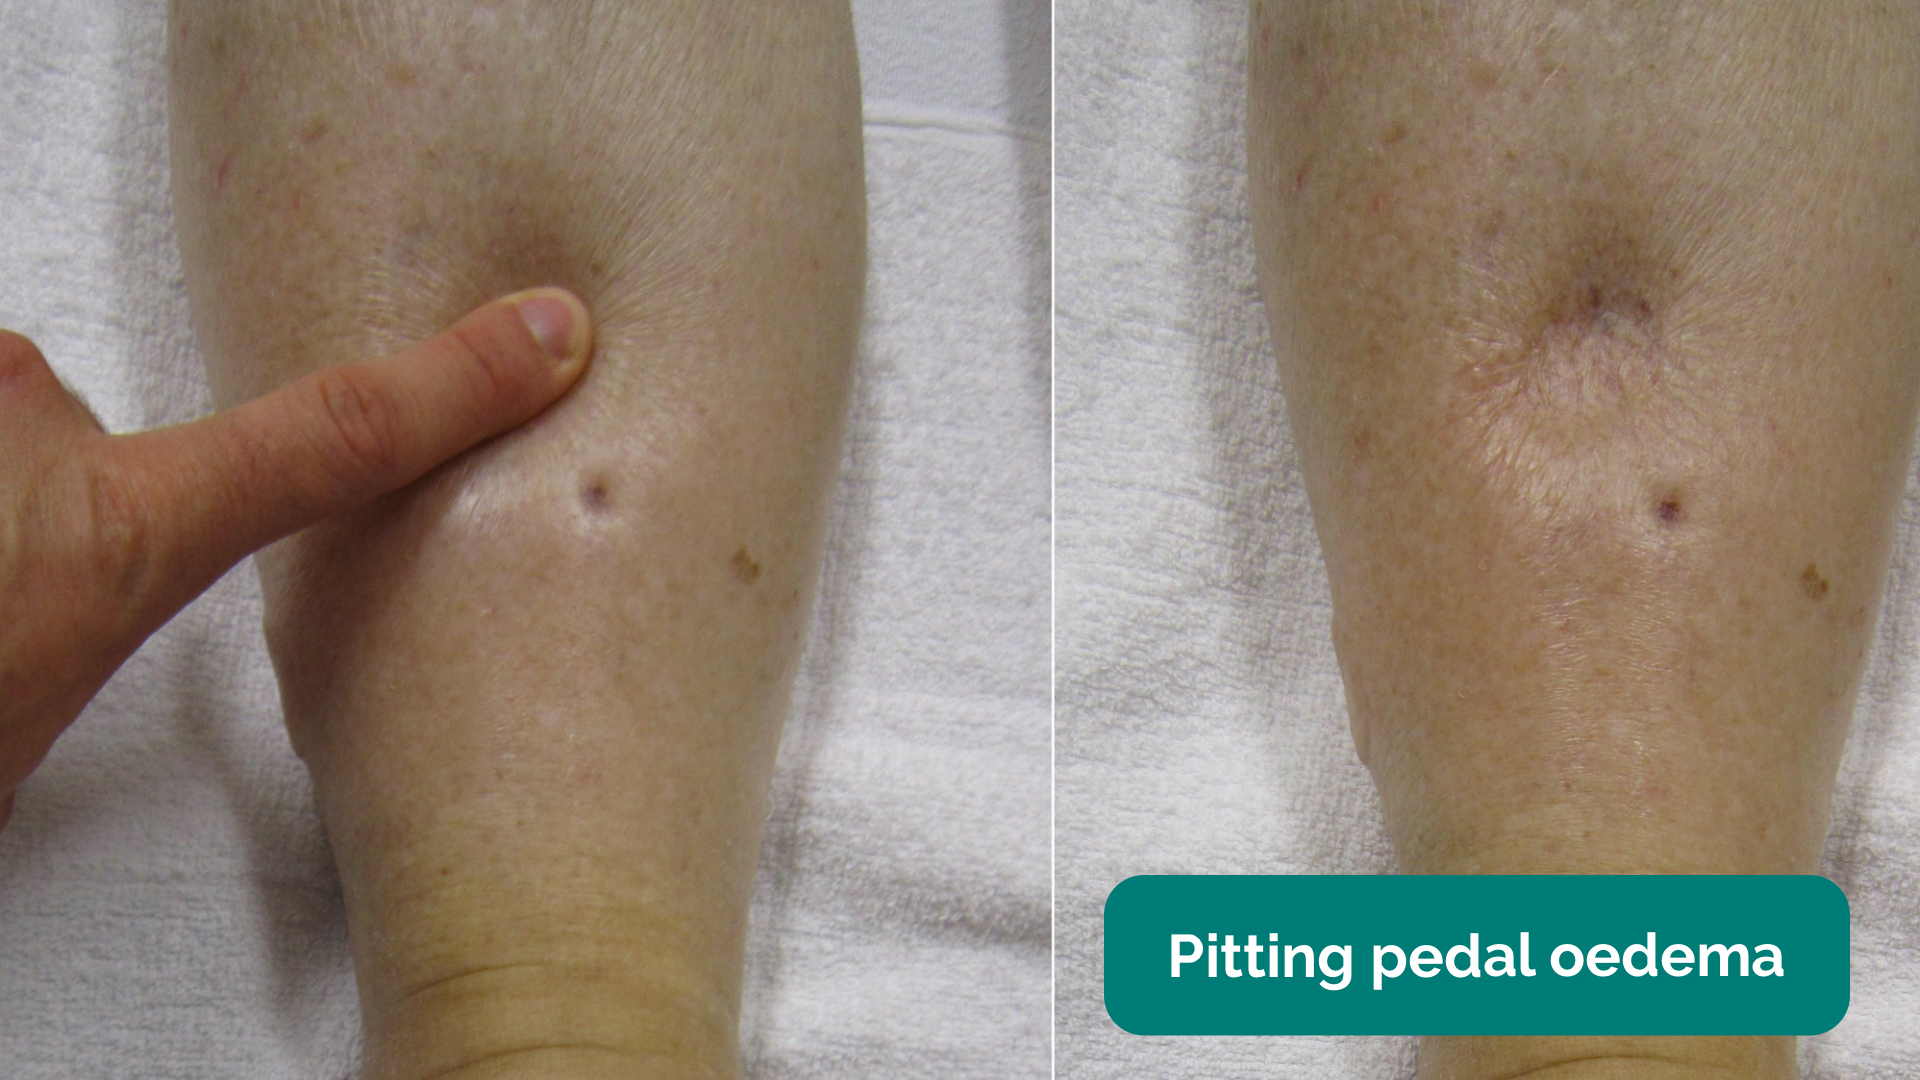
Pitting pedal oedema 28
Actions decided to help with diagnosis
Blood test
X ray/ radiology referral
Referral
What medication are you prescribing
Have you discussed side effects
Side effects
Interactions
Have you done a medication review
Yes
No
Any continue care arrangements
Any safety net plan issued
Did you reviewed radiology and pathology results
Yes
No
Any red-flag symptoms
Have you followed national and local guidelines
Abdominal examination
Any visual abnormalities of the abdomen
Abdomen